
What’s in this guide
- Prerequisites: What You'll Need Before You Start
- Can You Wire a Hot Tub Yourself?
- Hot Tub Wiring Requirements & Materials
- How to Wire a Hot Tub: Step-by-Step Installation
- Reading Hot Tub Wiring Diagrams
- Testing & Troubleshooting Your Hot Tub
- When to Hire a Professional Electrician
- Frequently Asked Questions
- Your Next Step: Wire It Right or Hire Right
⚠️ Safety Disclaimer: Hot tub wiring involves 240-volt electricity near water — a combination that can cause electrocution, fire, or death if done incorrectly. This guide is for educational purposes only. Always consult a licensed electrician before performing any electrical work. Requirements vary by local jurisdiction; always obtain the required permits and pass inspection before energizing any circuit.
Your hot tub just arrived. It’s sitting on the patio, the delivery crew is gone, and the only thing standing between you and your first soak is the electrical hookup. That moment — staring at a junction box with no idea where to start — is exactly where this guide begins. If you are searching for hot tub wiring how to instructions, you are in the right place.
“I just got my 19 D swim spa delivered. Now for the wiring. Anyone mind showing me where they brought the wiring into the cabinet? My dealer recommended drilling a hole in the corner.”
— Real homeowner, r/hottub community
Hot tub wiring involves 240-volt electricity running within feet of water — the same combination the Consumer Product Safety Commission (CPSC) links to dozens of pool and spa electrocution incidents each year. Getting one detail wrong — the wrong wire gauge, a missing GFCI (Ground Fault Circuit Interrupter) breaker, or a disconnect panel placed too close to the water — can void your warranty, fail a mandatory inspection, or create a fatal shock hazard.
By the end of this guide, you’ll understand every step of a code-compliant hot tub wiring installation — from the main panel to the spa pack — so you can either complete it safely or hire an electrician with full confidence. This guide covers five core areas: safety and legal reality, code requirements and materials, step-by-step installation, reading wiring diagrams, and post-installation testing and troubleshooting.
Looking for hot tub wiring how to guidance? Most 240V hot tubs require a dedicated 50A or 60A circuit with #6 or #4 AWG THHN wire, a GFCI disconnect mounted at least 5 feet away, and a licensed permit — use The 5-Touch Safety System to verify compliance before energizing.
- Wire gauge: #6 AWG for 50A circuits; #4 AWG for 60A circuits
- GFCI placement: At least 5 feet from the tub edge (NEC Article 680)
- Wire type: THHN inside conduit outdoors — NOT Romex underground
- Permit required: Most jurisdictions require inspection before first use
- The 5-Touch Safety System: Five NEC checkpoints that confirm safe, code-compliant wiring before you flip the breaker
Prerequisites: What You’ll Need Before You Start
Before you touch a single wire, confirm you have these four things in place. Skipping any one of them creates a safety or legal problem that is far more expensive to fix after the fact.
- Your hot tub’s owner manual and spec sheet. Every tub lists its exact amperage draw, wire gauge requirement, and minimum circuit breaker size. These override any generic advice — including this guide.
- A permit from your local building department. In most U.S. jurisdictions, hot tub electrical work requires a permit and a final inspection by a licensed inspector before you can legally energize the circuit. Call your local authority having jurisdiction (AHJ) before purchasing materials.
- A licensed electrician on standby (or hired). Even if you plan to do the conduit run yourself, the final panel connections and GFCI installation may legally require a licensed electrician in your area.
- All materials and tools listed in the checklist in Section 2 of this guide.
Estimated time: 4–8 hours for an experienced DIYer. First-timers should budget a full day and plan for a helper.
Can You Wire a Hot Tub Yourself?
The honest answer to “can you wire a hot tub yourself” is: it depends on three things — your jurisdiction’s laws, your skill level, and your willingness to accept the liability. Most 240V hot tub circuits involve 50A or 60A of power running through outdoor conduit near a water source. That combination demands precision, not confidence.
Licensed electricians consistently report that hot tub wiring is one of the most frequently botched DIY electrical projects they’re called in to correct — often after a failed inspection or a GFCI that won’t stop tripping.
DIY vs. Hiring a Licensed Electrician
DIY is legally permitted in many U.S. states for homeowners working on their own primary residence — but “permitted” does not mean “safe” or “code-compliant without inspection.” The key variable is your local AHJ (Authority Having Jurisdiction). Some jurisdictions require a licensed electrician for any work on a dedicated 240V circuit. Others allow homeowner permits with mandatory inspection.
Here’s how to make the decision honestly:
| Factor | DIY | Hire a Pro |
|---|---|---|
| Jurisdiction allows homeowner permits | ✅ Possible | ✅ Always |
| No prior electrical experience | ⚠️ High risk | ✅ Recommended |
| Tub requires 60A circuit | ⚠️ Advanced | ✅ Recommended |
| Main panel is near capacity | ❌ Dangerous | ✅ Required |
| Warranty requires licensed install | ❌ Voids warranty | ✅ Required |
| HOA or rental property | ❌ Usually prohibited | ✅ Required |
Average cost to hire a licensed electrician for a hot tub hookup ranges from $500 to $1,500 depending on the distance from the main panel, local labor rates, and whether a subpanel is needed. That cost buys you a permitted, inspected, warrantied installation — and removes your personal liability entirely.
According to the Electrical Safety Foundation International (ESFI), homeowners who attempt DIY hot tub wiring without proper training are significantly more likely to create ground fault hazards that go undetected until the circuit is energized near water. The most dangerous wiring errors are the ones that pass visual inspection but fail under load.
Choose if: You have prior low-voltage electrical experience, your jurisdiction issues homeowner permits, your tub requires a 50A circuit (simpler than 60A), and you have a licensed electrician willing to inspect your work before energizing.
Hire a pro if: You have zero electrical experience, your panel is near capacity, your tub requires a 60A circuit, or your manufacturer warranty requires licensed installation.
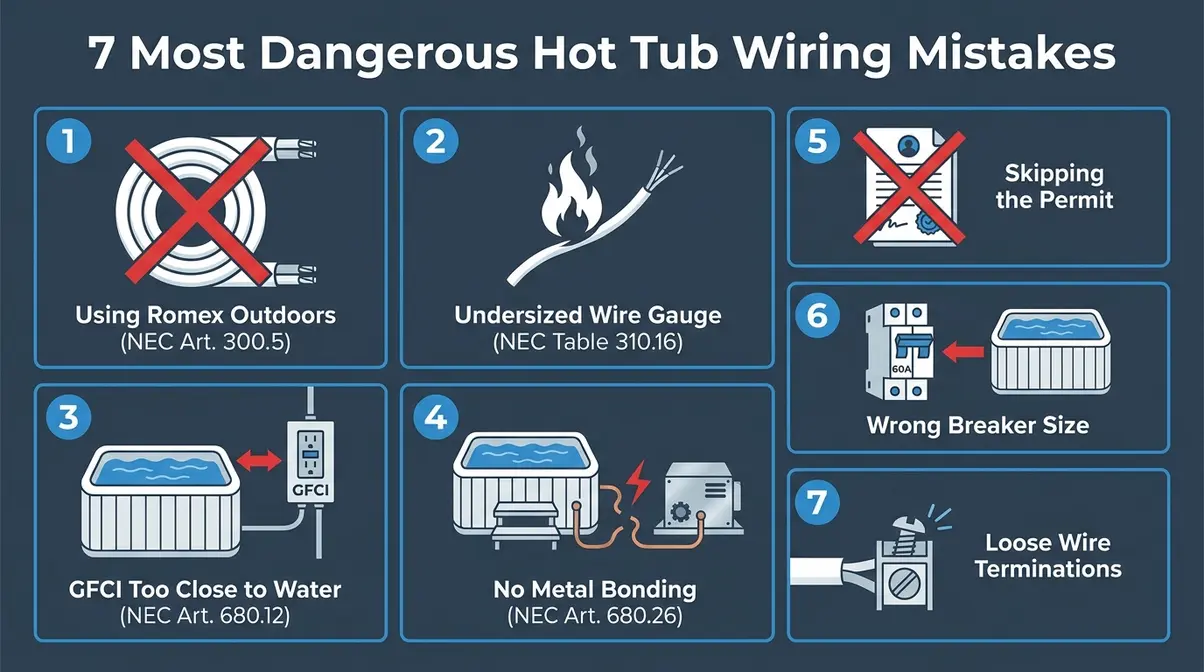
What Are the Most Common Mistakes When Wiring a Hot Tub?
Every one of these errors has caused either a failed inspection, a voided warranty, or — in the worst cases — a serious electrical injury. Licensed electricians report these as the most common problems they find when called in after a DIY attempt.
Mistake 1: Using Romex (NM-B) Cable Outdoors or Underground
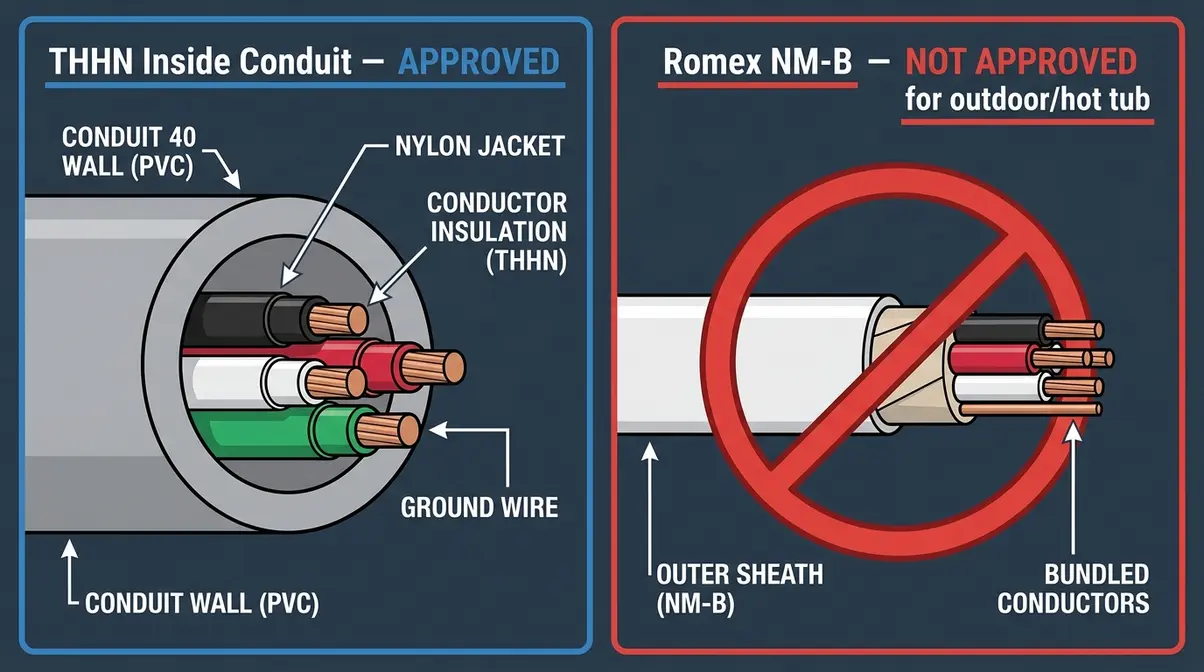
Romex is a non-metallic sheathed cable designed for dry indoor use. Running it through outdoor conduit or directly underground violates NEC Article 680 and creates a serious moisture intrusion risk. Use THHN wire inside weatherproof conduit for all outdoor runs.
Mistake 2: Undersized Wire Gauge
Using #8 AWG wire on a 50A circuit is a fire hazard. NEC Table 310.16 requires #6 AWG copper for 50A and #4 AWG copper for 60A circuits at standard temperatures. Undersized wire overheats under load.
Mistake 3: GFCI Disconnect Placed Too Close to the Water
NEC Article 680.12 requires the emergency disconnect to be between 5 feet and 50 feet from the inside wall of the hot tub. Placing it closer than 5 feet creates a shock hazard if someone reaches for it while in the water.
Mistake 4: No Bonding of Metal Components
Bonding (connecting all metal parts — pump, heater, frame, water — to a common ground point with #8 solid copper wire) is required by NEC Article 680.26. Without it, stray voltage can build up in the water and cause “electric shock drowning.” This is the most commonly missed step in DIY installations.
Mistake 5: Skipping the Permit
Installing without a permit means no inspection. No inspection means no one catches the mistakes above before the circuit is energized. It also creates liability exposure if an injury occurs and may void your homeowner’s insurance coverage.
Mistake 6: Incorrect Breaker Sizing
A 50A hot tub needs a 50A 2-pole GFCI breaker — not a 60A breaker “for extra headroom.” Oversizing a breaker means the protection device won’t trip when it should, allowing wiring to overheat before the circuit opens.
Mistake 7: Loose Wire Terminations
A wire that is not fully seated in its terminal creates resistance. Resistance creates heat. Heat in an enclosed junction box near water is a fire and shock hazard. Every termination must be torqued to the manufacturer’s specification — typically 20–35 in-lb for spa pack terminals.
Permits and Inspections: What Your Local Code Requires
A permit is not optional in most U.S. jurisdictions — it is a legal requirement for any new 240V circuit installation. The permit process exists to protect you: a licensed inspector verifies that your installation meets the National Electrical Code (NEC) before the circuit is energized. Understanding hot tub electrical safety regulations and local codes is essential.
Here’s what the permit process typically looks like:
- Apply for a permit at your local building or electrical department (many now offer online applications). You’ll need a basic site plan showing the panel location, the conduit run path, and the tub placement.
- Schedule a rough-in inspection after conduit is installed but before wires are pulled (in some jurisdictions, this step is combined with the final inspection).
- Schedule a final inspection after all wiring is complete but before the circuit is energized. The inspector checks wire gauge, GFCI placement, bonding connections, and disconnect location.
- Receive your Certificate of Completion. Keep this document — your homeowner’s insurance provider may request it if you ever file a claim related to the hot tub.
Permit cost: Typically $50–$200 depending on jurisdiction. The cost of skipping it — a failed sale inspection, voided insurance, or liability in an injury — is far higher.
Per NEC Article 680 inspection protocols, the inspector will specifically verify the 5-foot minimum GFCI disconnect distance, proper bonding of all metal components, correct wire gauge for the circuit amperage, and weatherproof conduit for all outdoor runs. These are exactly the five checkpoints in The 5-Touch Safety System introduced in the Installation section of this guide.
Hot Tub Wiring Requirements & Materials
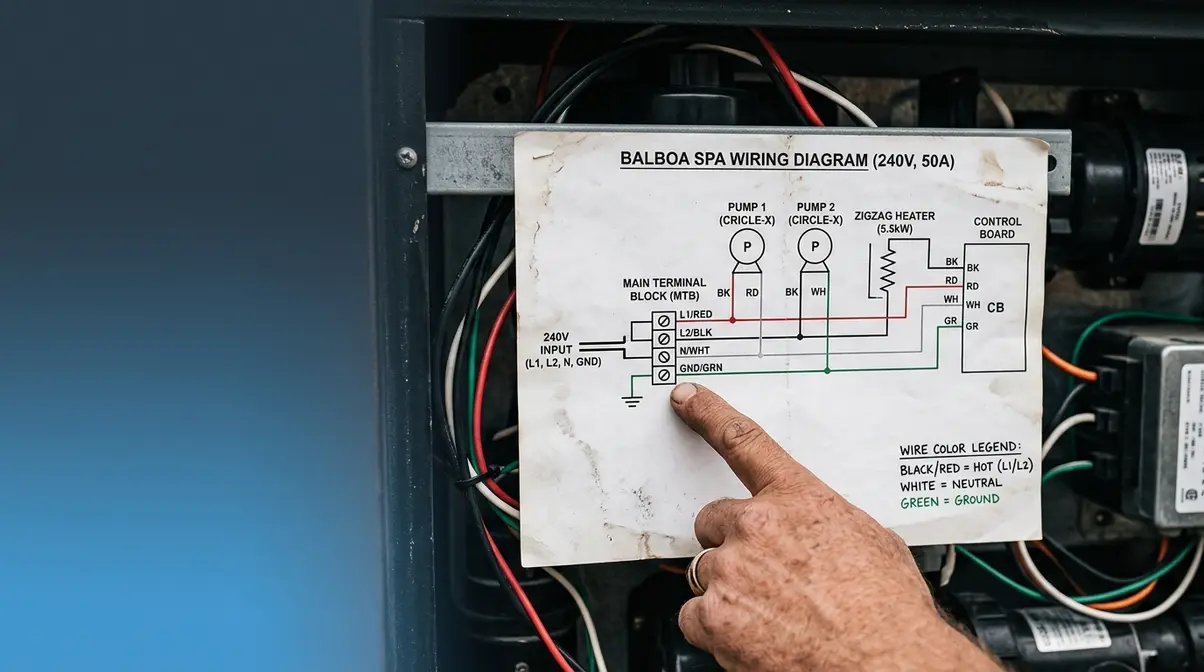
Understanding what the NEC requires before you buy a single foot of wire saves you from the most common and expensive mistake: purchasing the wrong materials. Hot tub wiring requirements are not suggestions — they are minimum safety standards backed by decades of injury and fatality data.
What Wiring Is Needed for a Hot Tub? (Voltage & Gauge)
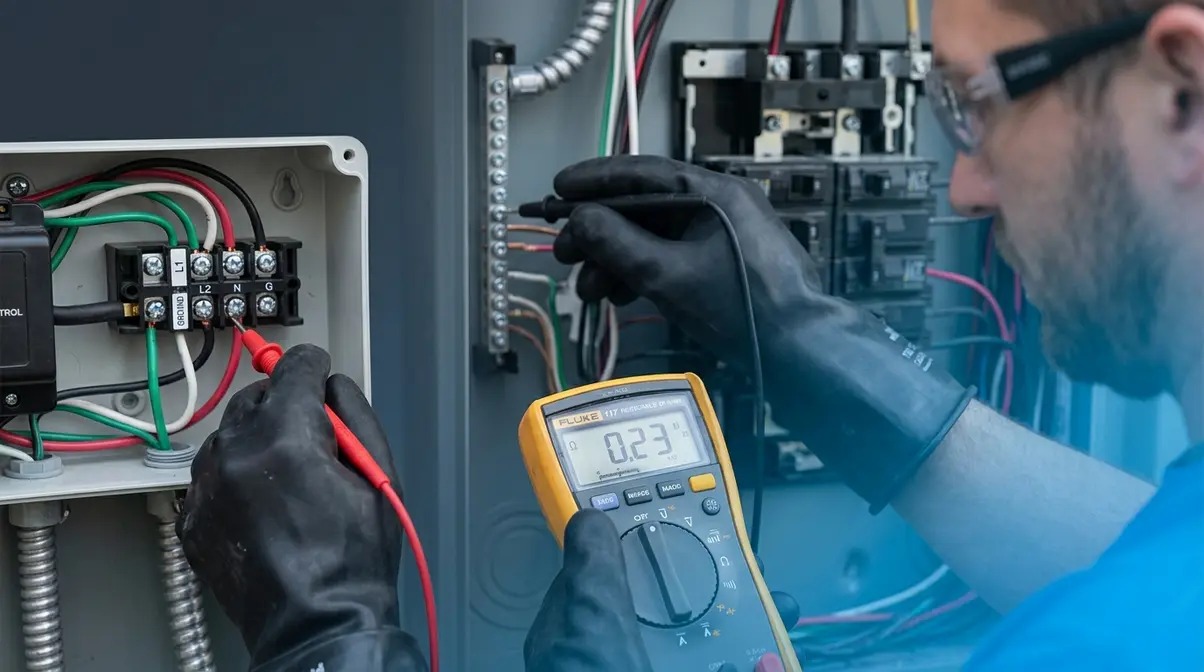
Most 240V hot tubs require a dedicated 50A or 60A circuit. “Dedicated” means the circuit serves only the hot tub — no other appliances share it. The specific amperage requirement is printed on your tub’s data plate (usually inside the equipment compartment) and in the owner’s manual. For more detailed sizing charts, consult our complete hot tub wire gauge guide.
Here’s the NEC-compliant wire gauge and breaker specification for each configuration:
| Circuit | Breaker Size | Wire Gauge (Copper) | Wire Gauge (Aluminum) | Conduit Required? |
|---|---|---|---|---|
| 240V / 50A | 50A 2-pole GFCI | #6 AWG | #4 AWG | Yes (outdoor) |
| 240V / 60A | 60A 2-pole GFCI | #4 AWG | #2 AWG | Yes (outdoor) |
| 120V / 20A (plug-in tubs) | 20A GFCI | #12 AWG | N/A | No (if indoor) |
AWG (American Wire Gauge) works inversely — a lower number means a thicker, higher-capacity wire. #4 AWG is thicker than #6 AWG and required for the higher 60A load.
Per NEC Table 310.16 (2026 edition), these wire gauges assume copper conductors at 60°C insulation rating in conduit at ambient temperatures up to 86°F (30°C). In climates regularly exceeding 86°F, consult an electrician about derating requirements.
A quotable benchmark: #6 AWG copper is the minimum wire gauge for any 50A hot tub circuit — using anything smaller is a National Electrical Code violation and a fire hazard. (NEC Table 310.16, 2026)
THHN vs. Romex: Which Wire Goes Where
This is the question that trips up more DIY hot tub wiring projects than almost any other. The answer is straightforward once you understand what each wire type is designed for.
THHN wire (Thermoplastic High Heat-resistant Nylon-coated) is a single conductor wire with a durable nylon jacket designed to be pulled through conduit. It handles moisture, UV exposure, and temperature extremes. THHN is the correct choice for all outdoor and underground hot tub wiring runs inside conduit.
Romex (NM-B cable) is a multi-conductor cable with a plastic sheathing designed for dry indoor use inside walls. It is not rated for direct burial, outdoor conduit runs, or wet locations. Using Romex for a hot tub run — even inside conduit — violates NEC Article 300.5 and Article 680, and will fail inspection.
| Wire Type | Use Case | Hot Tub Application |
|---|---|---|
| THHN (individual conductors) | Inside conduit, outdoor/underground | ✅ Correct for all outdoor runs |
| Romex / NM-B (cable) | Dry indoor walls only | ❌ Never for hot tub outdoor wiring |
| UF-B (Underground Feeder) | Direct burial without conduit | ⚠️ Allowed for direct burial only; check local code |
| USE-2 | Underground service entrance | ⚠️ Allowed in some jurisdictions; verify with AHJ |
For a typical hot tub installation, you’ll pull three THHN conductors through conduit: two hot wires (usually black and red), one neutral wire (white), and one ground wire (green or bare copper). Some 240V tubs don’t require a neutral — check your tub’s wiring diagram to confirm whether you need a 3-wire or 4-wire run (covered in detail in the Diagrams section).
GFCI Disconnect Requirements (NEC Article 680)
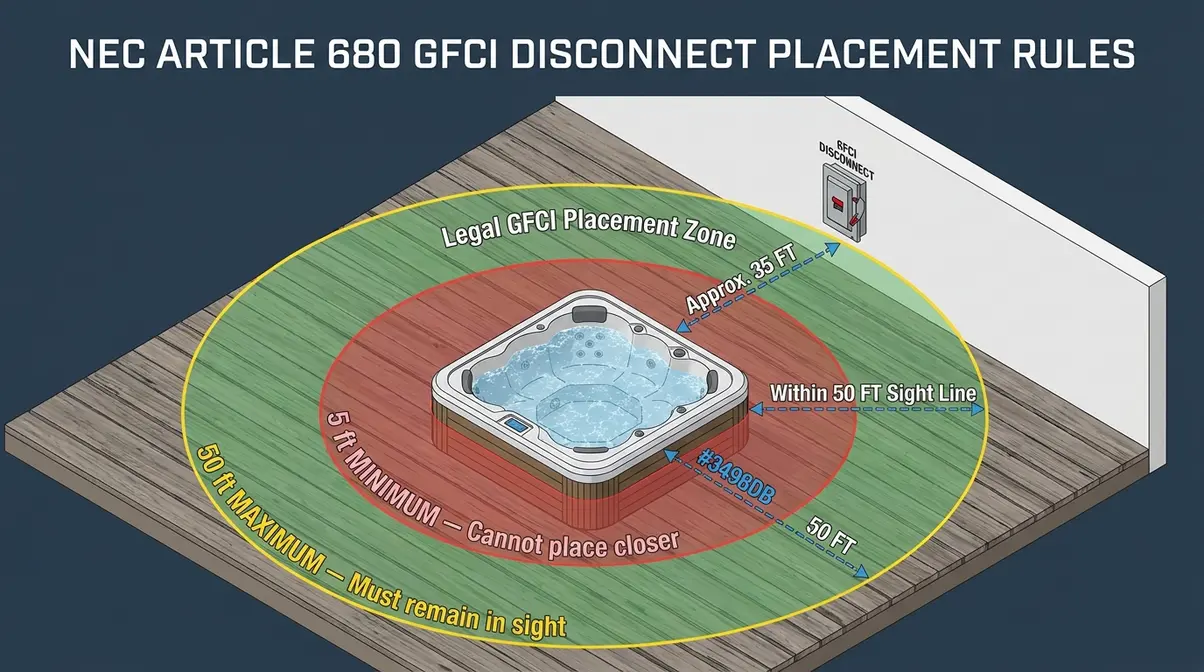
A GFCI (Ground Fault Circuit Interrupter) disconnect is not optional for any hot tub installation. NEC Article 680.12 mandates a readily accessible emergency shutoff within sight of the tub, between 5 and 50 feet from the inside wall of the spa. If you are shopping for components, review our guide on the best hot tub GFCI breakers to ensure you select a reliable model.
Here’s what NEC Article 680 specifically requires for the disconnect:
- Location: Between 5 feet and 50 feet from the inside wall of the hot tub. Must be in the line of sight of the tub (NEC 680.12).
- Type: A listed (UL-approved) GFCI disconnect or a GFCI circuit breaker at the main panel — some installations require both.
- Rating: Must match the circuit amperage (50A disconnect for 50A circuit; 60A for 60A circuit).
- Weatherproofing: Must be housed in a NEMA 3R or better weatherproof enclosure for outdoor installations.
- Height: Mounted between 12 inches and 6 feet above grade (finished ground level).
The 5-foot minimum distance exists because someone in the water should not be able to reach the disconnect while still in contact with the tub. The 50-foot maximum ensures it’s reachable in an emergency. Both limits are hard requirements — not guidelines.
Per the CPSC’s pool and spa electrical safety guidelines, GFCI protection is the single most effective device for preventing electrocution in pool and spa environments. A GFCI detects current leakage as small as 4–6 milliamps and trips in 1/40th of a second — fast enough to prevent a fatal shock in most circumstances. (CPSC Pool and Spa Safety)
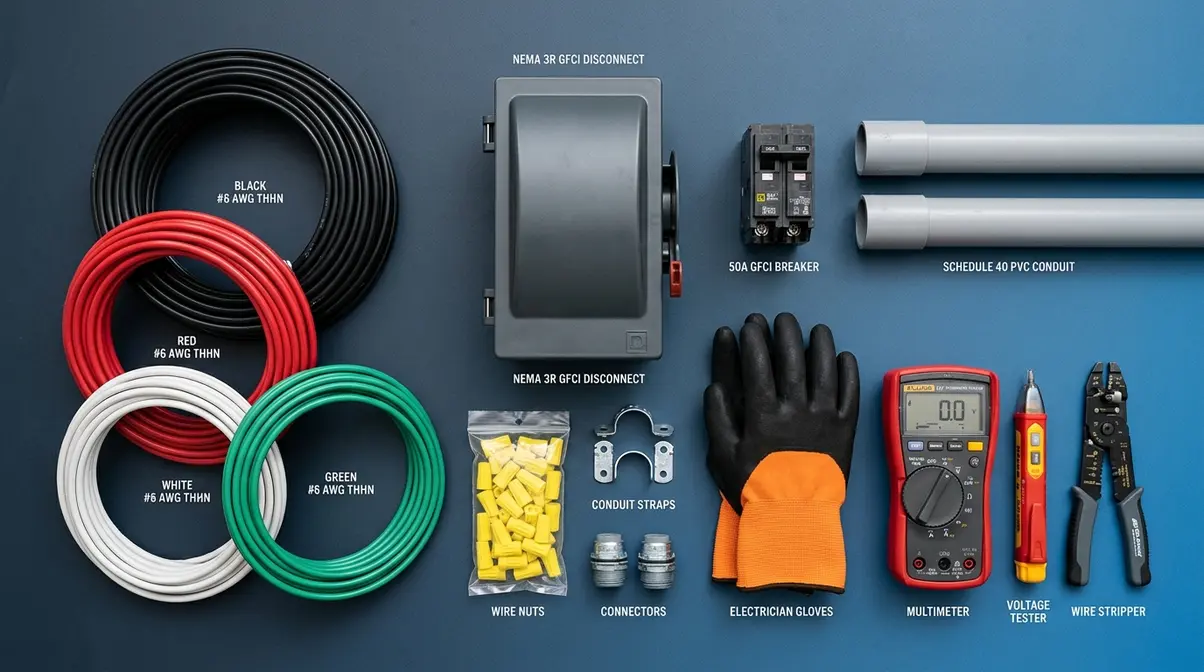
Complete Materials & Tools Checklist
Gather everything on this list before you begin. Making a mid-project hardware store run while a circuit is partially wired is a safety hazard.
Electrical Materials:
- [ ] 50A or 60A 2-pole GFCI circuit breaker (match to tub’s amperage requirement)
- [ ] GFCI disconnect box / spa panel (50A or 60A rated, NEMA 3R weatherproof)
- [ ] THHN copper wire: two #6 AWG hot wires (black and red), one #6 AWG neutral (white), one #8 AWG ground (green) — for 50A circuit. Use #4 AWG for 60A.
- [ ] #8 AWG solid copper bonding wire (for NEC 680.26 bonding grid)
- [ ] EMT (Electrical Metallic Tubing) or Schedule 40 PVC conduit — 1-inch diameter minimum for 50A; 1.25-inch for 60A
- [ ] Conduit connectors, straps, and weatherproof junction boxes
- [ ] Wire nuts, electrical tape, heat-shrink connectors
Tools:
- [ ] Non-contact voltage tester (mandatory safety tool — verify power is OFF before touching any wire)
- [ ] Digital multimeter
- [ ] Wire stripper (rated for #4–#8 AWG)
- [ ] Fish tape or wire-pulling lubricant
- [ ] Conduit bender
- [ ] Torque screwdriver (for terminal connections)
- [ ] Drill with 1-inch hole saw bit
- [ ] Level, tape measure, pencil
Safety Equipment:
- [ ] Rubber-insulated gloves (rated 1,000V minimum)
- [ ] Safety glasses
- [ ] GFCI-protected extension cord (for any power tools used during installation)
How to Wire a Hot Tub: Step-by-Step Installation
Evaluation Methodology Note: The installation sequence below follows NEC Article 680 (2026 edition) and reflects the standard sequence used by licensed electricians across thousands of residential hot tub installations. Each step references the specific code section it satisfies.
This is the most important section of this guide. Read it completely before starting any work. Each step builds on the previous one — skipping or reordering steps creates safety hazards.
Step 1 — Turn Off Power at the Main Panel
Tools needed: Non-contact voltage tester, flashlight
Estimated time: 5 minutes
- Open your main electrical panel cover.
- Identify the main breaker (the large double-pole breaker at the top of the panel).
- Flip the main breaker to the OFF position. This de-energizes all circuits in the panel.
- Use your non-contact voltage tester to verify that the bus bars (the metal rails that breakers clip onto) show no voltage. Hold the tester near each bus bar — it should show no reading or remain silent.
- Tape the main breaker in the OFF position and post a warning sign: “Do not energize — electrical work in progress.”
Why this step matters: Working in a live panel is the number one cause of fatal DIY electrical accidents. The main breaker kills power to the bus bars, but the service entrance wires entering the top of the panel remain live at all times — only your utility company can de-energize those. Never touch the service entrance wires under any circumstances.
Step 2 — Mount and Wire the GFCI Disconnect Box
Tools needed: Drill, level, tape measure, conduit hole saw, screwdriver
Estimated time: 45–60 minutes
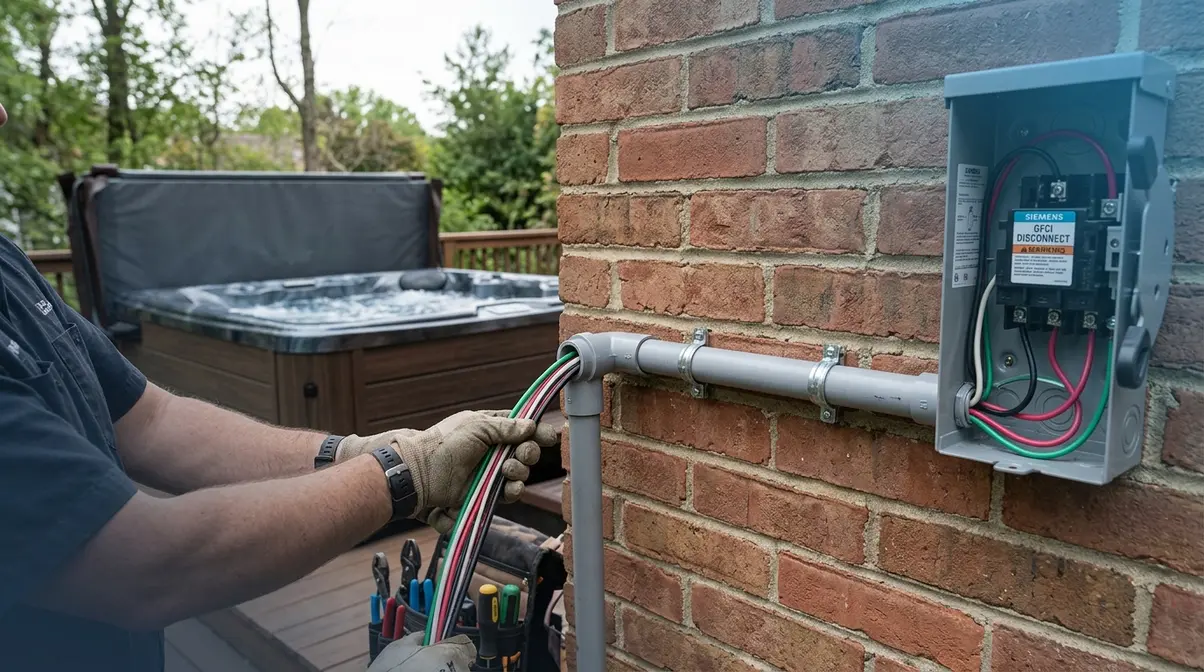
The GFCI disconnect box (also called a spa panel) is the emergency shutoff mounted outside between 5 and 50 feet from the tub. This is where your main panel feed terminates before continuing to the tub’s spa pack.
- Choose a mounting location between 5 and 50 feet from the inside wall of the hot tub, within direct line of sight of the tub (NEC 680.12). Mark the location with a pencil.
- Mount the weatherproof NEMA 3R enclosure to the wall using the appropriate fasteners (lag screws into studs, or masonry anchors for concrete/brick). Use a level to confirm it’s plumb.
- Drill a knockout hole in the bottom of the enclosure for the incoming conduit from the main panel, and a second knockout in the top or side for the outgoing conduit toward the spa pack.
- Install conduit connectors (fittings) in both knockouts, hand-tight for now.
- Do NOT connect any wires to the disconnect yet — wire connections happen after conduit is run and wires are pulled (Steps 3 and 4).
GFCI disconnect wiring terminals (reference for Step 4):
| Terminal | Wire Color | Wire Gauge (50A) |
|---|---|---|
| Line 1 (L1) | Black (hot) | #6 AWG THHN |
| Line 2 (L2) | Red (hot) | #6 AWG THHN |
| Neutral (N) | White | #6 AWG THHN |
| Ground (G) | Green | #8 AWG THHN |
Step 3 — Run Conduit from Panel to Disconnect
Tools needed: Conduit bender, conduit straps, hacksaw or conduit cutter, measuring tape
Estimated time: 1–2 hours
Conduit protects your THHN wires from physical damage and moisture. For outdoor above-ground runs, use 1-inch Schedule 40 PVC or EMT conduit. For underground runs (buried), use Schedule 40 or Schedule 80 PVC — EMT is not approved for direct burial.
- Measure the total run distance from your main panel to the GFCI disconnect box. Add 10% for bends and terminations.
- Plan your conduit path to minimize bends. NEC 358.26 limits you to a maximum of 360 degrees of total bends between pull points — in practical terms, no more than four 90-degree bends without a junction box or pull box in between.
- For underground runs: dig a trench at least 12 inches deep for Schedule 80 PVC, or 18 inches deep for Schedule 40 PVC (NEC Table 300.5). Check local code — some jurisdictions require 24 inches.
- Cut conduit sections to length and dry-fit the entire run before gluing (PVC) or connecting (EMT).
- Secure conduit to walls or structures with conduit straps every 3 feet for PVC, every 10 feet for EMT (NEC 352.30).
- Glue PVC joints with PVC primer and cement. Apply primer first (purple), then cement — let cure for 30 minutes before pulling wire.
- Run a second conduit section from the GFCI disconnect box to the spa pack, following the same process.
Underground burial note: If you’re going under a driveway or paved surface, rent a pipe-boring tool rather than cutting through pavement. Local rental centers typically carry these for $50–$100/day.
Step 4 — Pull THHN Wires Through Conduit
Tools needed: Fish tape, wire-pulling lubricant, wire stripper, electrical tape
Estimated time: 30–60 minutes per run
Pulling wire is the step most guides skip over — but it’s where most beginners get stuck, literally. THHN wire through conduit requires proper technique and the right lubricant.
- Attach your fish tape to the conduit and feed it through the entire run until it exits the far end. On long runs or runs with multiple bends, you may need a helper to feed the tape while you pull.
- Bundle your THHN conductors together at one end. Tape the wire ends to the fish tape hook using electrical tape — wrap tightly in a tapered shape so the bundle passes through conduit connectors smoothly.
- Apply wire-pulling lubricant (not WD-40 or grease — use a listed wire-pulling compound like Ideal Yellow 77) to the wires before pulling. This is especially important on runs over 20 feet or with multiple bends.
- Pull steadily — not in jerks. Have a helper feed wire from the supply end while you pull from the exit end.
- Leave at least 12 inches of wire extending beyond each conduit termination for connections (NEC 300.14).
- Label each wire at both ends with colored tape or a marker: black = L1 (hot), red = L2 (hot), white = neutral, green = ground.
Wire quantity for a 50A run: You’ll pull four conductors — two #6 AWG hots, one #6 AWG neutral, and one #8 AWG ground. For a 60A circuit, step up to #4 AWG hots and neutral, and #6 AWG ground.
Step 5 — Connect Wires to the Spa Pack
Tools needed: Wire stripper, torque screwdriver, multimeter
Estimated time: 30–45 minutes
The spa pack (also called the control pack or equipment compartment) is the brain of your hot tub — it houses the pump relay, heater, and main terminal block where your circuit wires land. Every hot tub brand locates this differently, which is why the user quote at the top of this guide is so relatable: finding where the wiring enters the cabinet is the first practical challenge.
- Open the hot tub’s equipment compartment. The access panel is typically on the side or front of the cabinet — a Phillips or hex-head screw secures it.
- Locate the main terminal block inside the spa pack. It will be labeled: L1, L2, N (neutral), and GND (ground). Some tubs use a 3-wire system with no neutral (L1, L2, GND only) — confirm with your tub’s wiring diagram.
- For the entry point: Your dealer’s advice to drill a hole in the corner of the cabinet is standard practice. Use a 1-inch hole saw to drill through the cabinet wall. Install a weatherproof strain relief fitting (also called a cord grip) in the hole to protect the wires from chafing on the cabinet edge.
- Feed your THHN wires through the strain relief and route them to the terminal block.
- Strip 3/4 inch of insulation from each conductor using your wire stripper.
- Connect each wire to its labeled terminal: black → L1, red → L2, white → N, green/bare → GND.
- Torque each terminal screw to the manufacturer’s specification — typically 20–35 in-lb. Do not overtighten (strips threads) or undertighten (creates loose connection heat).
- Bonding connection: Locate the bonding lug on the spa pack (labeled “BOND” or with the bonding symbol). Connect your #8 AWG solid copper bonding wire here. Run the bonding wire to each metal component: the pump motor, heater, any metal handrails, and the water itself via the bonding lug on the equipment pack. This is NEC Article 680.26 — not optional.
Step 6 — Final Panel Connections & The 5-Touch Safety Check
Tools needed: Non-contact voltage tester, multimeter, torque screwdriver
Estimated time: 30–45 minutes + inspection time
This is the most consequential step — and the one where The 5-Touch Safety System pays for itself. Before you connect the new breaker and energize the circuit, run through all five checkpoints. Each one corresponds to a specific NEC Article 680 requirement. For a deeper dive into panel connections, see our detailed hot tub electrical installation guide.
Final Panel Wiring (after completing the 5-Touch check):
- With the main breaker still OFF, snap your new 2-pole GFCI breaker into an open slot in the panel. Choose a slot that accommodates a double-pole breaker (two adjacent slots).
- Connect the black (L1) and red (L2) THHN wires to the breaker terminals — one per terminal. Torque to the breaker manufacturer’s spec (typically 35–40 in-lb).
- Connect the white neutral wire to the breaker’s neutral pigtail (GFCI breakers have a dedicated white coiled pigtail for this purpose — this is different from a standard breaker).
- Connect the green or bare ground wire to the panel’s ground bus bar.
- Verify all connections are tight. Close the panel cover.
⚠️ THE 5-TOUCH SAFETY SYSTEM
The 5-Touch Safety System is a five-checkpoint NEC compliance framework. Complete all five before energizing. Each “touch” is a physical verification — you are confirming code compliance with your hands and your meter, not just your eyes.
| Touch | What You Check | NEC Reference | Pass Condition |
|---|---|---|---|
| Touch 1 | Wire gauge matches circuit amperage | NEC Table 310.16 | #6 AWG on 50A; #4 AWG on 60A |
| Touch 2 | GFCI disconnect distance from tub | NEC Article 680.12 | Between 5 and 50 feet |
| Touch 3 | All metal bonding connections secure | NEC Article 680.26 | Bonding wire on pump, heater, frame, water lug |
| Touch 4 | Conduit and enclosures weatherproof | NEC Article 300.5 / 680 | NEMA 3R or better; no open knockouts |
| Touch 5 | Ground wire continuity (with multimeter) | NEC Article 250 | <1 ohm resistance from spa pack ground to panel ground bus |
How to perform Touch 5 (ground continuity test):
Set your multimeter to the resistance (Ω) setting. Touch one probe to the ground terminal in the spa pack and the other to the ground bus bar in your main panel. A reading below 1 ohm confirms a solid ground path. Any reading above 1 ohm indicates a loose connection, a broken ground wire, or an improperly rated conductor — find and fix it before energizing.
Only after all five touches pass should you restore power at the main panel and test the circuit.
Reading Hot Tub Wiring Diagrams
A hot tub wiring diagram looks intimidating at first — but once you understand the symbols and the circuit path, it becomes the most useful tool in your installation. Every hot tub ships with a wiring diagram inside the equipment compartment or owner’s manual. Learning to read yours takes about 10 minutes and prevents the most common connection errors.
How to Read a Standard Hot Tub Wiring Diagram
Every hot tub wiring diagram follows the same basic structure regardless of brand. The circuit flows from left to right (or top to bottom) in this order: main panel → GFCI breaker → disconnect box → spa pack → individual components (pump, heater, blower, lights).
Key symbols you’ll encounter:
| Symbol | Meaning |
|---|---|
| Double horizontal lines | 240V power source |
| Circle with X | Motor (pump or blower) |
| Zigzag line | Heating element |
| Rectangle with terminals | Terminal block or relay |
| Dashed line | Control wiring (low-voltage) |
| Solid line | Power wiring (line-voltage) |
| Ground symbol (three descending lines) | Earth ground or bonding point |
Reading the wire colors: Most hot tub diagrams use the NEC standard color convention — black and red for the two 240V hot lines, white for neutral, and green or bare for ground. Some older tubs use blue or yellow for hot lines — always cross-reference the diagram’s legend, not just the wire color.
The most important number on any diagram is the amperage rating printed near the main terminal block. This confirms whether your tub is a 50A or 60A unit — and therefore which wire gauge and breaker size you need.
3-Wire vs. 4-Wire Systems: Key Differences
This is one of the most searched topics in hot tub wiring, and the confusion is understandable. The difference comes down to whether your hot tub uses a 240V-only circuit (3-wire) or a 240V circuit with a neutral for 120V components (4-wire).
- 3-Wire System (240V only):
- Conductors: L1 (black), L2 (red), Ground (green/bare)
- No neutral wire
- Used for hot tubs with all 240V components (pumps, heater — no 120V lights or outlets)
- Less common in modern tubs
- 4-Wire System (240V with neutral):
- Conductors: L1 (black), L2 (red), Neutral (white), Ground (green/bare)
- Required when the tub has any 120V components — LED lights, audio systems, USB charging ports, or 120V convenience outlets
- Standard in most modern hot tubs (post-2010)
- Required by NEC for new installations with mixed-voltage loads
| Feature | 3-Wire | 4-Wire |
|---|---|---|
| Neutral wire | No | Yes (#6 AWG for 50A) |
| Supports 120V components | No | Yes |
| Common in modern tubs | Rare | Standard |
| NEC compliance (new install) | Limited use cases | Preferred |
Practical rule: If your hot tub has LED lights, an audio system, or any USB/120V outlet, it requires a 4-wire system. If you’re unsure, look at the terminal block in your spa pack — if there’s a terminal labeled “N” or “Neutral,” run four conductors.
Brand-Specific Diagrams (Marquis & Others)
While the NEC requirements apply universally, each manufacturer has a slightly different internal layout for the spa pack terminal block, control board, and component wiring. Always use your specific tub’s diagram — generic diagrams are a starting point, not a substitute.
Marquis hot tubs typically use a top-mounted equipment compartment with a terminal block accessible from the front panel. Their diagrams clearly label the BOND terminal separately from the ground terminal — a common source of confusion for DIYers who connect the bonding wire to the ground lug instead.
Sundance, Hot Spring, and Caldera tubs typically use a side-mounted equipment pack with a hinged access door. Their terminal blocks are often color-coded to match the wire colors in the diagram.
Master Spa and Bullfrog tubs use a rear-mounted equipment area. Their diagrams include a separate low-voltage control section — do not confuse the 24V control wiring (thin, often orange or blue) with the line-voltage power wiring.
Finding your brand’s diagram: If the diagram inside your equipment compartment is missing or illegible, search ” wiring diagram” on the manufacturer’s support page. Most manufacturers provide downloadable PDFs. For older tubs, the ESFI electrical safety resource library may have archived documentation.
Testing & Troubleshooting Your Hot Tub
The installation is complete — but the job isn’t done until you’ve tested the circuit, confirmed all safety systems are functioning, and know what to do if something doesn’t work. Energizing a circuit without testing is how correctly-wired tubs develop problems that take weeks to diagnose.
Post-Installation Testing Checklist
Complete these tests in order. Do not skip to a later test if an earlier one fails — each test builds on the previous result.
Before energizing (power still OFF):
- [ ] Ground continuity test: Multimeter reads <1 ohm from spa pack ground terminal to panel ground bus (Touch 5 of The 5-Touch Safety System).
- [ ] Visual inspection: All conduit connections tight, no open knockouts, no exposed wire insulation.
- [ ] Bonding verification: #8 AWG bonding wire connected to all required metal components (pump, heater, frame, water bonding lug).
- [ ] GFCI distance confirmation: Tape measure confirms disconnect is between 5 and 50 feet from tub inside wall.
After energizing (power ON — proceed with caution):
- [ ] Voltage test at disconnect: Use your multimeter (set to AC voltage, 250V+ range) to confirm 240V between L1 and L2 terminals at the disconnect box. A reading of 220–240V is normal. Below 200V indicates a loose connection or undersized wire.
- [ ] GFCI test: Press the TEST button on the GFCI breaker or disconnect. The circuit should immediately de-energize. Press RESET to restore power. If the GFCI does not trip when tested, the device is defective — replace it before proceeding.
- [ ] Tub power-on: Turn on the hot tub per the manufacturer’s startup instructions. Verify the display illuminates, the pump activates, and the heater begins cycling.
- [ ] No-load current check (optional but recommended): A clamp-style ammeter around one hot conductor should read within 10% of the tub’s rated amperage draw at full load. A reading significantly above the rated amperage may indicate a wiring or equipment fault.
Why Your GFCI Keeps Tripping (and How to Fix It)
A GFCI that trips immediately upon reset — or trips within minutes of normal operation — is one of the most frustrating hot tub problems homeowners face. The good news: it’s almost always diagnosable with a systematic approach. You can also learn more about testing your hot tub circuit breaker if the GFCI itself appears faulty.
The GFCI is doing its job. A tripping GFCI means the device has detected a current leakage path to ground. This is a safety mechanism, not a malfunction. Do not bypass or replace the GFCI with a standard (non-GFCI) breaker.
Common causes of nuisance GFCI tripping in hot tubs:
| Cause | Diagnosis | Fix |
|---|---|---|
| Moisture in a component | Trips after rain or first fill | Dry out equipment compartment; check pump seals |
| Failing heater element | Trips when heater activates | Disconnect heater; if GFCI stops tripping, replace element |
| Bad pump motor winding | Trips when pump runs | Disconnect pump; if GFCI stops tripping, replace motor |
| Loose wire terminal | Trips under load, not at rest | Re-torque all terminals; check for discoloration (heat damage) |
| Improper neutral-ground bond | Trips immediately | Verify neutral is not bonded to ground at the spa pack |
| Defective GFCI breaker | Trips randomly with no pattern | Replace GFCI breaker |
| Moisture in conduit | Trips after heavy rain | Install drain fittings; seal conduit entry points |
Isolation method: To identify which component is causing the trip, disconnect one component at a time from the spa pack terminal block (with power OFF), then restore power and test. When the GFCI stops tripping, the last component you disconnected is the fault source.
Per licensed electricians’ consistent reporting across installation forums, a failing heater element is the most common cause of GFCI tripping in hot tubs over 5 years old. Heater elements corrode from the inside out and eventually develop a ground fault path through the water.
How to Safely Disconnect and Cap Hot Tub Wiring
Whether you’re moving, selling, or replacing your hot tub, decommissioning the electrical circuit correctly is a legal and safety requirement. An abandoned, energized circuit is a code violation and a hazard.
- Turn off the circuit at the main panel. Flip the GFCI breaker to OFF. Use your non-contact voltage tester to confirm the disconnect box is de-energized.
- Disconnect wires at the spa pack. Remove the equipment compartment cover and disconnect all THHN wires from the terminal block. Label each wire before disconnecting.
- Disconnect wires at the GFCI box. Open the disconnect enclosure and remove the wires from the disconnect terminals.
- Cap all exposed wire ends. Install appropriately sized wire nuts on each conductor end. For permanent abandonment, use listed wire connectors rated for the wire gauge. Tape over the wire nuts with electrical tape for additional protection.
- Seal the conduit ends. Install conduit end caps on both ends of any abandoned conduit runs. This prevents moisture infiltration and insect nesting.
- Remove the breaker from the panel (for permanent removal) or leave it off and locked. If the hot tub is being permanently removed, have a licensed electrician remove the breaker and reclaim the panel slot. Do NOT leave a tripped or off breaker connected to wiring that terminates in an open conduit.
- Document the work and retain any permit paperwork. If the circuit was originally permitted and inspected, notify your building department of the decommission.
For temporary disconnection (seasonal storage, repairs): Simply switch off the GFCI breaker and lock it in the off position with a breaker lockout device. The wiring can remain in place.
When to Hire a Professional Electrician
Common Pitfalls of DIY Hot Tub Wiring
Even experienced DIYers encounter scenarios that require professional intervention. Recognizing these situations before you’re in them saves time, money, and safety risk.
Pitfall 1: Main panel is at or near capacity. If your main panel has fewer than two open slots for a double-pole breaker, or if your total panel load is near the service rating (typically 200A for residential), adding a 50–60A circuit may require a panel upgrade or a subpanel installation. This is not a DIY project — it requires a licensed electrician and a utility coordination in many cases.
Pitfall 2: Underground run crosses a paved surface. Boring under a driveway or patio requires specialized equipment and — in some jurisdictions — a contractor’s license for the excavation work. Cutting through a paved surface without the right tools damages the surface and risks hitting buried utilities.
Pitfall 3: Older home with aluminum wiring. Homes built before 1973 may have aluminum branch-circuit wiring. Connecting copper THHN to aluminum wiring requires anti-oxidant compound and listed aluminum-to-copper connectors (CO/ALR rated). Standard wire nuts are not approved for this application.
When to Choose a Licensed Electrician Instead
- Your main panel needs an upgrade. Panel work at the service entrance is never a DIY project.
- Your tub requires a 60A circuit and you have no electrical experience. The larger wire gauge (#4 AWG) is significantly harder to work with and less forgiving of mistakes.
- Your jurisdiction requires a licensed electrician for permit issuance. In many states, the permit is only issued to a licensed contractor. Attempting to pull the permit yourself may result in permit denial.
- Your hot tub warranty requires licensed installation. Some manufacturers void the warranty if the electrical hookup isn’t performed or certified by a licensed electrician.
When to Seek Expert Help
If you’ve completed the installation but encounter any of the following, stop and call a licensed electrician before energizing:
- Ground continuity test reads above 1 ohm
- Voltage at the disconnect box reads below 200V or above 250V
- Any wire termination shows signs of heat discoloration
- The GFCI trips immediately and repeatedly upon reset after all components are isolated
These signals indicate a wiring fault that visual inspection alone cannot reliably locate. A licensed electrician with a megohmmeter (insulation resistance tester) can identify the fault source in minutes.
Frequently Asked Questions
Can you wire a hot tub yourself — and do you need an electrician?
How much does it cost to wire a hot tub?
Can I use a 50 amp breaker for a 60 amp hot tub?
Why is there a 15-minute hot tub rule?
Can I wire a hot tub myself without a permit?
How do I know if my GFCI is working correctly?
— but only if your local authority having jurisdiction (AHJ) allows homeowner permits for 240V work. The practical answer depends on three factors: your jurisdiction’s rules, your circuit’s complexity, and your experience level. A 50A circuit with a straightforward conduit run is within reach for a skilled DIYer. A 60A circuit requiring a panel upgrade is not. Per the ESFI, homeowners without prior electrical training are significantly more likely to create undetected ground fault hazards. Always pull a permit and pass inspection before energizing — this applies whether you DIY or hire a pro.
The average cost to hire a licensed electrician for a hot tub hookup ranges from $500 to $1,500. This price depends heavily on the distance from your main panel to the hot tub, local labor rates, and whether your home requires a subpanel upgrade. While DIY installation saves on labor, the cost of materials (THHN wire, GFCI disconnect, conduit) will still typically run between $200 and $400.
No, you cannot use a 50 amp breaker for a 60 amp hot tub. Doing so will cause the breaker to trip continuously under normal load, as the hot tub will draw more current than the breaker is designed to handle. Always match the breaker size and wire gauge exactly to the manufacturer’s specifications printed on the hot tub’s data plate.
It refers to the recommendation from health authorities that adults limit hot tub soaking sessions to 15 minutes at a time in water temperatures at or above 104°F (40°C) — the maximum temperature allowed by ANSI/APSP-14 standards. Prolonged exposure at high temperatures can cause hyperthermia (dangerous overheating), particularly for pregnant women, people with cardiovascular conditions, and young children. This rule has no bearing on your wiring installation, but it’s a common search query from new hot tub owners who encounter it in their owner’s manual.
In virtually every U.S. jurisdiction, a new 240V circuit requires a permit and a final inspection before the circuit can be legally energized. Installing without a permit means no licensed inspector verifies your work before it’s live near water. It also creates liability exposure: if an injury occurs on an unpermitted installation, your homeowner’s insurance may deny the claim, and you may be personally liable. The permit process typically costs $50–$200 and adds one inspection appointment to your timeline. It is not optional.
After pressing TEST, the circuit should de-energize — any connected device should lose power. Press RESET to restore the circuit. If the GFCI does not trip when tested, or if it trips randomly without an apparent cause, the device may be defective. per manufacturer recommendations. Per NEC Article 680, GFCI protection is mandatory for all hot tub circuits — a non-functioning GFCI must be replaced before the tub is used. A properly functioning GFCI detects ground fault currents as small as 4–6 milliamps and trips in approximately 1/40th of a second. ()
Your Next Step: Wire It Right or Hire Right
Hot tub wiring is one of the most consequential DIY projects a homeowner can take on. The stakes — 240 volts near water, mandatory inspections, and lifetime liability — are real. But so is the satisfaction of completing a code-compliant installation that will serve your family safely for years.
The 5-Touch Safety System gives you a concrete framework for that confidence. Touch 1 confirms your wire gauge. Touch 2 confirms your GFCI distance. Touch 3 confirms your bonding. Touch 4 confirms your weatherproofing. Touch 5 confirms your ground continuity. Complete all five before you flip the breaker — every time, without exception.
Whether you complete this installation yourself or hand it off to a licensed electrician after reading this guide, you now have the vocabulary, the code knowledge, and the safety framework to make that decision wisely. You know what “up to code” actually means. You know the difference between THHN and Romex, between a 3-wire and 4-wire system, and between a nuisance GFCI trip and a genuine ground fault. If you’d rather have a professional handle the wiring, our complete hot tub installation guide can help you prepare the site.
Ready to get started? Start with your permit application. Pull your tub’s wiring diagram. Run through The 5-Touch Safety System before energizing. And if at any point the job exceeds your comfort level — call a licensed electrician. That call is never a failure. Per NEC Article 680 and the CPSC’s pool and spa safety guidance, a properly inspected hot tub wiring installation is the only kind worth having.

Dave King
Hot tub tester and writer at One Hot Tub.