What’s in this guide
- Before You Start: Safety Warnings and Equipment
- How to Read Your Multimeter for Hot Tub Testing
- Step 1 - Test the Fuses (Power Off)
- Step 2 - Test Voltage to the Pump (Power On)
- Step 3: Test for Ground Faults
- Step 4 - Test Motor Winding Continuity (Power Off)
- Step 5 - Test the Capacitor (Power Off)
- Diagnose Your Hot Tub Pump by Symptom
- When to Stop DIY and Call a Professional
- Frequently Asked Questions
- Repair or Replace: The Final Verdict
Home ›Maintenance And Troubleshooting
⚠️ Safety Warning: Testing a hot tub pump involves working near 120V or 240V electrical circuits. A charged capacitor can deliver a fatal shock even with power completely off. Read the full safety section before touching any component. When in doubt, stop immediately and call a licensed electrician.
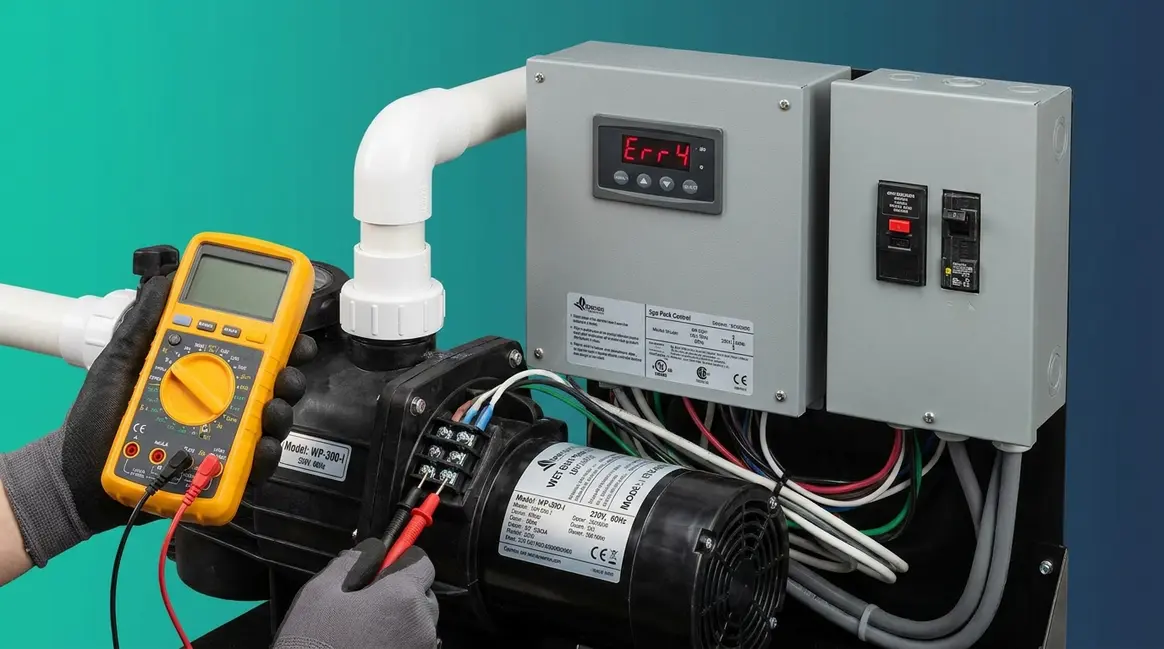
If your hot tub pump is humming but not moving water — or your GFCI (Ground-Fault Circuit-Interrupter) breaker trips the moment the pump tries to start — you can diagnose the exact cause in under 30 minutes using a digital multimeter, without buying a single part first.
A new hot tub pump costs $150–$600, and ordering the wrong one because you skipped the diagnosis is a frustratingly common and completely avoidable mistake. Spa technicians consistently see homeowners replace entire pump assemblies when a $20 capacitor or a $5 fuse was the only failed component.
By the end of this guide, you’ll complete The 5-Test Pump Verdict — a systematic diagnostic sequence that definitively tells you whether your pump needs a capacitor, a fuse, or a full replacement — so you spend money only on what’s actually broken. We’ll cover the safety setup, explain how to test hot tub pump with multimeter settings, and walk through each of the five tests in order, always starting with power off.
Key Takeaways: The 5-Test Pump Verdict
A systematic multimeter test sequence lets you diagnose hot tub pump failure in 30 minutes — before you spend $150–$600 on a replacement.
- Test fuses first: A blown fuse is a $5 fix that mimics complete pump failure
- Healthy winding resistance: 1–20 Ohms across terminals; OL (open loop) to the ground frame
- Capacitor failure causes roughly 70% of “hums but won’t spin” symptoms — test it before replacing the motor
- Never skip capacitor discharge — a charged capacitor can store lethal energy for hours after power is disconnected
- The 5-Test Pump Verdict tells you exactly what failed, so you replace only the broken part
Before You Start: Safety Warnings and Equipment
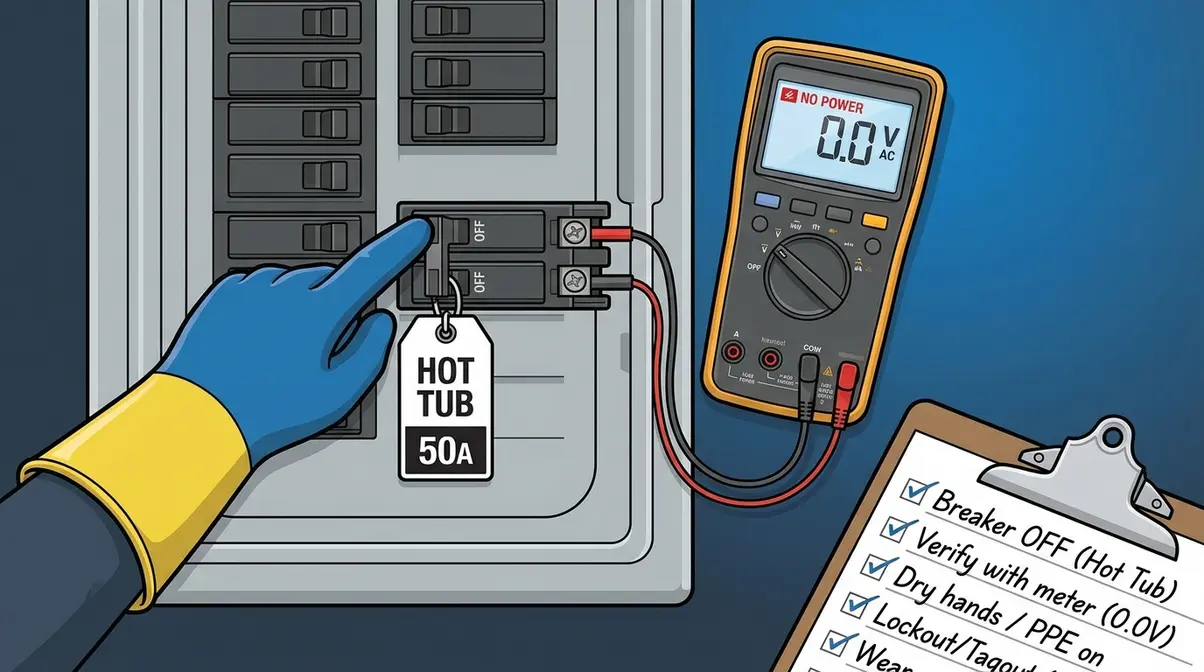
Safe pump diagnostics begin long before you pick up a multimeter. This section establishes the safety framework and equipment checklist that every test in this guide depends on.
“We experienced an electrical storm, and my 50 amp breaker didn’t trip.”
That quote, shared in a popular spa owner community, captures the anxiety that brings most readers here. Electrical events — storms, power surges, GFCI trips — leave hot tub owners unsure whether the pump is fried or simply needs a reset. The 5-Test Pump Verdict is a systematic sequence — fuses, voltage, ground faults, winding continuity, capacitor — that produces a definitive repair-or-replace verdict for any hot tub pump. Use it in order, and you eliminate guesswork at every stage.
Critical Electrical Safety Rules
The U.S. Consumer Product Safety Commission (CPSC) requires all hot tub electrical components to be protected by GFCI breakers to prevent electrocution hazards (CPSC hot tub safety recommendations, CPSC, 2026). Before any test, follow these non-negotiable rules, which align with standard hot tub electrical requirements:
- Turn off the dedicated circuit breaker — the 50-amp (or 60-amp) breaker at your home’s main panel, not just the topside control panel.
- Verify power is off with your multimeter set to AC voltage before touching any terminal.
- Discharge the start capacitor before removing it or touching its leads — a charged capacitor stores lethal energy for hours after power is disconnected (Fluke Corporation, 2026).
- Work with dry hands on a dry surface. Never test near standing water.
- STOP immediately if you see burned wiring, melted insulation, or smell burning — these require a licensed electrician, not a multimeter.
This guide follows the systematic diagnostic sequence used by certified pool and spa technicians. It is not a substitute for professional electrical diagnosis when safety indicators are present.
Tools You Need
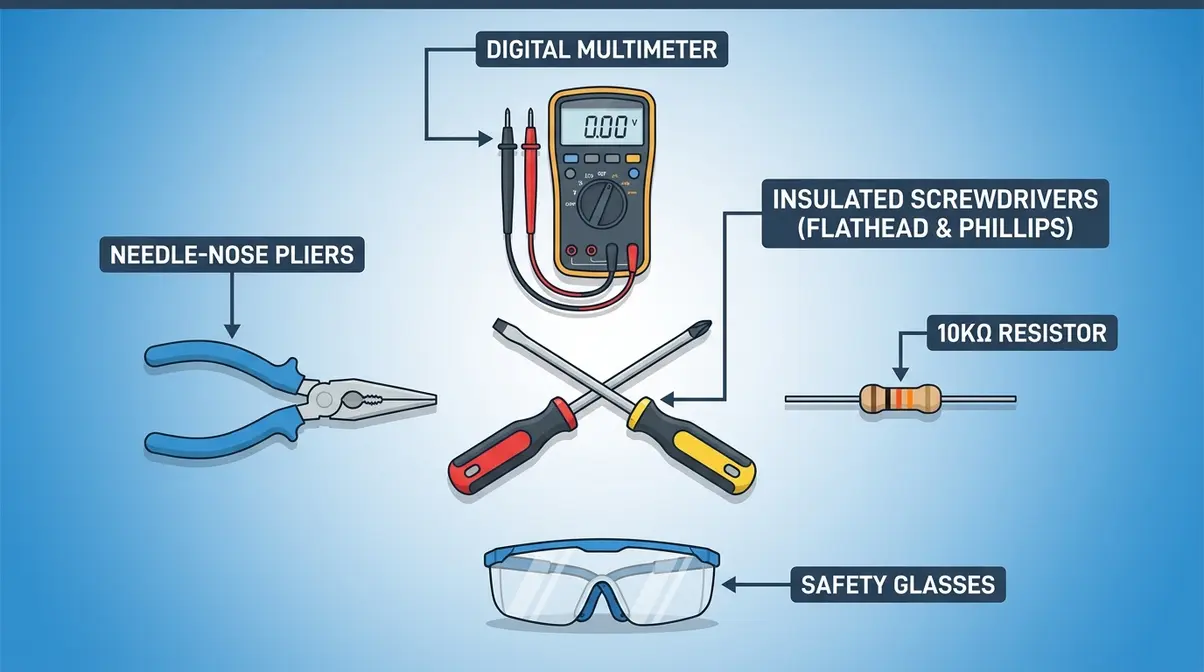
Gather everything before you open the equipment bay:
- Estimated Time: 30 minutes
- Digital multimeter (DMM) — any auto-ranging model works; set to AC voltage (V~), DC voltage (V—), resistance (Ω), and capacitance (F) modes
- Insulated screwdrivers (flathead and Phillips)
- Needle-nose pliers (for fuse removal)
- A 10,000 Ohm (10kΩ) resistor — used to safely discharge the capacitor
- Safety glasses
- Rubber-soled shoes
- Pump model number — written on the motor label; you’ll need it to cross-reference winding resistance specs
How to Read Your Multimeter for Hot Tub Testing
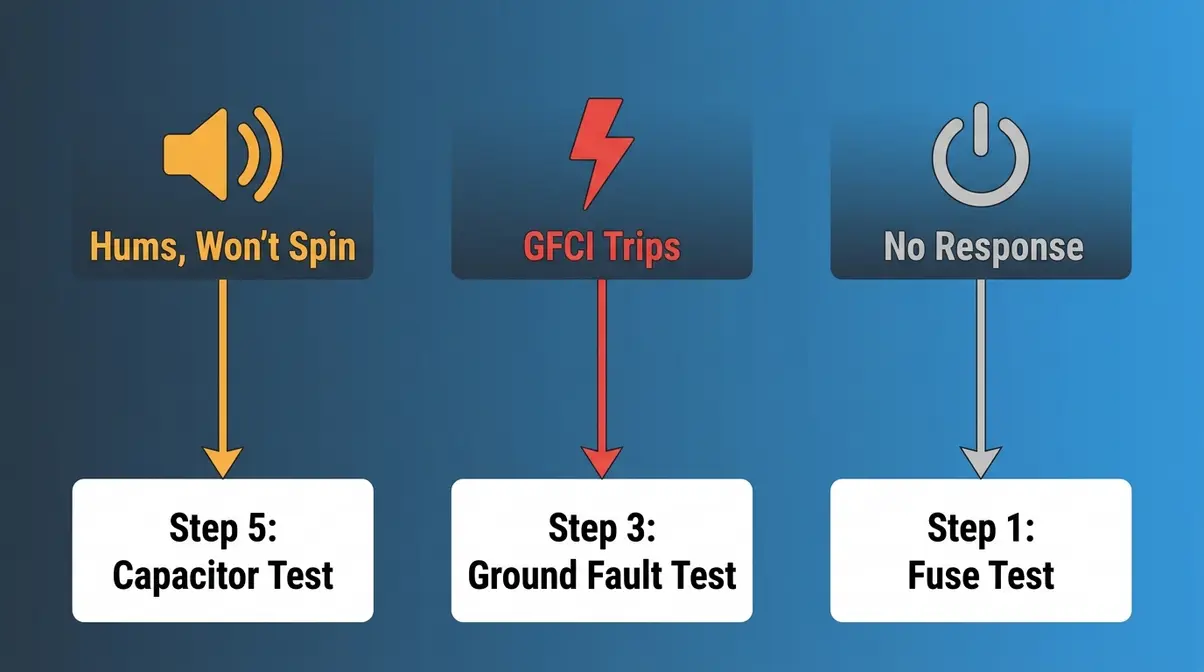
Understanding your multimeter’s modes before you reach the pump saves time and prevents dangerous mistakes. Spa technicians report that misreading the dial setting is one of the top causes of incorrect “dead motor” diagnoses.
Multimeter Modes and Settings
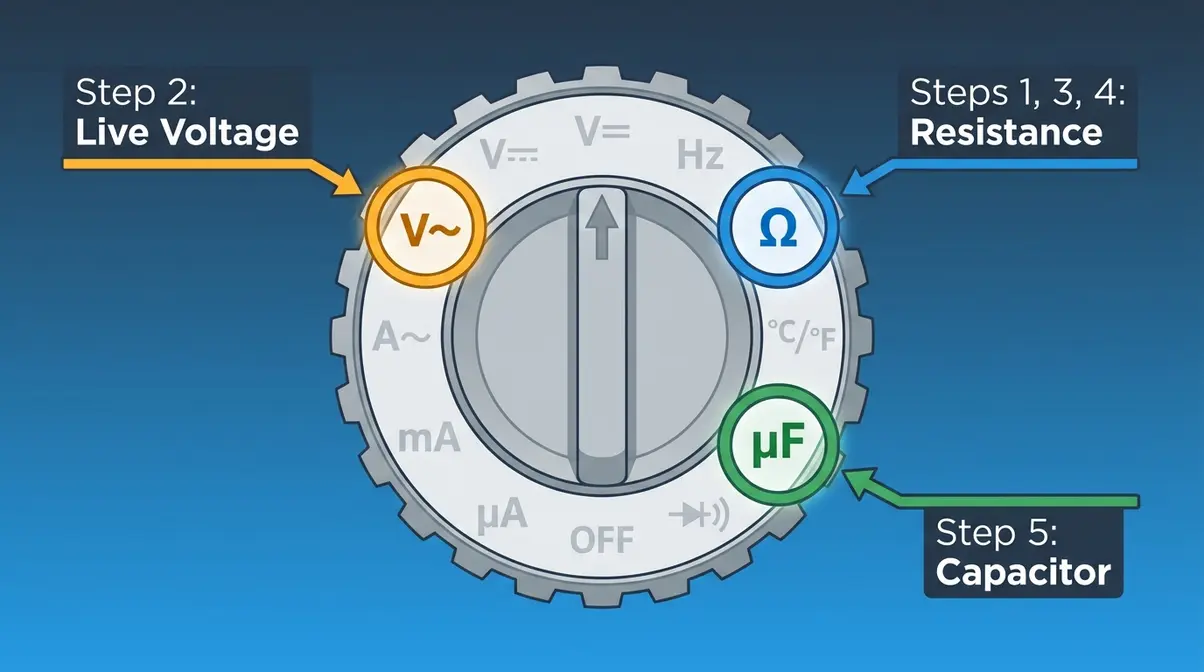
Your multimeter has three modes you’ll use in this guide:
- AC Voltage (V~ or VAC): Measures live power flowing to the pump. Use for Step 2 only — with power ON.
- Resistance (Ω): Measures how much a circuit resists electrical flow, expressed in Ohms. Use for Steps 1, 3, and 4 — always with power OFF.
- Capacitance (F or µF): Measures a capacitor’s storage capacity in microfarads. Use for Step 5 — with power OFF and capacitor discharged.
Continuity is a related concept: a complete, unbroken electrical path. When your multimeter reads a low Ohm value (near zero) across two points, continuity exists. When it reads “OL” (overload/open loop), the circuit is broken. Understanding this distinction is the foundation of every test that follows.
What Ohm Readings Mean for Your Pump
Resistance readings tell you whether the motor windings are intact. According to InyoPools multimeter motor testing guide, acceptable winding resistance for pool and spa pump motors falls within predictable ranges based on circuit voltage:
| Pump Voltage | Main Winding (T1–T2) | Start Winding (T1–T3 or T2–T3) | Winding-to-Ground Frame |
|---|---|---|---|
| 120V | 1.5–3.0 Ω | 3.0–6.0 Ω | OL (infinite) |
| 240V | 3.0–6.0 Ω | 6.0–12.0 Ω | OL (infinite) |
| Any — FAILED | OL across terminals | OL across terminals | Any reading <1 MΩ |
A reading of OL across the windings means an open (broken) winding — the motor is electrically dead. A reading of any finite value from winding to ground means a ground fault — the motor is unsafe to run and almost certainly tripping your GFCI. These two failure modes account for the majority of hot tub motor failures diagnosed by certified spa technicians.
Step 1 – Test the Fuses (Power Off)
Always test fuses first. A blown fuse perfectly mimics complete pump failure — the motor won’t hum, won’t start, and produces no response whatsoever. Fuses cost $5 and take three minutes to test. If you are unsure how to tell if hot tub fuse is blown, this step will clarify everything. Replacing a pump motor costs up to $600 and takes an afternoon.
Locating Pump Fuses on the Board
With the circuit breaker OFF and verified dead with your multimeter, open the equipment bay access panel. The control board — the green or black circuit board mounted inside — contains a fuse block, typically holding one or two automotive-style blade fuses (5–30 amp) or cylindrical glass fuses. The fuse block is usually labeled “PUMP,” “SPA,” or “MOTOR” in small print.
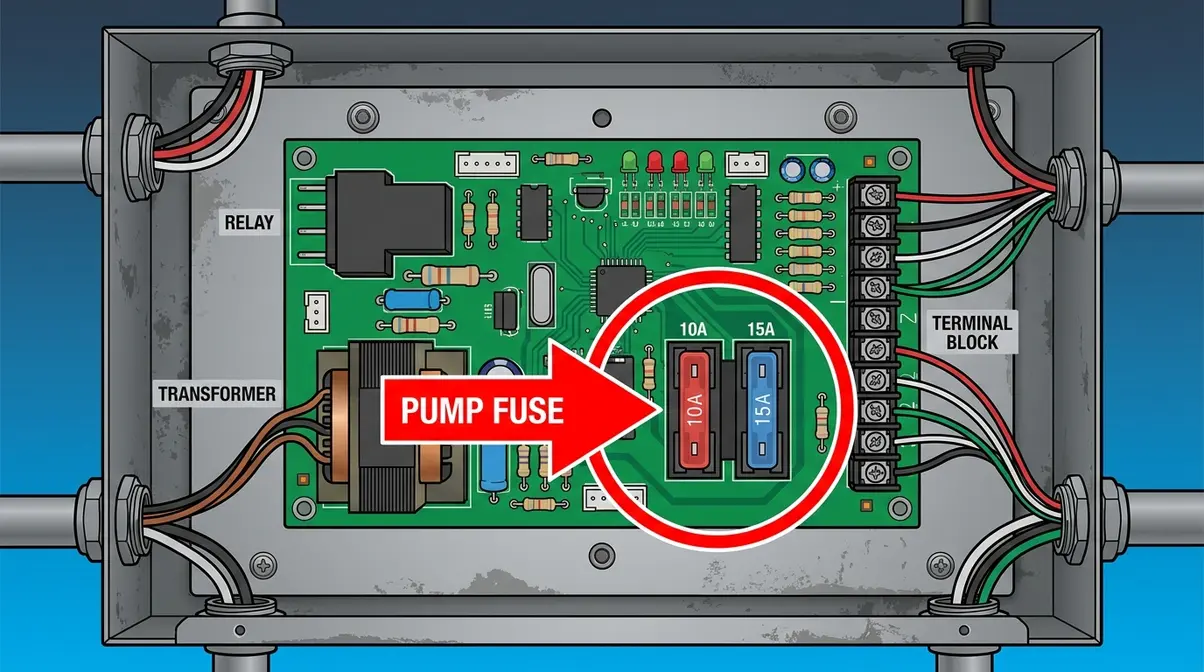
Remove the fuse using needle-nose pliers. Never use your fingers — residual charge on control board components can cause a sharp, startling static discharge even with the breaker off.
How to Test Fuses for Continuity
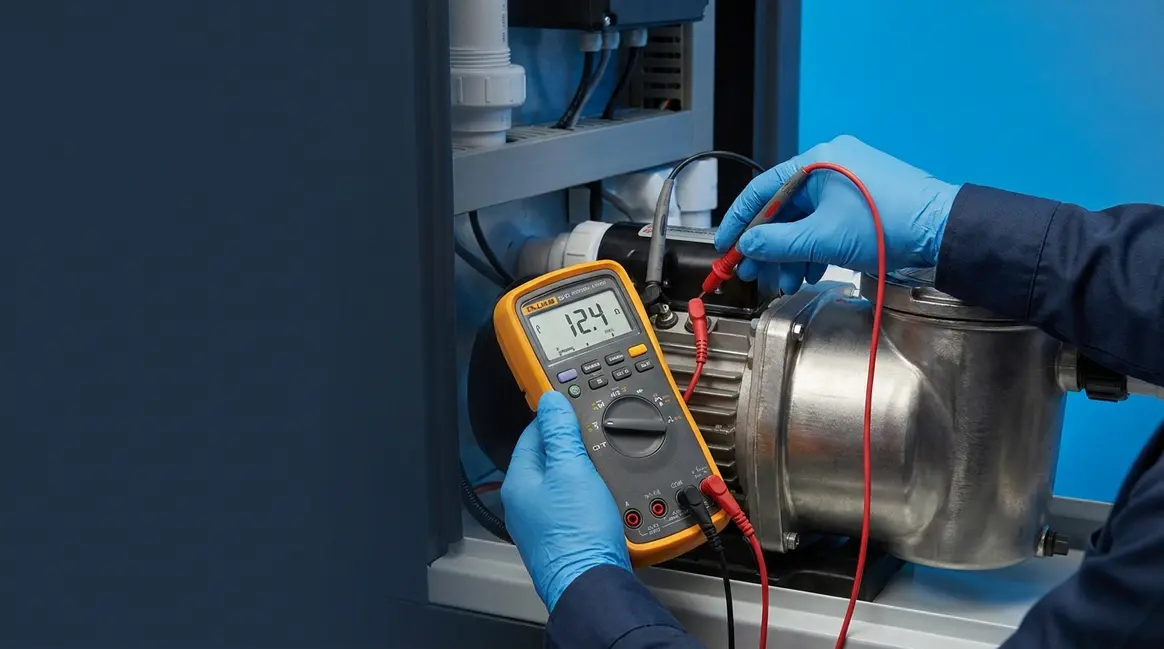
Set your multimeter to Resistance (Ω) mode. Place one probe on each metal end cap of the removed fuse.
- Good fuse: Reads 0–1 Ω (near-zero resistance; continuity confirmed)
- Blown fuse: Reads OL (open loop; no continuity)
A blown fuse reading means you have two tasks: replace the fuse and identify what caused it to blow. A fuse that blows again immediately after replacement usually indicates a winding ground fault (Step 3) or a seized motor bearing. According to SpaCare’s motor diagnostic guide, repeated fuse failures on the same circuit almost always point to a downstream motor fault rather than the fuse itself.
STOP if: The replacement fuse blows again within 10 seconds of power-on. Proceed to Step 3 (ground fault test) before going further.
Step 2 – Test Voltage to the Pump (Power On)
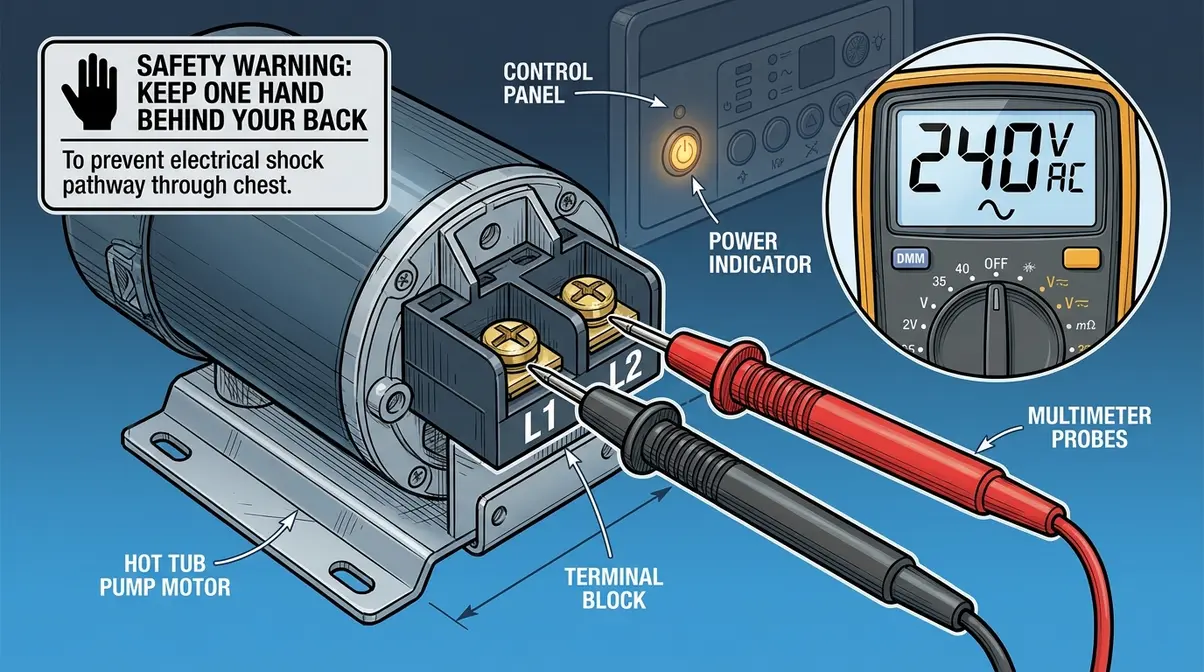
This is the only step performed with power on. Treat it accordingly — work slowly, keep probes away from your body, and never allow probe tips to contact each other or the equipment bay chassis simultaneously.
Live Voltage Testing Setup
Restore power at the circuit breaker. Do not touch any terminal until you’ve confirmed your multimeter is set to AC Voltage (V~) and your probes are firmly seated in the correct ports (COM and VΩ). Locate the pump’s terminal block — the point where the control board wires connect to the pump motor leads. On most pumps, this is a plastic block with two or three screw terminals on the motor housing.
Reading the Voltage Results
Place your probes on the two main power terminals (L1 and L2, or the wire colors specified in your pump’s wiring diagram). Expected readings:
| Circuit Type | Expected Voltage | Acceptable Range |
|---|---|---|
| 120V single-phase | 120V AC | 108–132V AC |
| 240V two-phase | 240V AC | 216–264V AC |
- Correct voltage reading: The control board is sending power correctly. The problem lives inside the pump motor — proceed to Steps 3–5.
- Low or zero voltage: The problem is upstream — check the control board, relay, or breaker, not the pump motor itself.
Turn the circuit breaker OFF again after confirming voltage. All remaining steps are performed with power off.
Step 3: Test for Ground Faults
A ground fault occurs when a winding’s insulation breaks down and current leaks to the motor’s metal frame. This is the most common reason a hot tub’s GFCI breaker keeps tripping. The GFCI detects the leaking current and cuts power within milliseconds — which is exactly what it’s designed to do. Testing for ground faults is a key part of knowing how to test hot tub pump with multimeter correctly.
How to Set Up the Ground Fault Test
With the circuit breaker confirmed OFF, disconnect the pump’s motor leads from the terminal block. Set your multimeter to Resistance (Ω) — or, if your meter has a dedicated megohmmeter (MΩ) setting, use that for more sensitive readings.
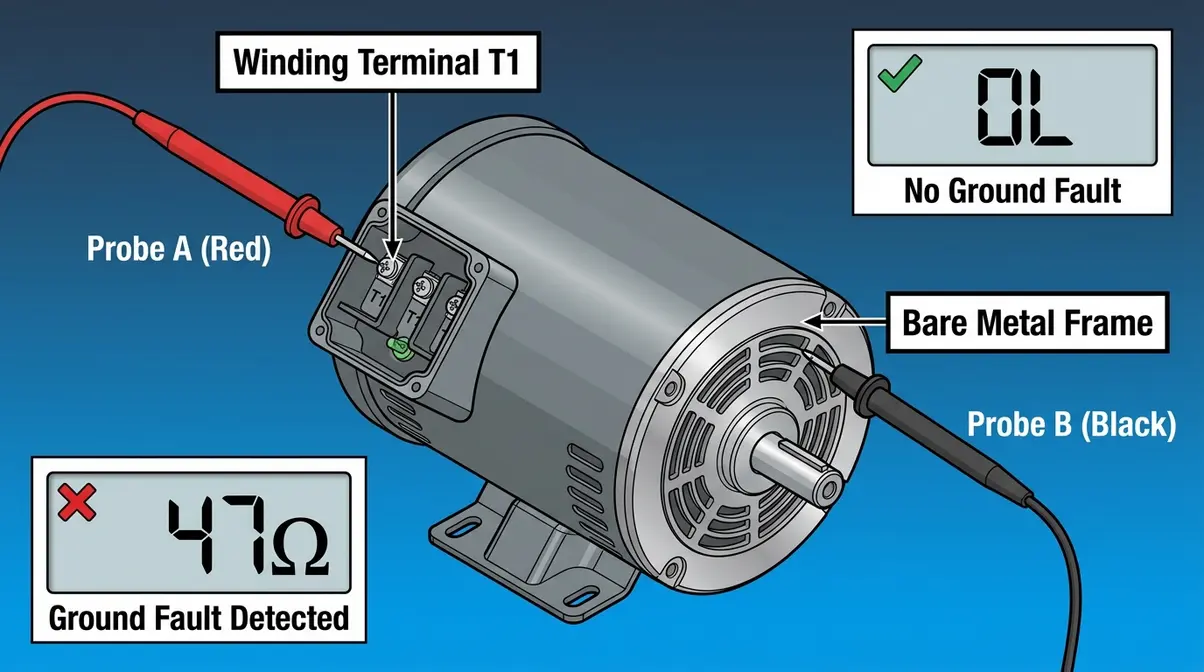
Place Probe A on any motor winding terminal (T1, T2, or T3). Place Probe B firmly against an unpainted section of the motor’s metal frame or housing. Repeat for each terminal.
What a Ground Fault Reading Means
| Reading | Interpretation | Action |
|---|---|---|
| OL (infinite resistance) | No ground fault — insulation intact | Proceed to Step 4 |
| Any finite reading (1Ω–1MΩ) | Ground fault present — insulation compromised | Motor requires rewinding or replacement |
| Near-zero (0–10Ω) | Severe ground fault — motor is unsafe | Do not operate; replace motor |
Users in spa owner communities report that GFCI trips occurring within 2 seconds of pump startup almost always indicate a winding ground fault. A motor with a confirmed ground fault should never be operated — it will continue tripping the GFCI and can create a shock hazard in the water. Consult a licensed electrician before proceeding if you find any finite winding-to-ground reading.
Step 4 – Test Motor Winding Continuity (Power Off)
When learning how to test hot tub pump with multimeter tools, checking winding continuity tells you whether the internal copper coils of the motor are intact or broken. The U.S. Department of Energy confirms that winding resistance testing is the standard method for detecting early motor degradation before complete failure occurs (DOE, 2014). This step directly answers the question: how many ohms should a pump have?
Measuring Winding Resistance
With power OFF and motor leads disconnected, set your multimeter to Resistance (Ω). Most hot tub pump motors have three terminals: T1, T2, and T3 (or labeled by wire color in your pump’s manual).
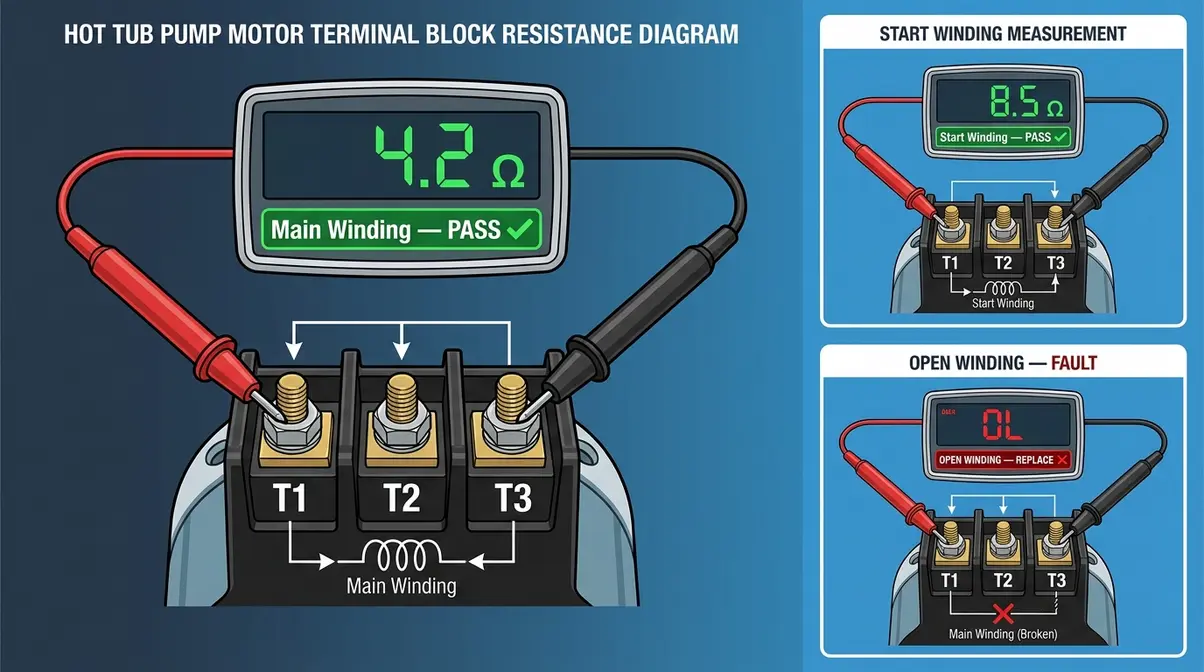
- Test each terminal pair in sequence:
- Place probes on T1 and T2 — record the reading
- Place probes on T1 and T3 — record the reading
- Place probes on T2 and T3 — record the reading
Hot Tub Pump Ohm Reading Reference Chart
Cross-reference your readings against the ranges confirmed by InyoPools’ pool and spa motor testing methodology (InyoPools, 2026):
| Terminal Pair | Winding Type | 120V Pump | 240V Pump | Failed Reading |
|---|---|---|---|---|
| T1 – T2 | Main winding | 1.5–3.0 Ω | 3.0–6.0 Ω | OL |
| T1 – T3 | Start winding | 3.0–6.0 Ω | 6.0–12.0 Ω | OL |
| T2 – T3 | Auxiliary | 1.5–6.0 Ω | 3.0–12.0 Ω | OL |
| Any terminal → Frame | Ground check | OL (∞) | OL (∞) | Any finite value |
- Interpreting your results:
- All readings within range: Windings are electrically healthy — the fault is likely the capacitor (Step 5) or upstream power delivery.
- One or more OL readings across terminals: That winding is open (broken). The motor requires rewinding or full replacement — repair is rarely cost-effective.
- Readings significantly above range (e.g., 15Ω on a 120V main winding): Partial winding degradation. The motor may still run but will draw excessive current and fail prematurely.
Step 5 – Test the Capacitor (Power Off)
The start capacitor is the cylindrical component — typically 1–4 inches long, mounted on or near the motor — that stores electrical charge to help the motor reach starting speed. Spa technicians consistently report that a humming motor with zero rotation indicates a failed capacitor in approximately 70% of cases. This is the most misdiagnosed and most frequently replaced component in hot tub pump repair.
Safely Discharging the Capacitor
⚠️ This step is mandatory before touching capacitor leads. A capacitor can retain a dangerous charge for hours after power is disconnected. OSHA electrical safety standards and IEEE guidelines for capacitor handling both specify that capacitors must be discharged through a resistive load before contact (OSHA 29 CFR 1910.137; IEEE Std 18-2012).
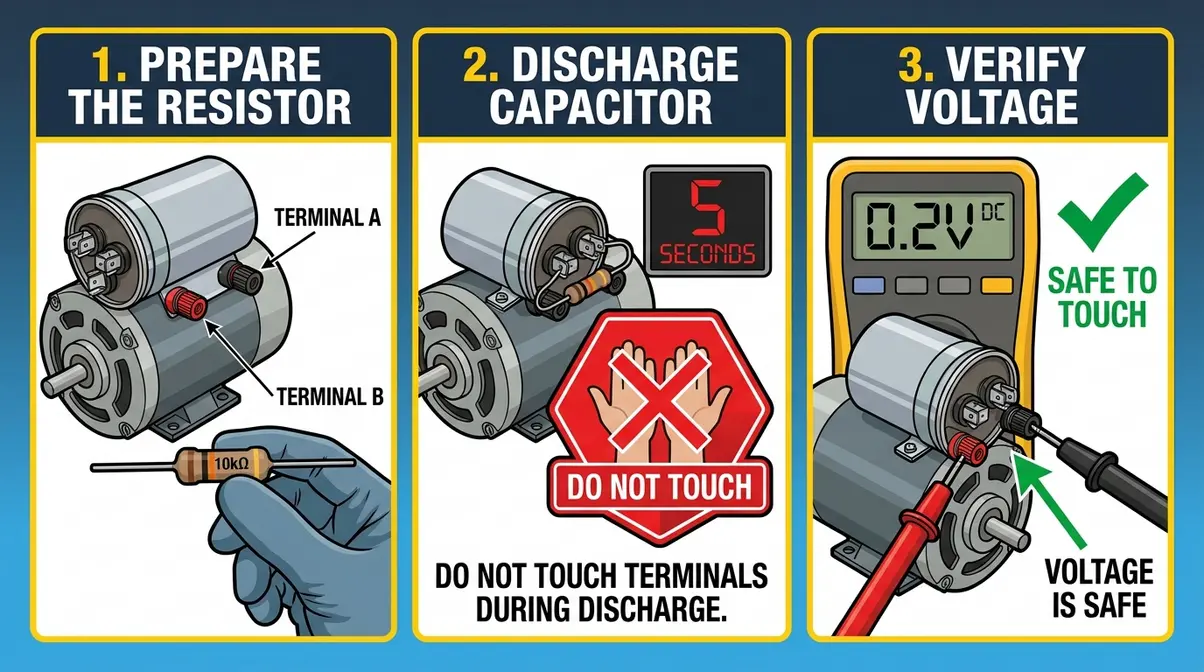
- Safe discharge procedure:
- With power confirmed OFF, locate the capacitor on or near the motor housing.
- Identify the two terminals on top of the capacitor.
- Hold a 10,000 Ohm (10kΩ) resistor by its body — not its leads.
- Touch one resistor lead to each capacitor terminal simultaneously and hold for 5 full seconds. The resistor bleeds the stored charge safely.
- Repeat once more for a total of 10 seconds of discharge time.
- Verify discharge: touch your multimeter probes (set to DC voltage) to the capacitor terminals. A reading below 1V DC confirms safe discharge.
Never short a capacitor with a screwdriver — the resulting arc can cause burns, damage the capacitor, and startle you into contacting a live circuit.
Testing Capacitor Microfarads
Set your multimeter to Capacitance (µF or F) mode. Place one probe on each capacitor terminal.
The capacitor’s rated microfarad (µF) value is printed on its label (e.g., “40 µF ±6%”). Your multimeter reading should fall within the rated tolerance, typically ±6–10% of the labeled value (Fluke Corporation, 2026).
| Rated µF | Acceptable Reading Range | Failed Range |
|---|---|---|
| 20 µF | 18.0–22.0 µF | <18 µF or >22 µF |
| 30 µF | 27.0–33.0 µF | <27 µF or >33 µF |
| 40 µF | 36.0–44.0 µF | <36 µF or >44 µF |
| 50 µF | 45.0–55.0 µF | <45 µF or >55 µF |
Interpreting Capacitor Test Results
- Reading within ±10% of rated µF: Capacitor is functional. The humming motor problem lies elsewhere — recheck winding resistance or inspect for a mechanical jam (debris in the impeller).
- Reading significantly below rated µF (e.g., 15 µF on a 40 µF capacitor): Capacitor has lost capacity and is failing. Replace it — capacitors cost $10–$30 and are available at electrical supply stores and online.
- Reading of OL or zero: Capacitor is open or shorted. Replace immediately.
- Multimeter shows no reading or fluctuates wildly: Your meter may lack a capacitance mode, or the capacitor is severely damaged. Replace based on visual evidence (bulging top, leaking electrolyte).
A replacement capacitor must match the original’s µF rating and voltage rating (usually 250V or 370V AC). Mismatching voltage ratings — even if the µF is correct — shortens capacitor life dramatically.
Diagnose Your Hot Tub Pump by Symptom
Not sure which step to start with? Use your pump’s symptom to prioritize. For instance, a hot tub pump keeps turning on and off might indicate an overheating issue, but the symptoms below point directly to electrical faults. This section maps the three most common failure presentations to the specific tests most likely to identify the cause, based on diagnostic patterns reported across certified spa technician communities.
Pump Hums But Won’t Run
Most likely cause: Failed start capacitor. When the capacitor loses capacity, the motor receives power and tries to start (producing the characteristic hum) but can’t develop enough torque to overcome the rotor’s inertia.
Diagnostic priority: Skip directly to Step 5 (capacitor test) after confirming fuses are intact (Step 1). If the capacitor tests within range, check for a mechanical impeller jam — turn the impeller by hand through the back of the motor housing. A seized impeller that won’t rotate freely indicates a bearing failure, not an electrical fault.
According to Cedar Tubs’ pump failure diagnostic guide, a pump that hums but produces no water movement is the single most reliable indicator of capacitor failure across all hot tub pump brands.
GFCI Breaker Keeps Tripping
Most likely cause: Winding ground fault. When motor insulation breaks down, current leaks from the winding to the motor frame — the GFCI detects this leakage current (typically >4–6 mA) and trips within milliseconds.
Diagnostic priority: Go straight to Step 3 (ground fault test). A GFCI that trips within 2 seconds of pump startup is almost never a GFCI problem — the safety device is working correctly. Replacing the GFCI breaker before testing the motor is a common and expensive mistake.
STOP if: The GFCI trips before the pump even attempts to start. This indicates a wiring fault or severely damaged motor — do not attempt further DIY diagnosis. Call a licensed electrician.
Pump Won’t Start At All
Most likely cause: Blown fuse, loss of supply voltage, or open motor winding. A completely silent pump — no hum, no click, no response — means either no power is reaching the motor or the motor’s windings are completely open.
Diagnostic priority: Follow the full 5-Test Pump Verdict sequence in order. Start with Step 1 (fuses), then Step 2 (voltage), then Step 4 (winding continuity). If all three check out, the fault may lie in the control board relay rather than the pump motor itself — a relay that fails to close prevents any power from reaching the motor regardless of board voltage.
When to Stop DIY and Call a Professional
Multimeter testing tells you what is wrong. It doesn’t always tell you whether you should fix it. Knowing when to hand off to a licensed electrician protects both your safety and your wallet.
Signs You Need an Electrician
Stop DIY diagnosis immediately if you encounter any of the following:
- Burned or melted wiring anywhere in the equipment bay
- Burning smell from the control board or motor housing
- Visible arc marks (black scorch marks on terminals or wiring)
- A GFCI that trips before the pump attempts to start — this indicates a fault in the wiring, not the pump
- Water intrusion inside the motor housing or control panel
- Any winding-to-ground reading below 1 MΩ on a motor that has been recently submerged
These conditions involve risks beyond the scope of multimeter diagnostics. A licensed electrician or certified pool and spa technician can perform insulation resistance testing (megohmmeter testing) and safely evaluate control board integrity.
What to Tell the Technician
Sharing your multimeter results before the technician arrives saves diagnostic time — and you pay for that time. Prepare this information:
- Pump model and voltage (from the motor label)
- Which tests you completed and their readings (e.g., “T1–T2 reads OL, T1–T3 reads 4.2 Ω, no ground fault detected”)
- Your GFCI trip timing — does it trip instantly, within 2 seconds, or after 30+ seconds of operation?
- Any recent events — electrical storm, pump running dry, airlock after refilling, bearing noise before failure
A technician armed with your test data can often confirm the diagnosis and order parts before the service visit, cutting the repair to a single appointment.
Frequently Asked Questions
How do I tell if my hot tub pump is bad?
A hot tub pump is likely bad if it hums without moving water, trips the GFCI within seconds of startup, or produces no response at all. The most reliable confirmation is a multimeter test sequence checking fuse continuity, supply voltage, winding-to-ground resistance, winding continuity, and capacitor microfarads. Pumps failing two or more of these tests—particularly an open winding combined with a ground fault—are rarely economically repairable, whereas a simple capacitor failure is a cheap $20 fix.
Can you test a pump without water?
Yes — all five multimeter tests in this guide are performed with the pump dry and the power off (except Step 2, which tests voltage at the terminal block). You do not need water in the tub to diagnose electrical faults in the motor, windings, capacitor, or fuses. However, never run a hot tub pump dry under any circumstances. Operating without water damages the mechanical seal and impeller within minutes due to extreme friction. Testing is diagnostic only, so always restore water before fully operating the pump after any repair.
How many ohms should a pump have?
A healthy 120V hot tub pump should read 1.5–3.0 Ω across the main windings (T1–T2) and 3.0–6.0 Ω across the start windings. For 240V pumps, expect 3.0–6.0 Ω on the main windings and 6.0–12.0 Ω on the start windings. Any terminal pair reading OL (open loop) indicates a broken winding, while any reading from a winding terminal to the motor’s metal frame indicates a ground fault. Both conditions typically require motor replacement rather than repair (InyoPools, 2026).
Most common reason for pump failure?
Capacitor failure is the most common cause of hot tub pump failure, accounting for roughly 70% of “hums but won’t spin” presentations seen by certified spa technicians (Cedar Tubs, 2026). Capacitors degrade naturally over 3–7 years, losing their ability to store enough charge to start the motor. The second most common cause is winding insulation breakdown. This breakdown is often accelerated by running the pump dry, voltage spikes from electrical storms, or overheating from restricted water flow. Bearing failure, identifiable by a grinding or squealing noise before complete failure, is the third most common mechanical cause.
Repair or Replace: The Final Verdict
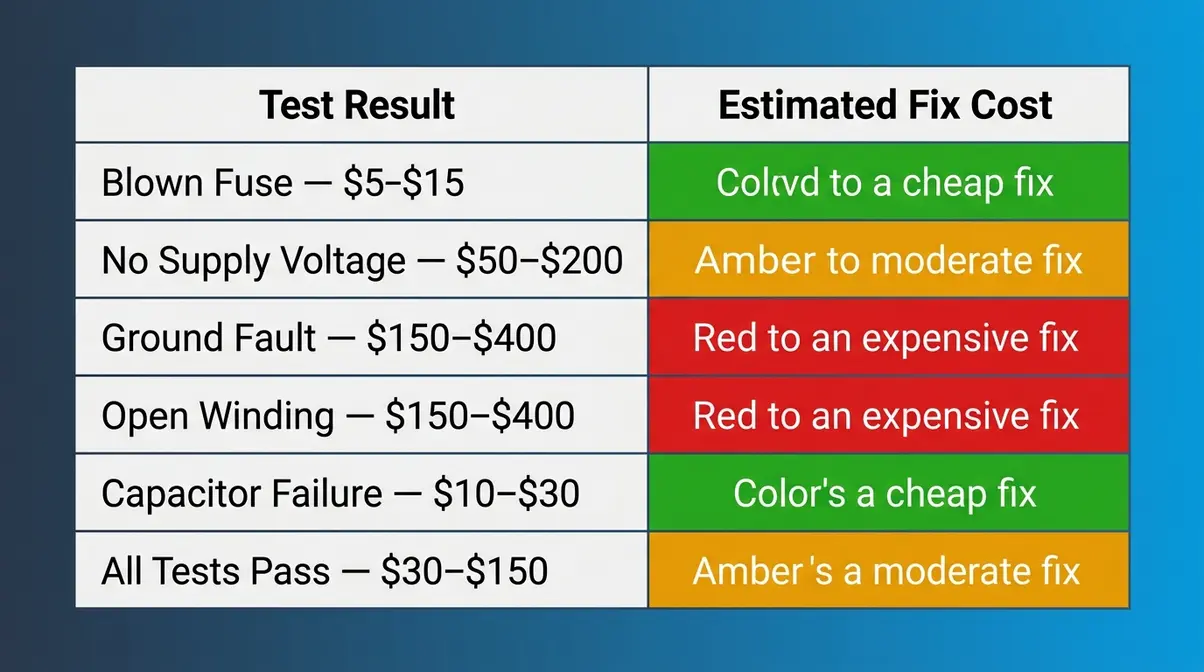
The 5-Test Pump Verdict produces one of three outcomes for every hot tub pump: a simple fix, a component replacement, or a full motor swap. Spa technicians use this same diagnostic sequence because it eliminates the guesswork that leads homeowners to spend $400 on a pump motor when a $20 capacitor was the only failed part.
The 5-Test Pump Verdict decision summary:
| Test Result | Verdict | Estimated Fix Cost |
|---|---|---|
| Blown fuse only | Replace fuse + investigate cause | $5–$15 |
| No supply voltage | Control board or relay fault | $50–$200 |
| Ground fault confirmed | Replace motor | $150–$400 |
| Open winding confirmed | Replace motor | $150–$400 |
| Capacitor out of range | Replace capacitor | $10–$30 |
| All tests pass | Mechanical fault (impeller/bearing) | $30–$150 |
Before you spend anything, run through all five tests in sequence. A pump that hums but won’t spin almost always needs a capacitor — not a new motor. A pump that trips the GFCI almost always has a winding ground fault — not a bad breaker. The data your multimeter gives you is the only reliable basis for that decision.
If your tests reveal a ground fault or open winding, consult a licensed electrician or certified spa technician before ordering parts — winding failures occasionally result from upstream wiring problems that will destroy a new motor just as quickly. Start with the tests, trust the numbers, replace only what’s broken, and explore quality hot tub pumps if a full motor swap is required.

David King
Hot tub tester and writer at One Hot Tub.