Table of Contents - How to Fix a Hot Tub Not Heating: Quick Troubleshooting Guide
This blog post may contain affiliate links. As an Amazon Associate I earn from qualifying purchases.
How to Fix a Hot Tub Not Heating: Quick Troubleshooting Guide
Check the Basics First: Power, Mode, and Water Level
Make sure the hot tub is powered on
- Has your GFCI (Ground Fault Circuit Interrupter) tripped? This safety gadget often clicks off when it detects moisture or electrical hiccups. Look for a reset button on your breaker panel or on the GFCI outlet.
- Is your circuit breaker flipped to “on” in your main electrical panel?
- Are all power switches for your hot tub turned on, including any disconnect switches lurking near your spa?
Verify the heating mode is set correctly
- Your tub isn’t sneakily set to “Sleep” or “Economy” mode, which only heats during filtration cycles.
- The temperature is set to your perfect soaking sweet spot—usually between 100°F and 104°F.
- No timers or schedules are battling against your heating wishes.
Check water level and top up if needed
- Fill your tub until water covers all jets—about 1-2 inches above the highest jet usually does the trick.
- Make sure the water completely covers the filter intake.
- After topping up, run those jets briefly to burp out any air bubbles that might block water flow.
Do’s and Don’ts for startup settings
Do’s
- Do verify all pumps are happily humming along
- Do ensure the control panel responds to your touch
- Do give your refilled tub 4-6 hours to start warming up
- Do keep that cover snugly closed during heating
- Do check that all valves are fully open
Don’ts
- Don’t try heating an empty or half-filled tub (it will throw a fit!)
- Don’t crank temperature above manufacturer limits (usually 104°F)
- Don’t leave air jets bubbling while trying to heat the water
- Don’t repeatedly reset tripping breakers (they’re trying to tell you something!)
- Don’t ignore those flashing error codes (they’re clues!)
Clean or Replace Filters to Improve Water Flow
How dirty filters affect heating
- Water struggles to reach your heater
- Your heating element can’t efficiently warm the water
- Pressure switches get confused and trigger safety shutdowns
- “Cold spots” form where water barely circulates
- Your once-toasty tub turns disappointingly lukewarm
- Early pump burnout (expensive to replace!)
- Sky-high energy bills
- Shorter overall hot tub lifespan
- Cloudy, uninviting water
Step-by-step: How to clean your hot tub filter
- Cut all power to your hot tub at the breaker (safety first!)
- Pop off the filter cover or access panel
- Remove the filter cartridge by unscrewing or pulling it free
- Spray it down with a garden hose, working top to bottom in a zigzag pattern
- For a deep clean, soak it in a specialized cleaning solution for 8-12 hours
- Give it another thorough rinse after soaking
- Let it dry completely (this step matters!)
- Reinstall and power everything back up
When to replace your filter
- Tears or cracks in the pleated material
- Pleats that stay smooshed together even after cleaning
- Stubborn discoloration that won’t wash away
- Loose or detached end caps
- Poor water flow despite your best cleaning efforts
Recommended filter cleaning products
| Product Type | Function | Usage Frequency |
|---|---|---|
| Filter Rinse Spray | Quick cleaning between deep cleans | Weekly |
| Enzyme Filter Cleaner | Breaks down oils and organic material | Monthly |
| Filter Deep Clean Solution | Removes minerals and stubborn residues | Quarterly |
| Filter Soak Container | Holds filter and cleaning solution | As needed |
Do’s and Don’ts of Filter Maintenance:
Do’s
- Do clean filters regularly (every 2-4 weeks)
- Do keep a spare filter on hand
- Do allow filters to dry completely
- Do deep clean quarterly
- Do rinse after each deep clean
Don’ts
- Don’t use household cleaners on spa filters
- Don’t use high-pressure washers (damages pleats)
- Don’t reinstall wet filters (promotes mold)
- Don’t wait until heating issues occur to clean
- Don’t bend or damage filter pleats during cleaning
Inspect for Airlocks and Circulation Issues
Air trapped in your plumbing system
How airlocks form after refilling
Airlocks typically occur during or after refilling
- During the splash and dash of draining and refilling
- After topping up water that’s vanished through evaporation
- Following any poking around for repairs or maintenance
- When pumps haven’t been properly primed during startup
How to remove air from the system
- Cut power to your hot tub (safety first!)
- Find your circulation pump (the heart of your system)
- Gently loosen the union fitting on the pump’s discharge side (don’t remove it!)
- Listen for the satisfying hiss of escaping air and watch for water to start dribbling out
- Once water flows steadily, snug that union back up
- Power up and check if your tub is back in business
- Play with your jets! Turn them on and off at high speed repeatedly to force air bubbles to scram
- Pop out the filter and run the system briefly for a quick flush
- Get crafty with a shop vacuum on “blow” mode at the filter housing to push that air right out
Signs of poor circulation
- Hot and cold spots that make your tub feel like a temperature puzzle
- Jets that puff rather than power when turned on
- Your pump making weird sounds (humming, grinding, or gurgling)
- Heater that keeps throwing in the towel and shutting off
- Control panel flashing error codes about flow or pressure
Do’s and Don’ts for Circulation Issues
Do’s
- Do bleed air from the system after each refill
- Do check for kinked or crushed plumbing lines
- Do listen for unusual pump noises
- Do ensure all valves are fully open
Don’ts
- Don’t run the heater with known circulation issues
- Don’t overtighten union fittings
- Don’t ignore error codes on your display
- Don’t leave the system running with airlocks
Test the Heater and Sensors
heater element and temperature sensors
How to identify a faulty heater
- Your jets and pumps run perfectly, but your water stays chilly as a winter morning
- Circuit breakers trip like clockwork whenever the heater kicks on
- Heater terminals look rusty, discolored, or damaged
- Strange clicking sounds coming from the heater housing (it shouldn’t be making percussion music!)
- That unmistakable burning smell near your equipment area (never a good sign!)
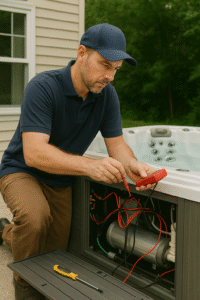
- Kill all power at the breaker (this is super important!)
- Find the heater in your equipment area (usually looks like a metal tube with electrical connections)
- Use a multimeter to check for continuity across the heater terminals
- If your meter shows infinity or “OL,” your heating element has likely gone to hot tub heaven
Common sensor error codes and meanings
| Error Code | What It’s Complaining About | How to Make It Happy Again |
|---|---|---|
| OH/OHH | “Help! I’m overheating!” | Check water flow, clean those filters |
| FLO/FL | “Water’s not moving properly!” | Check pump, chase out those airlocks |
| SN/SNS | “My sensors can’t feel anything!” | Check sensor connections |
| HL/HFL | “I hit my temperature limit!” | Let it cool down, then check water flow |
| dr/dry | “I’m thirsty!” | Add water to proper level |
Do’s and Don’ts when testing electrical parts
Do’s
- Do disconnect ALL power before playing electrician
- Do use proper testing equipment
- Do take before photos of wire connections
- Do check for crusty corrosion on connections
- Do check your manual for specific error codes
Don’ts
- Don’t touch components with wet hands (water + electricity = bad day)
- Don’t bypass safety features (they exist for a reason!)
- Don’t play the guessing game with wire connections
- Don’t force connectors that don’t want to go together
- Don’t ignore breakers that keep tripping (they’re sending SOS signals!)
Recommendations for Hot Tub Heating Products
Insulated Spa Cover
high-quality insulated coverFeatures to Look For:
| Feature | Benefit |
|---|---|
| Thickness (4-5 inches) | Better insulation (thicker = toastier!) |
| Marine-grade vinyl | Stands up to weather and won’t crack or peel |
| Tapered design | Sends rain and snow sliding off instead of pooling |
| Reinforced foam core | Stays firm and won’t sag in the middle |
| Tight-sealing gaskets | Keeps steam and heat from sneaking out |
Pros and Cons:
Pros
- Slashes heating bills by 50-70% (wow!)
- Your heater lives longer (less hard work!)
- Keeps leaves and critters out
Cons
- Costs $300-600 upfront
- Needs replacement every 3-5 years
- Can be heavy to lift without a cover lifter
Floating Spa Blanket
Key Specifications:
| Specification | Details |
|---|---|
| Material | UV-stabilized polyethylene (fancy talk for “sun-proof plastic”) |
| Thickness | 8-16 mil (like a sturdy plastic sheet) |
| Design | Bubble-wrap or solar-cell pattern (bubbles trap heat!) |
| Size | Customizable to fit your tub’s unique shape |
Pros and Cons:
Pros
- Budget-friendly ($50-100)
- Cuts evaporation by a whopping 95%
- Trims heating costs by 10-15%
Cons
- You’ll need to remove it before hopping in
- One more thing to store somewhere
- Typically needs yearly replacement
Digital Thermostat Upgrade
Key Features:
| Feature | Function |
|---|---|
| Precision sensors | Keeps temperature accurate within half a degree |
| Programmable cycles | Heats during cheaper off-peak hours (hello, savings!) |
| Smart controls | Adjust temperature from your phone while still in bed! |
| Energy efficiency modes | Learns your usage patterns and heats accordingly |
Pros and Cons:
Pros
- Temperature is spot-on accurate
- Can trim energy bills by 15-20%
- Tells you exactly what’s wrong when issues pop up
Cons
- Installation can be tricky
- Costs between $150-400
- Might need a pro to install it right
Final Thoughts
FAQs
Q1. Why isn’t my hot tub heating up properly?Q2. How long should it take for my hot tub to heat up after refilling?Q3. What should I do if my hot tub’s heater keeps shutting off?Q4. How often should I clean or replace my hot tub filter?Q5. Can upgrading my hot tub accessories improve heating efficiency?


