

Table of Contents - Wood Fired Hot Tub Guide: Heat, Setup & Winter Care
This blog post may contain affiliate links. As an Amazon Associate I earn from qualifying purchases.
A wood-fired hot tub can reach soaking temperature in as little as 2 hours — no electricity, no monthly energy bills, just fire and water doing what they’ve done for centuries. Whether you’re buying your first tub, building one from a kit, or struggling to get yours up to temperature, this wood fired hot tub guide covers every step.
Most guides stop at “add wood and wait.” They don’t tell you which wood to use, how to stack it for maximum heat, what foundation your tub needs, or how to drain it before the first hard freeze — the details that determine whether your investment lasts 2 years or 20. By the end of this guide, you’ll know exactly how to choose, set up, fire up, and maintain a wood-fired hot tub through every season.
This wood fired hot tub guide highlights that a tub heats to a safe soaking temperature of 100–102°F (37–39°C) in 2–4 hours using only dry, seasoned hardwood — no electricity required.
- Heating time: 2–4 hours with seasoned hardwood; an insulated cover cuts this significantly
- Safe temperature limit: Never exceed 104°F (40°C) per CDC guidelines
- Best wood: Seasoned hardwoods (oak, ash, maple) with <20% moisture burn hotter and cleaner
- The Heat-to-Soak Cycle: Master the 6-step lighting routine once and every session becomes effortless
- Maintenance reality: Without a filtration system, simply drain every 2–3 days — no complex chemicals needed
How a Wood Fired Hot Tub Works
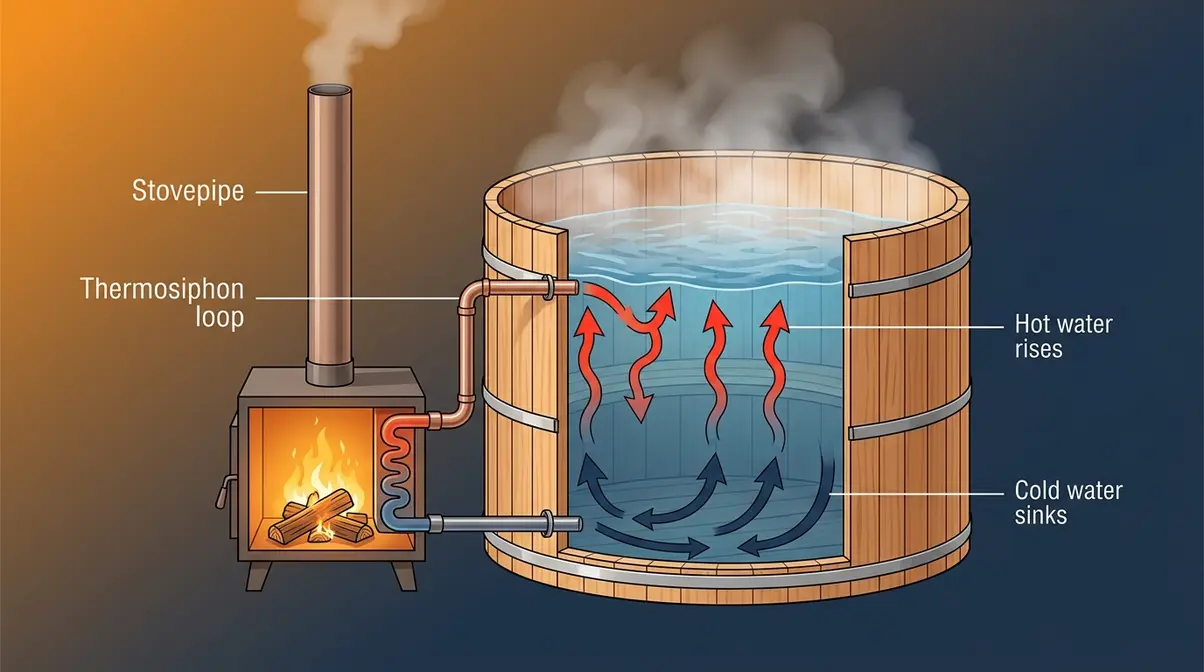
Welcome to the core of this wood fired hot tub guide: understanding the mechanics. A wood-fired hot tub is a self-contained soaking vessel heated entirely by burning wood — no electrical hookup, no circuit boards, no monthly utility spike. It operates through a beautifully simple principle: fire heats water, and heated water circulates naturally through the tub. For practically-minded homeowners who want a low-tech, off-grid soaking experience, this mechanism is both the appeal and the practical advantage. Understanding how it works before you buy or build saves you from common setup mistakes that cost time and money.
A wood-fired hot tub requires zero electricity — it heats entirely through thermosiphon convection, the same natural water circulation principle used in traditional Nordic bath houses.
Heating System Mechanics
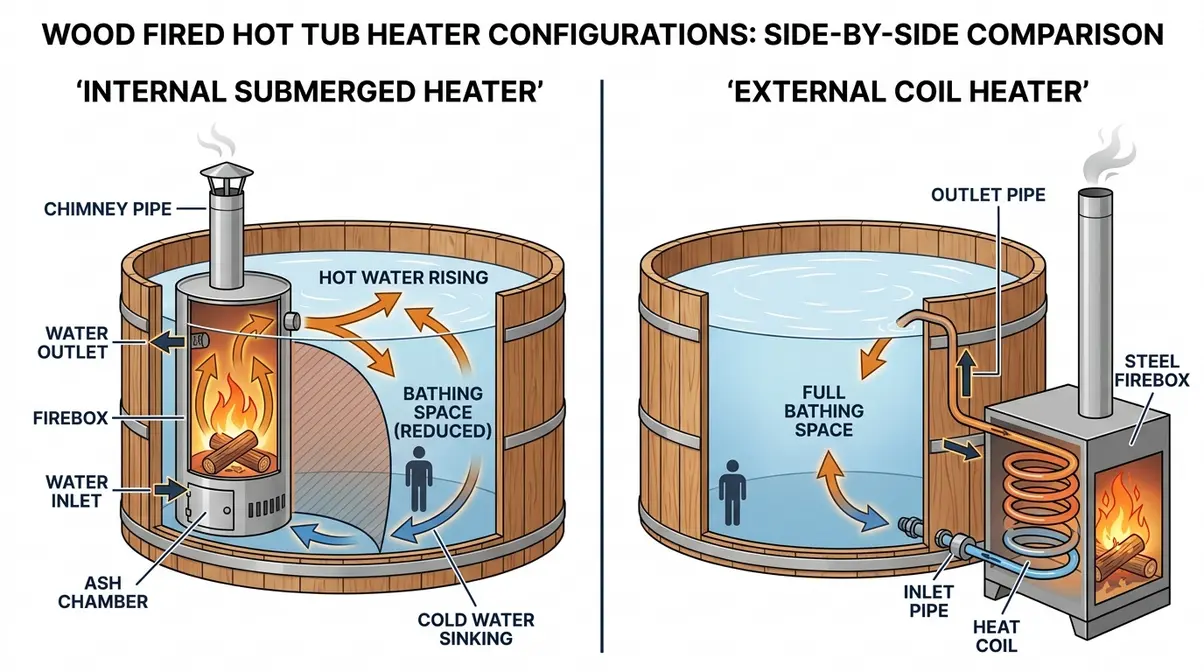
The wood fired hot tub heater — whether submerged or external — works through thermosiphon convection: the natural process by which cold water sinks toward the heat source and hot water rises to the surface, circulating the entire tub without a pump. Think of it like a lava lamp, but with water and heat instead of wax. As long as the fire burns, this loop runs continuously and silently.
You’ll encounter two heater configurations when shopping or building:
Internal submerged heater: The firebox sits directly inside the tub. Because the heat source is in direct contact with the water, this configuration heats approximately 10–15 minutes faster than the external alternative. The trade-off is reduced bathing space and the need to remove ash from inside the tub after each session. Internal heaters are more common in entry-level DIY kits because they’re mechanically simpler and less expensive to source.
External coil heater: The firebox sits beside the tub. Water circulates through a metal coil — absorbing heat, then returning to the tub through a thermosiphon loop. This configuration maximizes bathing space (no firebox competing with your legs) and simplifies ash management. It adds roughly 15–20 minutes to heat-up time. Most premium cedar tubs and higher-end DIY kits use this approach.
As the diagram above illustrates, the two configurations differ significantly in layout and maintenance requirements. If you’re buying a pre-built tub for two or more people, the external heater is the better choice for usable soaking space. If you’re building a DIY kit on a tight budget, an internal heater is simpler to assemble and cheaper to replace.
Understanding which heater configuration your tub uses isn’t just academic — it determines your maintenance routine, heating time, and how many people can comfortably soak. With that foundation in place, let’s look at how wood-fired tubs compare to their electric counterparts.
Wood Fired vs. Electric Tubs
The honest comparison most buyers need comes down to four factors: upfront cost, ongoing cost, convenience, and experience. Wood-fired tubs win decisively on the first two; electric tubs win on the third. The fourth is a matter of preference — though experienced owners consistently report that the ritual of building a fire adds to the experience rather than subtracting from it.
| Factor | Wood-Fired Hot Tub | Electric Hot Tub |
|---|---|---|
| Upfront Cost | $500–$5,000+ | $3,000–$16,000+ |
| Monthly Energy Cost | ~$0 (wood only) | $50–$150/month |
| Heat-Up Time | 2–4 hours (active) | 1–4 hours (passive, thermostat-set) |
| Maintenance Complexity | Low (drain-based) | Higher (chemicals, pumps, filters) |
| Off-Grid Capability | Yes | No |
| Lifespan (cedar) | 15–20 years | 5–10 years (jets/electronics) |
| Portability | High | Low |
The CDC guidelines on safe hot tub temperatures apply equally to both types: water should never exceed 104°F (40°C) to prevent heat-related illness (CDC, 2026). The key difference is that electric tubs maintain temperature automatically, while a wood-fired tub requires you to monitor it actively — a responsibility that takes roughly 5 minutes of attention per session once you understand The Heat-to-Soak Cycle (covered in full in the heating section).
The primary trade-off is time investment upfront versus cost investment ongoing. For cabin owners, rural properties, or anyone who wants a soaking experience disconnected from the power grid, wood-fired tubs are the clear practical choice.
Choosing Your Wood Fired Hot Tub
Choosing the right wood-fired hot tub comes down to three decisions: what material, what size, and what budget. Getting any one of these wrong leads to either a tub that deteriorates faster than expected or one that doesn’t fit your actual use pattern. Across wood-fired hot tub communities, the consistent finding is that buyers who spend 20 minutes on these three questions before purchasing avoid the most common and most expensive mistakes.
Tub Material Comparison
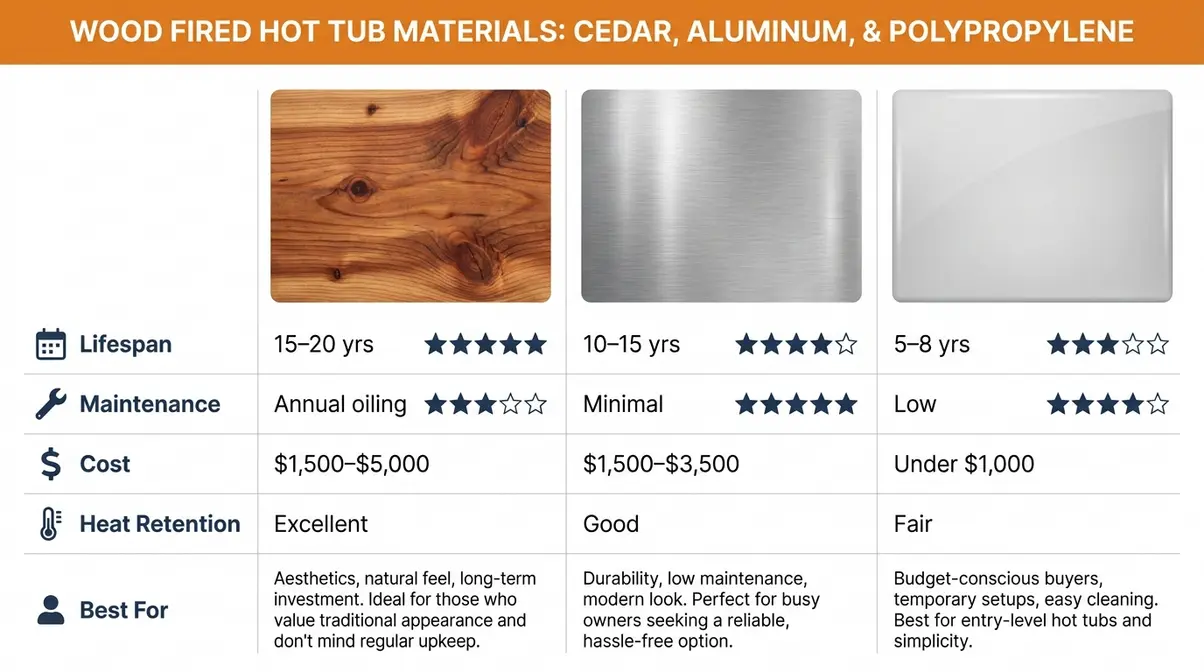
Material choice is the single biggest factor in your tub’s lifespan, maintenance burden, and total cost of ownership. Each material has a legitimate use case — the right one depends on your climate, budget, and how long you plan to keep the tub.
Cedar is the traditional choice and remains the most popular. It’s naturally rot-resistant, thermally insulating (meaning it loses heat more slowly than metal), and aesthetically appealing. According to woodworking experts at Bob Vila, cedar’s natural rot resistance means it can last 15-20 years outdoors. Cedar requires annual re-oiling or sanding to prevent drying and cracking, particularly in low-humidity climates. In wet climates, untreated cedar can develop mildew without proper drainage and air circulation.
“Wood burning hot tubs made of cedar can last 15-20 years with proper care, thanks to the naturally durable and decay-resistant properties of the wood.”
Aluminum tubs (such as those from Alumitubs) are the low-maintenance alternative. They don’t rot, don’t crack, and don’t require seasonal sealing. Heat-up time is slightly faster because metal conducts heat more efficiently than wood. The trade-off: aluminum loses heat faster when the fire dies down, and the aesthetic is more industrial than rustic. Aluminum tubs typically cost $1,500–$3,500 and suit buyers who prioritize durability over traditional aesthetics.
Polypropylene (molded plastic) tubs are the budget entry point. They’re lightweight, easy to install, and often available in kit form for under $1,000. They’re less durable than cedar or aluminum — UV exposure and temperature cycling can cause cracking over 5–8 years. For seasonal use or buyers testing the wood-fired experience before committing to a premium tub, polypropylene is a reasonable starting point.
Sizing and Shape Guide
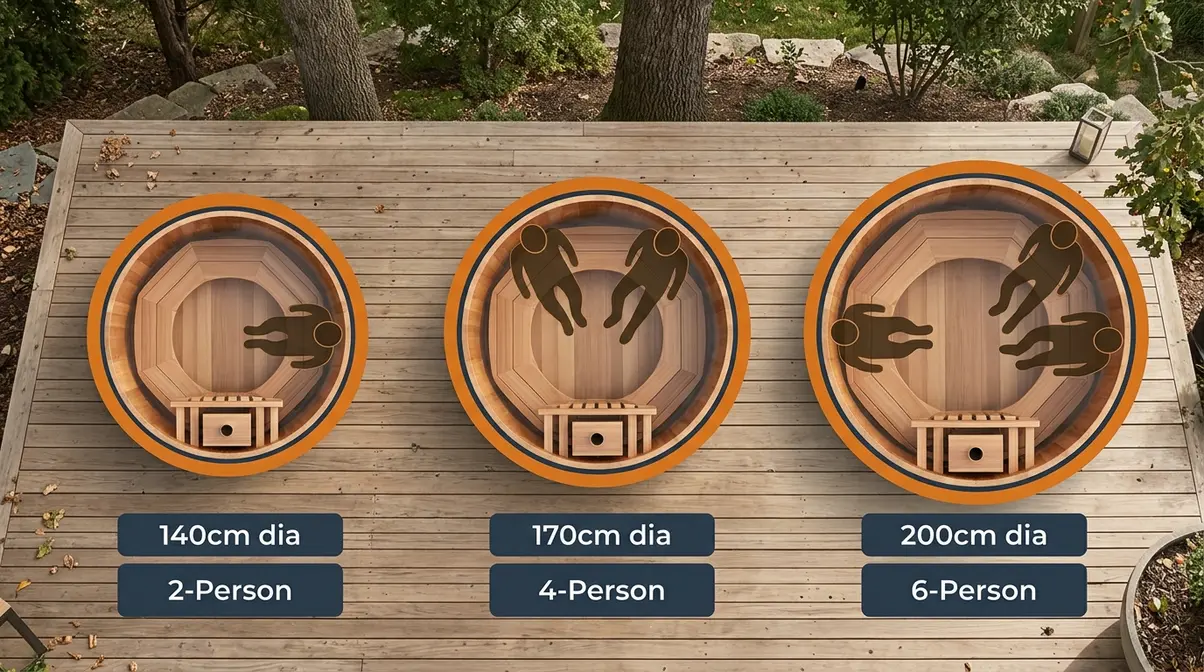
The most common sizing mistake is buying a tub based on its listed capacity rather than its actual interior dimensions. A tub listed as “4-person” with an internal heater may comfortably fit only 2–3 adults once the firebox occupies its share of space.
A practical rule used across the hot tub owner community: subtract one from the listed capacity if the tub has an internal heater, and measure the interior diameter before purchasing.
| Capacity Listed | Realistic Comfortable Fit | Typical Interior Diameter |
|---|---|---|
| 2-person | 1–2 adults | 140–150 cm (4.5–5 ft) |
| 4-person | 3–4 adults | 160–180 cm (5.2–5.9 ft) |
| 6-person | 4–5 adults | 190–210 cm (6.2–6.9 ft) |
Round tubs are the most common shape for wood-fired models because the circular form distributes thermosiphon convection evenly and is structurally simpler to build. Oval and rectangular tubs exist but are rarer and typically more expensive.
For a 2-person tub used primarily by a couple, a 140–150 cm round tub with an external heater is the sweet spot — comfortable, fast to heat, and manageable on standard-sized decks. For family use or entertaining, step up to 180 cm or larger.
Budget and Price Points
Wood-fired hot tubs span a wider price range than most buyers expect. Here’s what your budget actually buys at each tier:
| Budget Tier | Price Range | What You Get |
|---|---|---|
| Entry-Level | $500–$1,500 | DIY polypropylene or basic cedar kit, internal heater, minimal accessories |
| Mid-Range | $1,500–$3,500 | Pre-built cedar or aluminum tub, external heater, basic cover included |
| Premium | $3,500–$5,000+ | Premium cedar construction, external coil heater, insulated cover, jets optional |
Cheap wood fired hot tub options in the $500–$1,000 range are almost exclusively DIY kits — which is fine if you have basic carpentry skills and a weekend. For buyers who want a ready-to-fill tub, budget a minimum of $1,800–$2,500 for a quality pre-built unit with a decent cover. Factor in $200–$400 for a cover (essential for heat retention and safety) and $100–$300 for the foundation if you don’t have an existing pad.
DIY Wood Fired Hot Tub Builds
Building a wood-fired hot tub yourself is genuinely achievable for a homeowner with basic skills — but the effort and complexity vary dramatically between building from a kit and building from scratch. Our evaluation of multiple DIY approaches found that kit builds are appropriate for most homeowners, while scratch builds make sense only in specific circumstances.
What a Tub Kit Includes
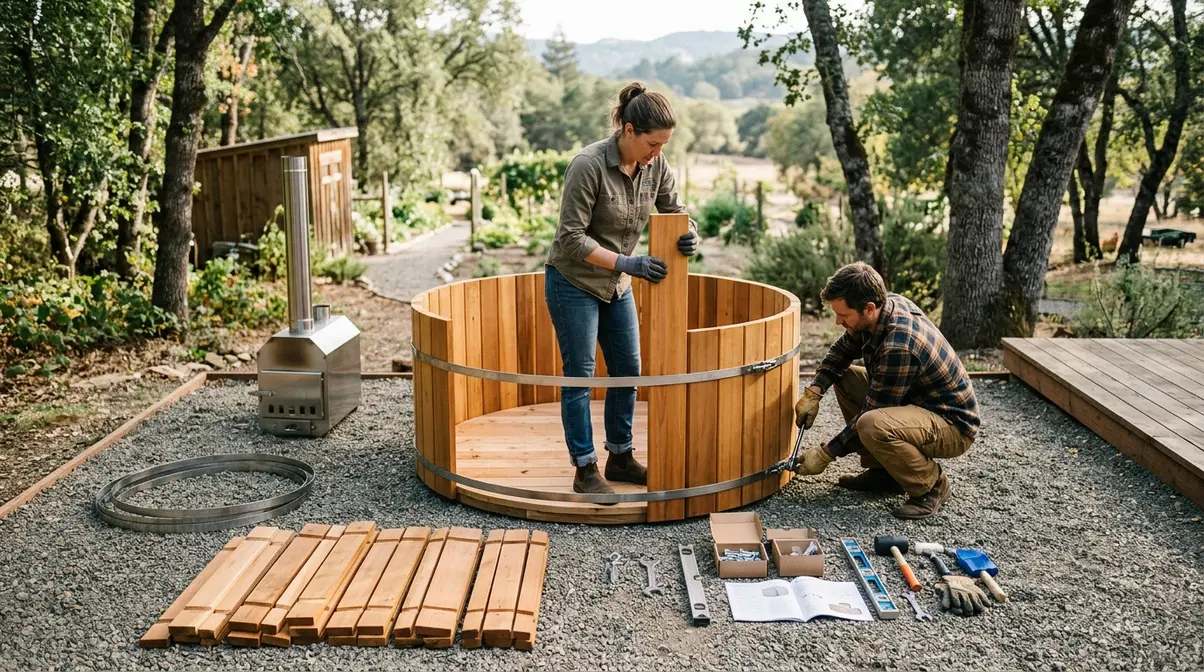
A wood fired hot tub kit typically includes the structural components needed to assemble the tub shell and connect the heating system. What’s included varies by manufacturer, so read the parts list carefully before ordering.
- Most kits include:
- Pre-cut stave boards (cedar or polypropylene) for the tub walls
- Metal hoops or straps for structural tension
- A base/floor assembly
- The heater unit (internal or external coil)
- Chimney pipe sections
- Seating bench (sometimes optional)
- Assembly hardware and instructions
- Most kits do NOT include:
- Foundation materials (gravel, concrete, timber frame)
- Garden hose or fill system
- Water treatment chemicals
- Cover (often sold separately — budget $200–$400)
- Tools (drill, mallet, level, pipe wrench)
The Field Mag DIY wood-fired hot tub guide is one of the most thorough community resources for understanding what kit assembly actually involves — including the tool requirements that manufacturers often understate.
Building from a Kit
- Prerequisites / What You’ll Need:
- Basic carpentry tools (drill, mallet, level, tape measure)
- 2–3 hours of uninterrupted time for assembly
- A helper for the wall-raising step
- A level, compacted foundation (see H2 #4 for specs)
- Garden hose for initial fill and leak testing
Build Steps:
- Prepare your foundation. Lay a level, compacted gravel pad or concrete slab rated to support the filled weight of your tub (water weighs 8.34 lbs per gallon — a 300-gallon tub fully loaded exceeds 2,500 lbs). Do not skip this step.
- Assemble the floor. Lay the base boards or pre-cut floor panel. Ensure it is level in all directions before proceeding — a 1-cm variance in a circular tub causes wall misalignment.
- Stack the stave boards. Stand the pre-cut wall boards vertically around the perimeter, tongue-and-groove edge to edge. A helper holds each board while you position the next.
- Tension the hoops. Slide the metal hoops over the assembled walls and tighten with the provided hardware. Start from the bottom hoop and work upward. Tighten in stages — over-tightening one hoop before the others are seated can crack boards.
- Install the heater. Connect the heater unit (internal or external) per the manufacturer’s instructions. For external heaters, attach the inlet and outlet pipes to the tub wall fittings, ensuring a watertight seal with the provided gaskets.
- Install the chimney. Assemble chimney sections and ensure the flue clears any overhead structures by at least 1 meter (3.3 ft).
- Fill and leak test. Fill the tub with water before lighting any fire. Check all pipe fittings, floor seams, and wall joints for leaks. New cedar tubs will seep slightly for the first 24–48 hours as the wood swells — this is normal and typically self-seals.
- First fire (low and slow). Light a small fire only after the tub is fully filled. A low first burn cures the heater and lets you confirm the thermosiphon circulation is working before committing to a full heat-up session.
DIY Scratch Builds
Building a wood-fired hot tub from scratch — sourcing your own lumber, fabricating the heater, cutting staves — is cheaper on materials but significantly more demanding in skill and time. Common pain points reported by first-time scratch builders include: sourcing food-grade sealant for floor joints, fabricating a leak-free heater connection, and achieving the tension required to make a stave-wall tub watertight.
- Scratch builds make sense if:
- You have woodworking experience (joinery, stave-cutting)
- You have access to a metal shop for heater fabrication
- Your budget is under $500 and you have significant time available
- Stick with a kit if:
- This is your first build
- You want a tub ready to use within a weekend
- You want manufacturer support if something doesn’t seal correctly
For most homeowners, the $300–$600 premium of a kit over raw materials is worth the engineered fit, manufacturer instructions, and reduced risk of a leak that won’t self-seal.
Site Prep and Maintenance
Getting your site right before the tub arrives prevents the most expensive post-installation problems: foundation settling, drainage issues, and premature wood rot. Our evaluation of multiple installation approaches found that homeowners who invest an extra day in site preparation consistently report fewer problems in years two and three of ownership.
Location and Foundation
Three non-negotiable location requirements:
- Level ground: The foundation must be level within 1 cm across the entire diameter. Even a small slope causes uneven wall stress and, eventually, leaks.
- Drainage: Position the tub so that drainage (when you empty it) flows away from the structure and doesn’t pool under the tub base. Standing water under a cedar tub accelerates rot.
- Access: You need clear access to the firebox door (typically 60–90 cm clearance) for loading wood and ash removal. Plan for this before you finalize position.
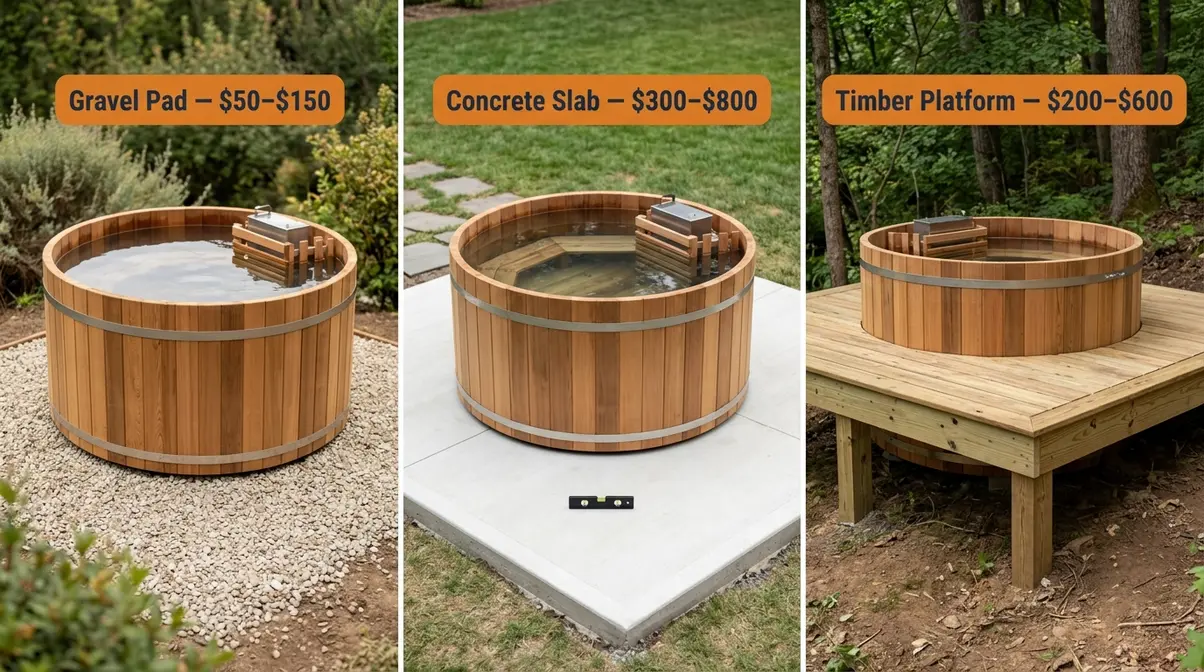
Foundation options and their practical trade-offs:
| Foundation Type | Load Capacity | Cost | Best For |
|---|---|---|---|
| Compacted gravel pad (15 cm deep) | Adequate for most tubs | $50–$150 DIY | Seasonal use, rural properties |
| Concrete slab (10 cm thick) | Highest — recommended for 4+ person tubs | $300–$800 | Year-round use, heavy tubs |
| Treated timber deck/platform | Good — check joist rating | $200–$600 | Elevated installations |
Never place a filled wood-fired hot tub on an unchecked deck without confirming the joist load rating. A 300-gallon tub with occupants exceeds 3,000 lbs — most residential decks are built to 40 lbs per square foot, which may be insufficient without reinforcement.
Water and Filtration
Fill your tub using a standard garden hose. The fill time for a 300-gallon tub is approximately 20–30 minutes. Always fill completely before lighting any fire — this is a safety-critical rule covered in detail in H2 #6.
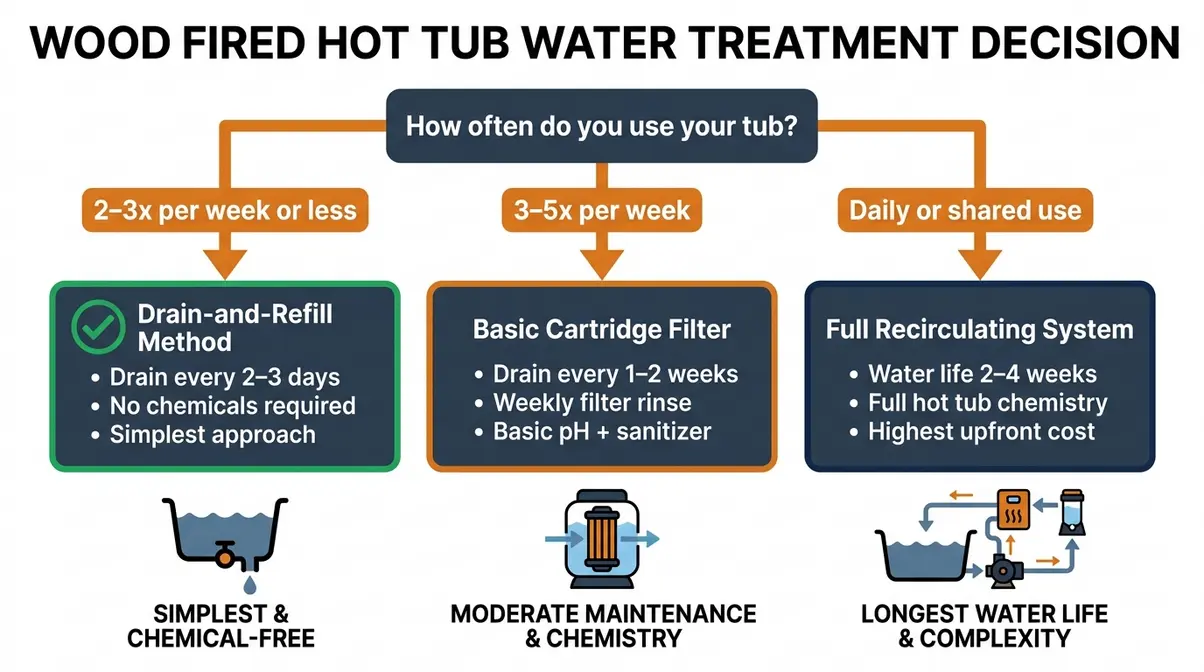
Wood-fired hot tubs don’t require a filtration system the way electric hot tubs do — but your choice of filtration approach determines your drain schedule and chemical load.
- No filtration (drain-and-refill method): Drain every 2–3 days with regular use. No chemical maintenance. Simplest approach — favored by owners using their tub 2–3 times per week.
- Basic cartridge filter: Extends drain interval to 1–2 weeks. Requires weekly filter rinse and basic pH/sanitizer management (chlorine or bromine).
- Full recirculating system: Available on premium and some mid-range models. Extends water life to 2–4 weeks. Requires standard hot tub chemistry management.
Do I Need a Filtration System?
A filtration system is optional for wood-fired hot tubs, not a requirement. Without one, simply drain and refill every 2–3 days of use — a practical and chemical-free approach favored by owners who use their tub 2–4 times per week. A basic cartridge filter extends the drain interval to 1–2 weeks and requires standard pH and sanitizer management. Full recirculating systems extend water life to 2–4 weeks but add cost and complexity. For most owners, the drain-and-refill method is the simplest and most reliable starting point.
Cleaning and Drain Schedule
Drain-and-refill cleaning protocol (every 2–3 days of use):
- Allow the tub to cool to below 40°C before draining (hot water can damage some drain fittings and hoses).
- Open the drain valve (typically located at the base of the tub) and direct water away from the foundation.
- While the tub drains, wipe down the interior walls with a soft cloth — no abrasive cleaners on cedar.
- Rinse the interior with clean water before refilling.
- For cedar tubs: inspect the interior annually for any soft spots or discoloration indicating early rot. Address immediately with a food-safe wood treatment.
If your tub has an internal heater, remove ash from the firebox after every 2–3 sessions. Accumulated ash restricts airflow and reduces heating efficiency noticeably. For a deeper dive into general care, read our guide on how to maintain a hot tub for longevity and enjoyment.
Winterizing Your Tub
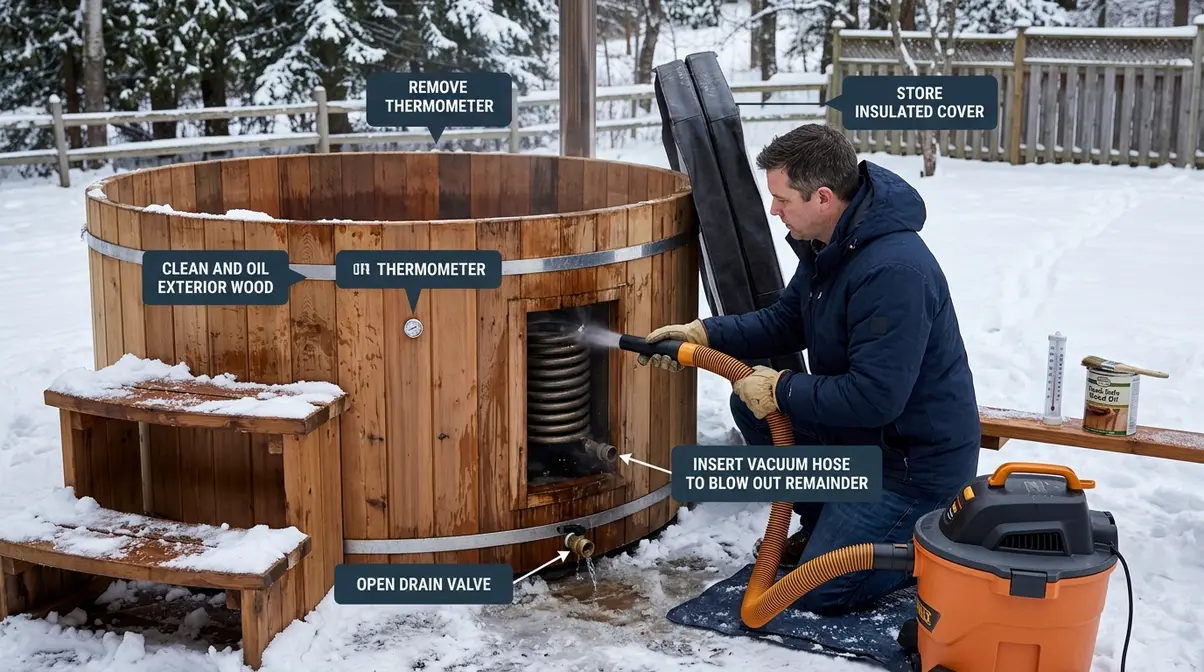
Winterization is the maintenance step most first-time owners skip — and the one that causes the most expensive damage. Water left in pipes, fittings, and the heater coil expands when it freezes, cracking components that cost hundreds of dollars to replace.
Complete winterization checklist:
- [ ] Drain completely. Open all drain valves and tilt the tub slightly if possible to ensure no water remains in low points.
- [ ] Blow out the lines. For tubs with external heater coils, use a shop vac or compressed air to clear any residual water from the inlet/outlet pipes and the coil itself.
- [ ] Remove and store the thermometer. Glass thermometers crack in hard freezes.
- [ ] Cover the firebox opening. Prevent moisture and debris from entering the heater during off-season storage.
- [ ] Apply an insulated cover. Your cover should have a minimum R-value of R-5 (R-value is a measure of thermal resistance — higher numbers mean better insulation). An R-10 cover is recommended for climates that experience temperatures below -10°C (14°F).
- [ ] Inspect all wood surfaces. Apply a food-safe wood oil to cedar surfaces before winter to prevent drying and cracking in cold, dry conditions.
- [ ] Elevate the tub base if possible. If your tub sits on a wooden platform, ensure drainage channels are clear to prevent ice formation under the base.
For year-round use in cold climates, some owners keep a small maintenance fire burning every few days to prevent freezing — this works but requires active management. The complete drain approach is safer and more reliable for owners who won’t use the tub for 4+ weeks. If you need broader advice for different tub types, check out our complete guide on how to winterize a hot tub.
Step-by-Step Heating Operation
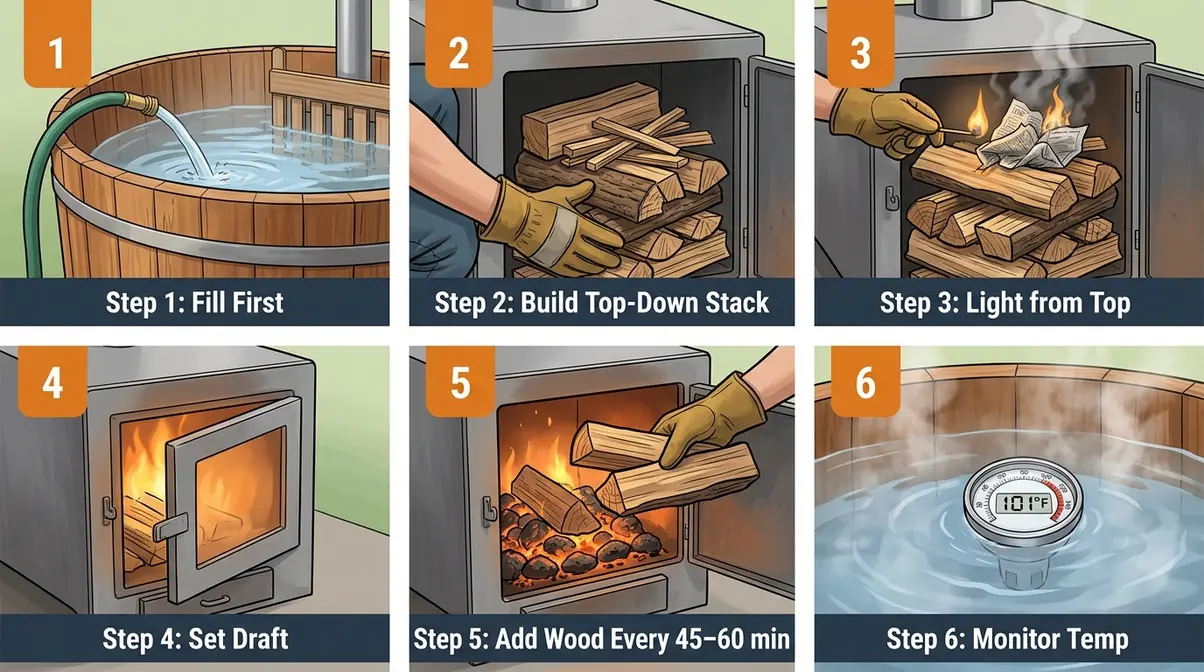
This is the section most guides skim over — and the one that determines whether your first session is a success or a frustrating 4-hour wait. The Heat-to-Soak Cycle is the end-to-end process of getting your tub from cold water to safe soaking temperature: wood selection, fire construction, heat management, and temperature monitoring. Master it once, and every subsequent session becomes a reliable, repeatable routine.
Heating Time Expectations
A wood-fired hot tub typically takes 2–4 hours to reach soaking temperature, depending on starting water temperature, tub volume, and wood quality. A 300-gallon tub starting at cold tap water (50°F/10°C) takes 3–4 hours with seasoned hardwood. Starting with warmer water on a summer day cuts this to 2–2.5 hours. Keeping an insulated cover on during the heat-up phase reduces heating time by 30–45 minutes. Wet or softwood can extend the process to 5+ hours — the single most common cause of disappointing first sessions.
Choosing the Right Wood
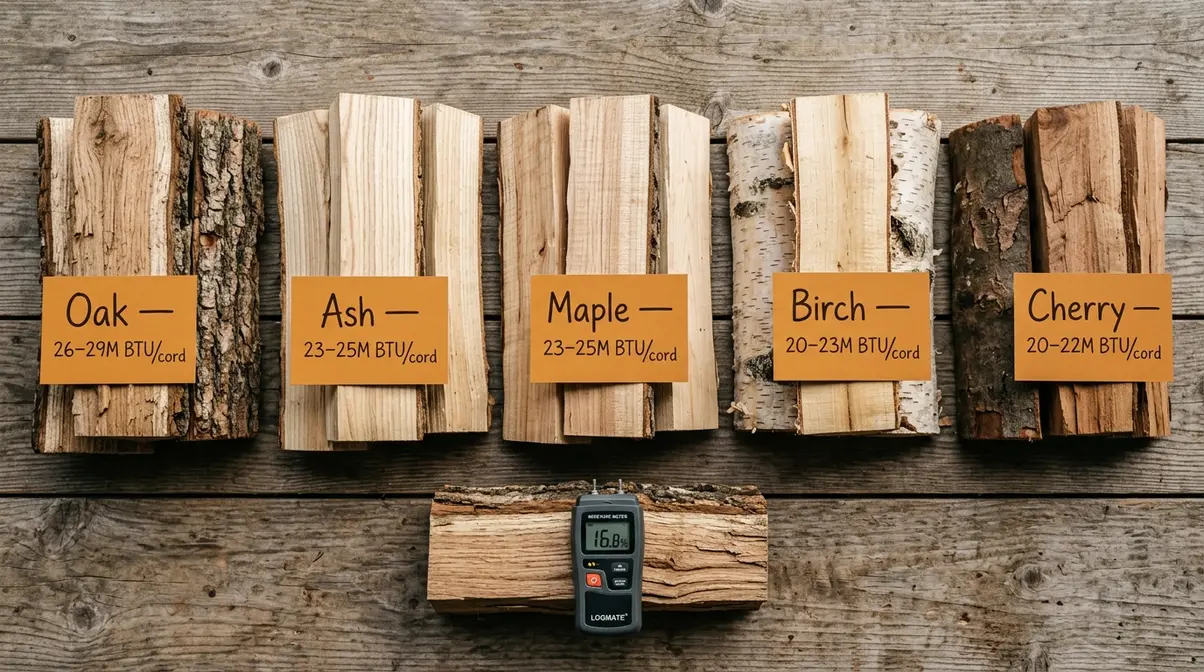
Wood selection is the most commonly underestimated factor in heating performance. The wrong wood — green (freshly cut), resinous, or softwood — burns cooler, produces more smoke, and leaves more creosote (a flammable residue) in your chimney than seasoned hardwood.
The EPA’s Burn Wise program recommends using only dry, seasoned wood with a moisture content below 20% for clean, efficient burning — EPA Burn Wise guidelines confirm that wet wood produces up to 3x more smoke and particulate matter than properly dried wood (EPA, 2026).
Best hardwoods for wood-fired hot tubs:
| Wood Type | Heat Output (BTU/cord) | Burn Time | Notes |
|---|---|---|---|
| Oak | 26–29 million | Long | Excellent — dense, hot, slow-burning |
| Ash | 23–25 million | Long | Easy to split, lights readily |
| Maple | 23–25 million | Long | Consistent heat output |
| Birch | 20–23 million | Medium | Good starter wood, pleasant smell |
| Cherry | 20–22 million | Medium | Burns clean, mild aroma |
- Avoid entirely:
- Green/unseasoned wood (moisture >20%): burns cool, produces excessive smoke, takes 2x longer to heat your tub
- Softwoods (pine, spruce, fir): high resin content accelerates chimney creosote buildup
- Painted, treated, or composite wood: toxic fumes when burned — a serious health hazard
- Driftwood: high salt content corrodes metal heater components
A simple moisture meter (available for $15–$25) is the most practical tool for confirming your wood is ready to burn. Experienced owners recommend keeping at least a 6-month supply of split hardwood stored under cover to ensure it’s always within range.
How to Light the Fire
The top-down burn method is the technique experienced owners consistently recommend for wood-fired hot tubs. Unlike the traditional bottom-up approach (kindling at the bottom, logs on top), the top-down method pre-heats the flue before the main fuel ignites — reducing smoke by roughly half in the critical first 10–15 minutes of a burn (a finding consistent across multiple wood-burning communities).
- Prerequisites / What You’ll Need:
- Estimated Time: 2-4 hours
- Tools & Materials:
- Seasoned hardwood (15–20 kg for a standard first heat-up)
- Dry kindling (small sticks, 1–2 cm diameter)
- Fire starters or newspaper (natural, not petroleum-based)
- A floating thermometer
- A poker or long-handled tool for fire management
- A bucket of water nearby (safety requirement)
The 6-Step Heat-to-Soak Cycle:
Step 1: Fill the tub completely before lighting
This is non-negotiable — a wood fired hot tub heater that ignites without water will overheat and suffer permanent damage within minutes. Confirm the water level covers the inlet port of the heater before striking a match.
- Step 2: Build your fire stack (top-down method)
- Bottom layer: 3–4 large hardwood logs (8–10 cm diameter), placed parallel
- Middle layer: 4–6 medium splits (4–6 cm diameter), perpendicular to bottom layer
- Top layer: A generous handful of dry kindling (1–2 cm sticks)
- Very top: 2–3 fire starters or crumpled natural newspaper
Step 3: Light from the top
Ignite the fire starters or newspaper at the very top of the stack. The fire burns downward, pre-heating the flue and the layers below before the main logs ignite. Resist the urge to add more kindling — the top-down method works through patience.
Step 4: Establish draft and close the door
Once the kindling is burning steadily (3–5 minutes), close the firebox door to the recommended draft position (typically one-quarter open, per your manufacturer’s instructions). Good draft control is the difference between a hot, efficient fire and a smoldering, smoky one.
Step 5: Add wood in stages
After 45–60 minutes, the initial load will have burned down to a solid coal bed. Add 2–3 medium splits at this point. Repeat every 45–60 minutes. Do not overload the firebox — overfilling restricts airflow and actually slows heating.
Step 6: Monitor temperature every 30 minutes
Use your floating thermometer. Target: 100–102°F (37–39°C) for comfortable soaking. Remove the cover periodically to stir the water and equalize surface and bottom temperatures — thermosiphon convection works continuously, but stirring accelerates even heat distribution across the tub.
While this top-down method is specific to wood, you can learn more about general heating principles in our article on how to heat a hot tub.
Typical Heat-to-Soak timeline for a 300-gallon tub:
| Starting Water Temp | Time to 100°F | Wood Used |
|---|---|---|
| 50°F (10°C) — cold tap | 3–4 hours | 15–20 kg hardwood |
| 65°F (18°C) — warm day | 2–3 hours | 10–15 kg hardwood |
| 80°F (27°C) — pre-warmed | 1–1.5 hours | 6–10 kg hardwood |
Temperature Regulation
Once your tub reaches soaking temperature, the goal shifts from heating to maintaining. This is where the active management aspect of wood-fired ownership differs most from electric tubs.
Target soaking temperature: 100–102°F (37–39°C). This range is comfortable for most adults and provides a safety margin below the 104°F (40°C) limit recommended by health authorities.
How long to heat depends on starting water temperature, ambient air temperature, tub volume, and cover usage. A well-insulated cover (R-5 or higher) left on during the heat-up phase can reduce heating time by 30–45 minutes for a standard 300-gallon tub — this is one of the most impactful and underused efficiency strategies among new owners.
- Temperature regulation during soaking:
- Too hot (approaching 104°F): Open the firebox door fully to reduce combustion rate, or remove some coals with a metal scoop. Add cold water via garden hose to drop temperature quickly if needed.
- Cooling too fast: Add 1–2 splits every 30–45 minutes to maintain temperature. A good coal bed holds heat for 20–30 minutes without additional wood.
- Never leave the fire unattended with the firebox door fully open — this creates a high-draft condition that can overheat the heater.
Heating Troubleshooting
If your wood-fired hot tub is not heating up at the expected rate, the cause is almost always one of five issues:
| Problem | Likely Cause | Fix |
|---|---|---|
| Fire won’t establish | Wet wood, poor draft | Switch to dry hardwood; check chimney clearance |
| Tub heating slowly (>4 hours) | Green wood or softwood | Use seasoned hardwood <20% moisture |
| Steam but no circulation | Thermosiphon blockage | Check inlet/outlet pipes for debris or air lock |
| Temperature plateaus at 85–90°F | Cover off during heat-up | Keep cover on during heating phase |
| Smoke back-drafting into tub area | Chimney too short or obstructed | Add chimney extension; clear obstructions |
Common pain points reported by first-time owners include using wood that “looks dry” but hasn’t been seasoned long enough (minimum 6 months for split hardwood), and starting with the firebox door fully closed — which starves the fire of oxygen in the critical first 10 minutes. Both issues are solved by investing in a moisture meter and following the top-down method draft protocol above. If you’re still stuck, review our quick troubleshooting guide on what to do when a hot tub is not heating.
Safety Rules and Limitations
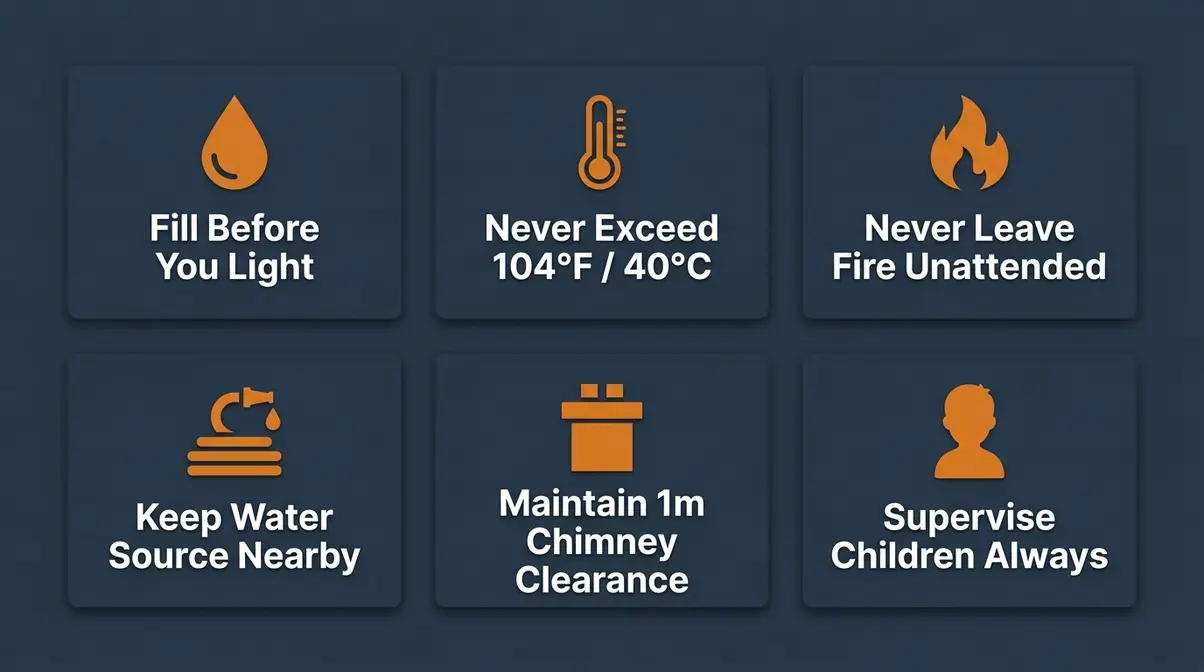
⚠️ SAFETY NOTICE: Wood-fired hot tubs involve fire, high-temperature water, and significant water weight. Read this section in full before your first use. Failure to follow these guidelines can result in serious injury, property damage, or equipment failure.
Wood-fired hot tubs are safe when operated correctly. The risks are real but entirely manageable — and understanding them takes less than 10 minutes.
Critical Safety Rules
These rules apply before every single session — not just the first one:
- Never light the fire before filling the tub with water. This is the most critical rule in wood-fired hot tub ownership. An empty or partially-filled heater will overheat and sustain permanent damage within minutes. Confirm the water level is at or above the heater’s inlet port before igniting.
- Never exceed 104°F (40°C). The CDC advises that hot tub water temperatures should never exceed 104°F (40°C) to prevent heat-related illness, including heat stroke (CDC, 2026). Use a floating thermometer every session. Pregnant women, children under 12, and individuals with cardiovascular conditions should consult a physician before use and should use lower temperatures (98–100°F / 37–38°C maximum).
- Manage the fire actively. Never leave a burning fire unattended with the firebox door open. Keep the firebox door at the manufacturer’s recommended draft position during normal operation.
- Keep a water source nearby. A garden hose or bucket of water should be within reach at all times during operation — for emergency fire control and for rapid temperature reduction if the water becomes too hot.
- Maintain chimney clearance. The chimney top should clear any overhead structure (pergola, tree branches, roof overhang) by a minimum of 1 meter (3.3 ft). Check clearance seasonally as trees grow.
- Supervise children and pets at all times. A wood-fired hot tub is not a self-monitoring appliance. The firebox exterior and chimney reach temperatures that can cause burns on contact.
The CPSC recommends that all hot tub covers include a locking mechanism when children are present — consult your manufacturer’s instructions for cover locking options (CPSC, 2026).
When to Avoid Wood Fired
A balanced assessment of any product includes knowing when it’s not the right tool. Wood-fired hot tubs are genuinely the wrong choice in the following situations:
- You want instant hot water. If you want to soak within 30 minutes of deciding to, a wood-fired tub will disappoint. The 2–4 hour heat-up time is a fundamental characteristic, not a problem to be solved.
- You live in an area with outdoor fire restrictions. Many municipalities and HOAs restrict or prohibit open-air burning. Check local bylaws before purchasing — this is a dealbreaker that no amount of enthusiasm overcomes.
- You have mobility limitations that make fire management difficult. Loading wood, managing draft, and monitoring temperature require repeated trips to the firebox. An electric tub with a remote thermostat is more appropriate.
- Your primary use case is daily quick soaks. The drain-and-refill maintenance cycle and heat-up time make wood-fired tubs best suited for planned, leisurely sessions — not daily 20-minute recovery soaks.
When to Call a Pro
Contact your manufacturer or a licensed contractor before proceeding in the following scenarios:
- Deck installation: If placing a filled tub (2,500–3,500+ lbs) on an existing deck, have a licensed contractor verify joist load capacity before filling.
- Chimney proximity to structures: If the chimney must pass within 1 meter of any combustible structure, consult a certified chimney installer for clearance specifications.
- Persistent thermosiphon failure: If the tub repeatedly fails to circulate water despite a strong fire, the inlet/outlet configuration may need professional inspection — this is not a DIY repair for first-season owners.
- Local permitting: Some jurisdictions require permits for permanent hot tub installations. Consult your local building authority before pouring a concrete foundation.
Frequently Asked Questions
Summer Tub Usage
Yes, you can use a wood-fired hot tub in the summer by simply using less wood or skipping the fire entirely. Many owners use their tub as a cool plunge pool during hot months, which provides excellent relief from the heat. If you do want a warm soak, start with a very small fire and monitor the temperature closely, as the ambient summer heat will cause the water to reach 100°F (37°C) much faster than in winter.
Full Tub Weight
A standard 300-gallon wood-fired hot tub weighs between 2,500 and 3,000 pounds when fully loaded with water and occupants. The water alone accounts for roughly 2,500 pounds (8.34 lbs per gallon), while the cedar tub and heater add 200 to 400 pounds. This massive weight is why placing a tub on an unreinforced residential deck is dangerous; always pour a concrete pad or have a licensed contractor reinforce your deck before installation.
Best Wood for Heating
Seasoned hardwoods with less than 20% moisture content are the best choice for wood-fired hot tubs. Oak, ash, and maple deliver the highest heat output (23–29 million BTU per cord) and burn long and clean. Birch and cherry are good secondary options. Avoid softwoods (pine, spruce) due to resin buildup in the chimney, and never burn painted, treated, or composite wood — the fumes are toxic. A $15–$25 moisture meter is the most useful tool you can buy for confirming wood readiness (EPA, 2026).
Winterizing Procedures
Winterizing a wood-fired hot tub requires a complete drain, line clearing, and protective covering before sustained freezing temperatures arrive. Drain all water from the tub, then use compressed air or a shop vac to clear residual water from heater coils and inlet/outlet pipes — any trapped water will expand and crack components when frozen. Apply a food-safe wood oil to all cedar surfaces, cover the firebox opening, and fit an insulated cover with a minimum R-value of R-5 (R-10 for climates below -10°C/14°F). Inspect all wood surfaces for soft spots before the season ends.
Is it safe to use a wood fired hot tub?
Wood-fired hot tubs are safe when operated according to manufacturer guidelines and established health authority recommendations. The two most critical rules: never light the fire before the tub is fully filled with water, and never allow water temperature to exceed 104°F (40°C) — the limit established by the CDC to prevent heat-related illness (CDC, 2026). Keep a water source nearby during all sessions, maintain chimney clearances, and supervise children at all times. Pregnant women and individuals with cardiovascular conditions should consult a physician before use. Following these guidelines makes wood-fired hot tub ownership both safe and straightforward.
The Right Tub and Setup
A wood-fired hot tub isn’t a complicated appliance — it’s a simple system that rewards preparation. Choose seasoned hardwood, build your fire using the top-down method, and keep your cover on during the heat-up phase, and you’ll reach a comfortable 100–102°F in 2–4 hours, every time. For outdoor enthusiasts at Hello Goodland and similar communities, this reliable, repeatable process is exactly what makes wood-fired ownership satisfying rather than stressful.
The Heat-to-Soak Cycle — the end-to-end process from cold water to soaking temperature — is the framework that ties everything in this guide together. Get the wood right, stack the fire correctly, manage the draft, and monitor the temperature: four variables, mastered once, repeated effortlessly. That’s the practical reality of wood-fired hot tub ownership that most guides never get around to explaining.
Your next step is straightforward: if you’re buying, use the material and sizing tables to narrow your choice to two or three models, then verify local fire restrictions before ordering. If you’re building from a kit, gather your foundation materials first — the tub goes together in a day, but a settled foundation takes a week. If you already own one and struggled with heating, start with the troubleshooting table and invest in a moisture meter before your next session. We hope this wood fired hot tub guide has given you the confidence to start your off-grid soaking journey. The fire is ready when you are.