Table of Contents - Poses for Hot Tubs: The Ultimate Guide to Capturing Perfect Moments
- The Art of the Hot Tub Pose: Core Concepts for Stunning Photos
- Setting the Scene: Props and Ambiance for Memorable Pictures
- Solo Hot Tub Poses: Embrace Relaxation and Serenity
- Romantic Hot Tub Poses for Couples
- Group Hot Tub Poses: Fun with Friends and Family
- Advanced Guide: Pro Tips for Flawless Hot Tub Photography
- Maintaining Your Hot Tub for Picture-Perfect Results
- Seasonal Hot Tub Photography: Adapting to the Elements
- Editing Your Hot Tub Photos for Maximum Impact
- Sharing Your Hot Tub Photos on Social Media
- Conclusion: Your Hot Tub, Your Story
- Frequently Asked Questions
- How do you pose for a hot tub picture?
- What are some good props for hot tub pictures?
- What is the best time of day to take hot tub photos?
- How can I look more confident in hot tub photos?
- Can I use my phone to take good hot tub pictures?
- How do you take romantic couple pictures in a hot tub?
- What should I caption a hot tub photo?
- How do you deal with steam and fog on the camera lens?
This blog post may contain affiliate links. As an Amazon Associate I earn from qualifying purchases.
Hot tub photography has evolved from simple vacation snapshots to an art form that captures relaxation, connection, and the joy of hydrotherapy. Whether you’re documenting a peaceful solo soak, a romantic evening with your partner, or a fun gathering with friends, the right pose can transform an ordinary photo into a lasting memory. This comprehensive guide covers everything you need to know about posing in and around your hot tub, from flattering angles and lighting techniques to safety considerations and creative prop ideas that will make your photos stand out on social media and in your personal collection.
The Art of the Hot Tub Pose: Core Concepts for Stunning Photos
Creating memorable hot tub photos requires more than just pointing a camera and smiling. Understanding fundamental principles like safety, lighting, composition, and body positioning helps you capture images that look professional and feel authentic. The best hot tub poses balance aesthetics with comfort, allowing genuine relaxation and joy to shine through while showcasing the therapeutic experience that makes hot tub ownership so rewarding.
Safety First: Posing Safely in and Around Your Hot Tub
Before attempting any hot tub pose, prioritize safety for yourself and your equipment. Wet surfaces around hot tubs become incredibly slippery, making sudden movements or standing poses potentially dangerous. Always ensure you have secure footing, and consider placing non-slip mats near the tub’s edge where photographers might stand.
Electronic devices pose a significant risk around water. If using a smartphone for photography, invest in a quality waterproof case rated for submersion, not just splash resistance. Position cameras and phones away from the tub’s edge where they could accidentally fall in, and designate one person as the photographer rather than passing devices between wet hands.
Temperature awareness matters more during photo sessions than regular soaks. When you’re focused on getting the perfect shot, you might not notice signs of overheating like dizziness, nausea, or excessive fatigue. Limit posing sessions to 15-20 minutes before taking a break, and keep water nearby to stay hydrated. This is especially important when shooting during summer months or when the water temperature is above 102 degrees Fahrenheit.
Avoid bringing glass containers into or near your hot tub area during photo sessions. The visual appeal of a wine glass might seem perfect, but the risk of breakage creates both injury hazards and potential damage to your hot tub’s filtration system. Use shatterproof acrylic drinkware instead, which photographs nearly identically to glass while eliminating these dangers. For tips on maintaining your hot tub’s pristine condition, visit One Hot Tub for comprehensive care guides.
Chemical balance affects both photo quality and safety. Cloudy water from improper maintenance can ruin otherwise perfect shots, while excessive sanitizer can irritate skin and eyes during extended posing sessions. Regular testing and adjustment of hot tub chlorine levels ensures crystal-clear water that photographs beautifully while protecting everyone’s comfort and health.
Finding Your Light: How Lighting Transforms Your Hot Tub Photos
Lighting determines the mood, quality, and overall success of your hot tub photography more than any other single factor. Natural and artificial light sources create dramatically different effects, and understanding how to work with each type elevates your photos from amateur snapshots to professional-quality images. The interplay between light, steam, and water creates unique photographic opportunities that simply don’t exist in other settings.
The Magic of Golden Hour
Golden hour refers to the period approximately one hour after sunrise and one hour before sunset when the sun sits low on the horizon, casting warm, diffused light that flatters skin tones and creates stunning environmental colors. This natural lighting condition is universally considered the best time for outdoor photography, and it works exceptionally well for hot tub poses because the soft light minimizes harsh shadows and creates a romantic, peaceful atmosphere.
During golden hour, position yourself so the sun illuminates your face at a slight angle rather than directly from behind or in front. Side lighting creates gentle shadows that add dimension to features without the unflattering harshness of midday sun. If you’re shooting facing the sunset, you can create beautiful silhouette poses where the warm sky provides a glowing backdrop while your outline remains artistically darkened.
The warm color temperature of golden hour light complements the steam rising from your hot tub, creating an almost ethereal effect in photos. This diffused light also reduces the need for extensive photo editing, as skin appears naturally smooth and glowing. Photographers often call this the “magic hour” because even amateur photographers can capture professional-looking results with minimal technical knowledge.
For the best results, plan your photo session to begin about 30 minutes before the peak golden hour period. This gives you time to set up, test angles, and adjust poses before the light reaches its optimal quality. The fleeting nature of golden hour—typically lasting only 20-30 minutes at its best—means preparation is essential for capturing multiple poses and angles.
Moody Nighttime and Twilight Shots
Nighttime hot tub photography creates dramatically different moods compared to daytime shots, offering opportunities for intimate, romantic, or even mysterious aesthetics. The contrast between the dark surroundings and illuminated subjects creates visual interest that draws viewers into the image. Modern hot tubs come equipped with LED lighting systems that provide stunning underwater illumination in various colors, turning your spa into a natural photo studio after dark.
The built-in lights of your hot tub create fascinating effects when photographed from different angles. Shooting from above captures the entire illuminated water surface, creating a glowing pool effect that highlights subjects sitting in the water. From eye level, underwater lights create beautiful rim lighting along bodies and faces, adding depth and highlighting contours that might disappear in flat lighting.
Supplement your hot tub’s built-in lighting with ambient sources like string lights, lanterns, or tiki torches placed safely around the deck area. These additional light sources fill in shadows on faces while maintaining the moody atmosphere. Warm-toned lights work particularly well, as they complement skin tones and create a cozy, inviting feeling that cooler LED lights sometimes lack.
Twilight, the period just after sunset but before complete darkness, offers a unique middle ground where some natural light remains in the sky. During civil twilight, the deep blue hour creates a stunning backdrop that contrasts beautifully with the warm tones of hot tub lighting. This brief window produces some of the most visually striking hot tub photography, combining the best elements of both day and night shooting.
Technical camera settings matter more during nighttime photography. Increase your ISO to make the sensor more sensitive to available light, but be cautious as higher ISO values introduce grain or noise into images. Open your aperture as wide as possible, using low f-stop numbers to gather maximum light. A slower shutter speed captures more light but requires steady hands or a tripod to prevent blur.
Handling Harsh Midday Sun
Midday sun presents the most challenging lighting conditions for photography due to its direct overhead position creating unflattering shadows under eyes, noses, and chins. However, when midday is your only option for a hot tub photo session, several techniques can help you work with rather than against these difficult conditions.
Position your hot tub’s umbrella or gazebo to create shade over the area where you’ll be posing. This eliminates harsh direct sunlight while still providing ample ambient light for clear, well-exposed photos. The diffused light under shade closely mimics the quality of golden hour, though without the warm color temperature.
If natural shade isn’t available, position yourself so the sun is directly behind you, illuminating the photographer instead. This backlit approach can create a subtle halo effect around your hair and shoulders while keeping your face evenly lit by reflected light from the water and surrounding surfaces. Modern smartphone cameras handle backlit situations better than older cameras, often balancing exposure automatically.
Use your hot tub’s steam to your advantage during bright conditions. The vapor rising from heated water acts as a natural diffuser, softening harsh sunlight and creating interesting visual texture in photos. This works especially well in cooler weather when temperature differences between air and water produce more dramatic steam effects.
Portrait mode on smartphones and aperture priority mode on DSLR cameras can help manage harsh lighting by blurring backgrounds and reducing the visual impact of bright spots or harsh shadows in the surrounding environment. This focuses viewer attention on the subject while minimizing distracting elements created by intense sunlight.
Setting the Scene: Props and Ambiance for Memorable Pictures
The environment surrounding your hot tub poses contributes as much to the final image as the poses themselves. Thoughtfully selected props, a clean background, and intentional ambiance elements transform a simple hot tub photo into a curated lifestyle image that tells a story. The goal is creating an authentic scene that reflects the relaxation, luxury, or fun you’re actually experiencing during your soak.
Essential Props to Elevate Your Poses
Shatterproof drinkware tops the list of essential hot tub photo props, offering both aesthetic appeal and practical safety. Acrylic champagne flutes, wine glasses, and tumblers photograph almost identically to glass versions but eliminate breakage risks. Fill them with champagne, wine, juice, or even sparkling water with fresh fruit for visual interest. Hold the glass naturally at chest height or rest it on the tub’s edge, avoiding stiff, unnatural positioning that makes photos look staged.
Floating trays designed specifically for hot tubs provide a stable platform for drinks, snacks, or small decorative items while adding a luxury resort feel to photos. Position the tray within the frame but slightly to the side rather than directly center, following the rule of thirds for more dynamic composition. Some floating trays come with built-in holders for glasses and even small vases for flowers, creating ready-made photo opportunities.
Books and magazines work surprisingly well as hot tub props, suggesting a leisurely afternoon of reading and relaxation. Waterproof e-readers offer a modern alternative, though physical books with attractive covers photograph with more visual interest. Hold the book at a natural reading angle, occasionally glancing toward the camera or looking contemplatively at the pages rather than staring directly at the lens for every shot.
Bath bombs, essential oils, or colored lighting tablets add visual interest by tinting the water with gentle colors. Rose gold, purple, and blue tones photograph particularly well, creating an artistic quality that elevates standard hot tub photos. Use these sparingly and test them beforehand to ensure they don’t interfere with your hot tub’s filtration system or stain surfaces. Always drain the water after using colored additives before resuming normal hot tub use.
Plush, high-quality towels positioned on the deck or draped over the tub’s edge add texture and luxury to the frame. White or neutral towels provide classic elegance, while colored towels can complement your outdoor decor or the season. Roll several towels and stack them as spa-like accents, or casually drape one over your shoulders for a transitional shot between soaking and drying off.
Sunglasses create instant sophistication in daytime hot tub photos, adding a vacation or resort vibe even when you’re in your backyard. Oversized, stylish frames work best, as tiny glasses often appear too small to make a visual impact in photos. Push them up on your head for a casual look, or wear them normally for classic poolside aesthetics.
The Power of the Background
Your hot tub’s background dramatically impacts photo quality, often determining whether an image looks professionally shot or amateurish. Before beginning your photo session, walk completely around your hot tub and view it from every angle, identifying which direction offers the most visually appealing backdrop and which angles should be avoided due to clutter or unattractive elements.
Natural landscapes provide the most stunning backgrounds for hot tub photography. Mountain views, ocean vistas, forest settings, or even city skylines create context and visual interest that plain fence backgrounds cannot match. If you’re fortunate enough to have a scenic view, position your hot tub with this backdrop in mind, or orient your poses to feature these natural elements prominently.
For hot tubs on decks or patios without dramatic views, focus on creating visual interest through landscaping and decor. Well-maintained plants, decorative screens, outdoor artwork, or architectural features like pergolas and stone walls all serve as attractive backgrounds. Depth matters in backgrounds—layers of plants at varying distances create more interesting visuals than a single flat surface.
Eliminate clutter ruthlessly before shooting. Items like pool toys, cleaning equipment, empty planters, or outdoor furniture that isn’t part of your intended aesthetic should be moved out of frame. Even small details like garden hoses or recycling bins visible in the background can distract from an otherwise perfect photo.
Consider the color palette of your background elements. Complementary colors create visual harmony, while clashing colors can make even well-posed photos feel chaotic. If your hot tub cabinet is dark wood, green plants and earth-toned decor usually complement it well, while white or light-colored spas pair beautifully with vibrant flower colors and colorful outdoor cushions.
Solo Hot Tub Poses: Embrace Relaxation and Serenity
Solo hot tub photography celebrates personal wellness, self-care, and the meditative aspects of hydrotherapy. These poses focus on conveying tranquility and contentment, capturing the peaceful moments that make hot tub ownership such a valuable investment in personal well-being. The best solo poses look effortless and natural, as if the camera simply captured you in a genuine moment of relaxation.
The Classic Relaxation Pose

The classic relaxation pose represents the quintessential hot tub experience and serves as the foundation for countless variations. Lean back against the tub’s seating, allowing your head to rest against the headrest or tub edge with your neck supported and comfortable. Close your eyes and tilt your face slightly upward, which elongates the neck and creates a peaceful, meditative expression that photographs beautifully.
Position your arms naturally along the tub’s edge or rest them on the water’s surface with palms gently floating. Avoid crossing your arms over your chest, which can appear defensive or uncomfortable. Instead, let your hands rest wherever feels most natural, perhaps with fingertips trailing in the water or one hand behind your head in a casual gesture of complete relaxation.
The key to this pose is authenticity. Instead of forcing a smile or holding an uncomfortable position, genuinely relax for several minutes before the photo is taken. Breathe deeply, feel the warmth of the water, and let your facial muscles soften naturally. Photographers can capture multiple frames during this genuine relaxation period, ensuring at least several shots where your expression looks truly peaceful rather than staged.
Variations on this classic pose include turning your head to one side as if gazing at a beautiful view, even if the view is ordinary. The three-quarter profile this creates is universally flattering and adds visual interest compared to facing directly forward. You might also try one knee bent and raised slightly, creating more dynamic body positioning than sitting completely still.
The Morning Coffee or Evening Drink Pose

This popular pose combines the relaxation of hot tubbing with the simple pleasure of enjoying a favorite beverage, creating a lifestyle image that resonates with viewers seeking aspirational self-care moments. Hold your mug or glass with both hands at chest height, a posture that naturally brings your shoulders forward slightly and creates a cozy, contemplative mood.
Position the cup so its contents are visible, especially if you’ve added photogenic elements like latte foam, colorful cocktail garnishes, or fruit slices. The drink should appear fresh and appealing, not empty or half-consumed, as this small detail significantly impacts the overall image quality. Steam rising from a hot beverage adds wonderful visual texture that photographs particularly well during golden hour or cooler weather.
Your gaze direction determines the emotional tone of this pose. Looking directly at the camera with a soft smile creates a friendly, inviting feeling, as if you’re sharing this peaceful moment with the viewer. Looking down into your cup or off to the side toward a view creates a more contemplative, introspective mood that emphasizes personal reflection and solitude.
This pose works exceptionally well for seasonal content. A steaming mug of hot chocolate or mulled cider during winter creates a cozy contrast between the cold air and warm water. Summer versions might feature iced beverages with condensation on the glass, colorful smoothies, or champagne with strawberries for special occasions.
The Yogi: Meditative and Mindful Poses
For wellness-focused hot tub owners, incorporating gentle yoga or meditation poses connects hydrotherapy with other aspects of holistic health. Sit cross-legged on a hot tub seat in a comfortable lotus or half-lotus position, ensuring your foundation is stable before attempting this pose. The buoyancy of water makes balance slightly more challenging than on solid ground, so start simply and avoid complex poses that could lead to slipping.
Bring your hands to prayer position at heart center or rest them on your knees in a traditional meditation mudra, with thumb and forefinger touching in a gentle circle. Keep your spine straight but not rigid, allowing the natural curve of your back while lifting through the crown of your head. Close your eyes or maintain a soft downward gaze, creating the peaceful expression associated with meditation practice.
This pose connects beautifully with the therapeutic benefits of hot tub use, as both practices promote stress reduction, improved circulation, and mental clarity. The visual of someone meditating in a hot tub immediately communicates self-care and wellness, making it particularly effective for social media content focused on health, mindfulness, or lifestyle topics.
Safety remains paramount with any yoga-inspired hot tub pose. Avoid standing poses, complex balance positions, or anything requiring significant movement that could result in slipping on the tub’s smooth surfaces. Stick with stable, seated positions that look meditative and feel genuinely comfortable to maintain for several minutes during the photo session.
The Gazing at the View Pose
This popular pose works beautifully when you have any sort of vista, whether it’s mountains, ocean, forest, or even an attractive garden. Turn partially or completely away from the camera, looking out toward the landscape as if absorbed in its beauty. This creates a contemplative mood while showcasing both the subject and the environment, telling a more complete story than standard front-facing poses.
The three-quarter turn, where your body is angled about 45 degrees from the camera with your head turned to show your profile, tends to photograph most flatteringly. This angle defines your jawline, shows your features in profile, and creates visual interest through the diagonal line of your body. Rest your arms on the tub’s edge, with one or both shoulders visible above the water line.
For dramatic silhouette effects, shoot this pose during golden hour or sunset with the sun positioned behind you. The camera should expose for the bright sky, rendering you as a dark outline against the glowing background. This artistic approach works especially well when you have a genuinely stunning view that you want to feature prominently in the composition.
Even without a remarkable view, this pose creates visual interest by suggesting there’s something worth looking at beyond the frame. Face a garden, trees, or even your home’s architecture with the same contemplative expression, and viewers naturally assume you’re enjoying a pleasant view. The psychology of following someone’s gaze makes this an engaging composition that draws viewers into the image.
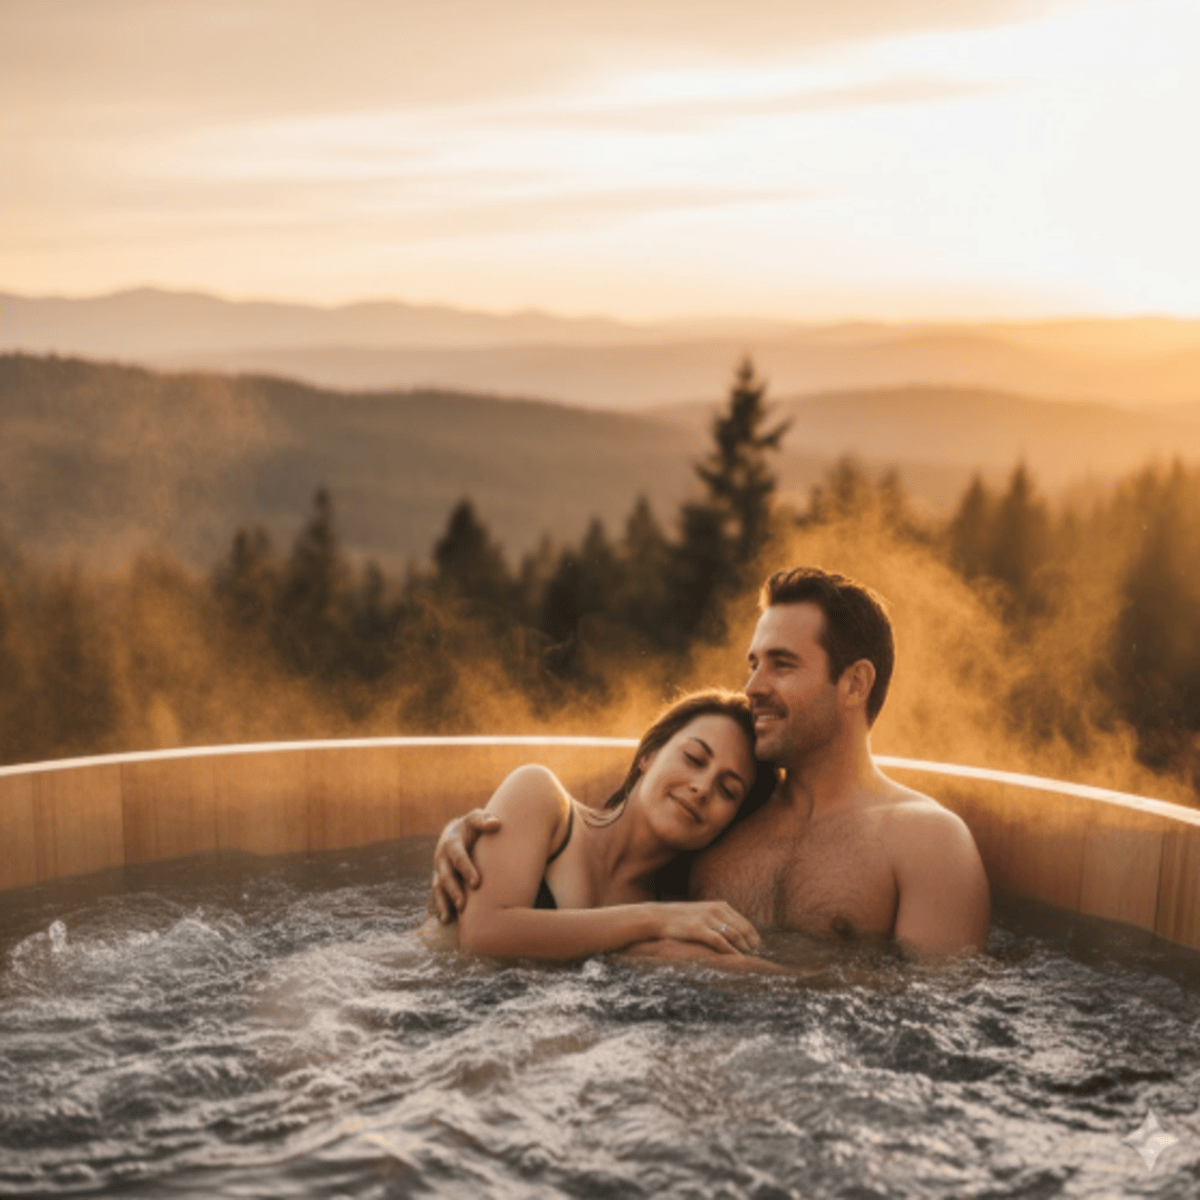
Romantic Hot Tub Poses for Couples
Hot tubs create naturally romantic settings that have made them popular features for anniversary celebrations, honeymoons, and date nights. Couples photography in this environment captures intimacy and connection while maintaining the relaxed, joyful atmosphere that makes these moments special. The best romantic poses feel genuine rather than overly staged, reflecting the authentic affection between partners.
The Intimate Embrace
The intimate embrace takes many forms, each conveying slightly different emotional tones while maintaining the core theme of closeness. The classic version has one partner sitting normally while the other sits across their lap or nestles into their side, creating full body contact that photographs as warm and affectionate. Ensure both faces are visible at least partially, angling bodies so the camera captures both people rather than one person blocking the other.
The behind embrace, where one partner sits behind the other with arms wrapped around their waist or shoulders, creates a protective, nurturing feeling in photos. The person in front can lean back into this embrace, tilting their head to rest against their partner’s shoulder or turning their face toward theirs. Both people should look relaxed and comfortable, avoiding stiff postures that make the embrace appear forced.
Face-to-face positioning, where couples sit opposite each other holding hands or with arms around each other, allows for eye contact that creates powerful emotional connection in images. This arrangement works particularly well for capturing genuine laughter and conversation, as the natural interaction between partners produces authentic expressions that posed smiles cannot replicate.
For variation, try the side-by-side embrace where couples sit together with arms around each other, both facing the same direction. This creates a unified, partnership feeling while allowing both people to look toward the camera or together toward a view. It’s less intense than face-to-face poses but still clearly conveys affection and togetherness.
The Playful Splash
Capturing playful moments creates dynamic, energetic photos that contrast beautifully with more serene relaxation shots. A gentle, controlled splash adds movement and genuine laughter to images, showing the fun side of sharing a hot tub with your partner. The key is keeping splashes small and controlled, creating visual interest through water droplets without drenching camera equipment or creating unflattering face-full-of-water shots.
Cup water in your hands and gently toss it toward your partner while they react with surprised laughter, or create small splashes with your hands just breaking the water’s surface. The photographer should use burst mode or continuous shooting, capturing multiple frames per second to ensure at least a few images catch the perfect moment of impact and expression.
Timing matters significantly with splash photography. The anticipation before the splash, the moment of impact with water droplets frozen mid-air, and the resulting laughter all create different photographic opportunities. Communicate with your photographer about which moment to capture, or take multiple sequences to give yourself options during the editing process.
Keep electronics safe during splash photography by using waterproof phone cases or maintaining safe distance with DSLR equipment. Even small splashes can damage devices, and the excitement of the moment can lead to accidents if proper precautions aren’t in place. Consider doing a practice round without actually splashing to perfect the motion and positioning before the real shots.
The Champagne Toast

Few poses convey celebration and romance as effectively as the champagne toast, making it perfect for anniversaries, engagements, New Year’s Eve, or any special occasion worth commemorating. Hold your glasses at the point where they’re just about to clink together, suspended in that anticipatory moment rather than after contact. This creates visual tension and interest that completed actions lack.
Position yourselves close enough that the glasses meet near the center of the frame without having to extend your arms awkwardly. Natural, relaxed arm positions look better than stretched-out, straining postures. You might sit facing each other, side by side, or at a slight angle, depending on your photographer’s position and your hot tub’s configuration.
Eye contact during the toast creates intimacy and connection, as if you’re toasting your relationship itself rather than performing for the camera. Alternatively, both look at the camera while holding the toast position, sharing your celebration with viewers. Each approach creates a different emotional tone, so consider shooting both variations if time allows.
The contents of your glasses matter more than you might expect. Clear champagne or white wine doesn’t show up well in photos, while rosé, red wine, or colorful cocktails create better visual contrast against both the water and the glass. Adding fresh berries or citrus garnishes increases visual appeal and suggests thoughtful preparation rather than a casual drink.
The Forehead Kiss or Whispering a Secret Pose
This tender pose captures intimate moments that feel private and authentic, creating images with genuine emotional impact. One partner gently kisses the other on the forehead, temple, or top of the head while the recipient closes their eyes or smiles softly. The person giving the kiss should move slowly and naturally, avoiding stiff or awkward positioning that makes the gesture appear forced.
The whispering variation has one partner leaning in close as if sharing a secret, with mouths near the other’s ear and faces close together. This creates anticipation and intimacy in the image, as viewers wonder what’s being said. Both people should appear relaxed and genuinely engaged with each other, perhaps with soft smiles or the slight laughter that often accompanies sharing private jokes.
Profile and three-quarter angles work best for these poses, allowing the camera to capture both faces at least partially while showing the closeness of the positioning. Straight-on front or back angles often hide one person’s face entirely, reducing the emotional impact of the image. Work with your photographer to find the angle that captures both people’s expressions.
These poses photograph beautifully during golden hour or with soft artificial lighting that enhances the romantic mood. Harsh midday sun or overly bright lighting can undermine the intimate feeling these moments convey. Consider timing your couples photo session to coincide with optimal lighting conditions for the most flattering results.
Group Hot Tub Poses: Fun with Friends and Family
Group hot tub photos capture the social aspects of spa ownership, documenting fun gatherings, celebrations, and quality time with favorite people. These images tend to be more energetic and playful than solo or couples shots, emphasizing laughter, connection, and shared experiences. The challenge lies in positioning multiple people so everyone appears clearly in the frame while maintaining a natural, unstaged appearance.
The Cheers to Us Group Toast

The group toast translates the romantic couples version into a celebratory friend or family moment. Everyone raises their glass toward the center of the group, creating a circular or semi-circular arrangement of arms and drinks. This works best when glasses meet at approximately the same height, creating visual symmetry that appears more polished than random scattered glasses.
Camera positioning significantly impacts how group toasts photograph. Shooting from slightly above captures the full circle of people and all their glasses meeting in the center, creating an attractive overhead composition. Eye-level shooting shows faces more clearly but may miss some glasses depending on positioning, making it better for smaller groups of three to four people.
Count to three before clinking glasses to ensure everyone’s ready and looking at the camera simultaneously. Capturing a group where half the people are mid-blink or looking elsewhere rarely produces usable photos, so take multiple shots and designate someone to watch that everyone’s positioned correctly before each frame.
This pose works for any celebration, from birthdays and graduations to simple summer evenings with friends. The universality of the toast gesture means viewers immediately understand the celebratory context, making these images perfect for social media posts about gatherings and special occasions.
The All-In Laughing Candid

Truly candid laughter creates the most authentic and engaging group photos, but genuine laughter is difficult to force or fake convincingly. Instead of saying “laugh” or “cheese,” have someone tell a joke, share a funny story, or prompt the group to recall a shared humorous memory. The photographer should shoot in burst mode during these moments, capturing the natural progression from straight faces through genuine laughter.
Position everyone relatively close together so the frame feels full and connected rather than spread out with awkward gaps. People should be close enough to touch or nearly touch, creating a sense of camaraderie and friendship that translates visually. Arrange the group with taller people toward the back and shorter people forward if shooting from eye level, or in a circular arrangement if shooting from above.
Having one person playfully splash another, whisper something silly, or initiate a spontaneous group hug can trigger authentic reactions worth capturing. These unplanned moments often produce the best photos because expressions are genuinely joyful rather than performed for the camera.
Multiple rounds of candid shooting increase your chances of capturing the perfect moment where everyone looks good simultaneously. Group dynamics mean someone’s always blinking, looking away, or mid-speech, so patience and quantity increase the odds of getting at least a few perfect frames.
The Human Pyramid: The Safe Version
Traditional human pyramids are dangerous in hot tubs due to slippery surfaces and limited space, but creative positioning can mimic the fun, structured look without the risk. Arrange people in staggered heights by using different seat levels in the hot tub, with some people sitting normally, others kneeling on seats, and others sitting on the tub’s edge with feet in the water.
Create a V-formation or triangle shape when viewed from the front, with one person at the top point and rows of two or three people below. This mimics pyramid structure while keeping everyone safely seated or kneeling rather than standing precariously. Shot from the front at eye level, this arrangement creates the visual interest of a pyramid without the safety hazards.
Another safe variation arranges people in ascending height order along one side of the hot tub, creating a diagonal line from shortest to tallest that’s visually dynamic without requiring stacking or balancing. This works particularly well for family photos where natural height variations already exist between parents and children.
Whatever arrangement you choose, prioritize stability and comfort. If anyone feels unsteady or uncomfortable, adjust positioning until everyone feels secure. The photo isn’t worth risking injury, and uncomfortable people show tension in their faces and postures that undermines the fun aesthetic you’re trying to achieve.
The Feet Up Lineup
This creative and visually interesting pose lines everyone up along one side of the hot tub with legs extended and feet propped on the opposite edge. The resulting row of legs and feet creates geometric visual interest while keeping everyone’s faces visible and relaxed. This pose works best in rectangular hot tubs with enough width for comfortable leg extension.
Everyone should extend their legs at approximately the same height and angle for visual consistency, though slight variations add personality and prevent the image from looking too rigid or staged. Feet can be flexed, pointed, or crossed at the ankles depending on the vibe you want to create. Pointed toes create a more elegant, stretched appearance, while relaxed or crossed feet feel more casual.
Upper bodies and arms should be positioned naturally, with people leaning back against the tub’s edge, arms resting along the sides, or hands behind heads in relaxed postures. The focus is on creating a cohesive line with the legs while keeping upper body positioning comfortable and varied enough to show individual personalities.
This pose photographs best from the side or at a three-quarter angle where the line of legs is clearly visible along with most or all faces. Straight-on front shooting makes the legs appear foreshortened and loses the visual impact of the lineup. Experiment with angles to find the most flattering perspective for your specific hot tub configuration.
Advanced Guide: Pro Tips for Flawless Hot Tub Photography
Moving beyond basic posing and composition requires understanding technical photography concepts and how to adapt them specifically for the hot tub environment. These advanced techniques help you control outcomes more precisely, creating consistently professional-quality results rather than relying on luck to capture occasional great shots. Mastering these skills transforms casual snapshots into portfolio-worthy images.
Flattering Angles for Every Body Type
Photography is as much about angles and positioning as it is about poses themselves. Understanding which angles flatter different body types allows everyone to feel confident and look their best in photos, promoting body positivity while producing aesthetically pleasing results.
Shooting from Above
Elevated camera angles, where the photographer shoots from above looking down at the subject, create universally flattering results for most people. This angle elongates the body, defines facial features, and minimizes areas many people feel self-conscious about. The downward perspective makes eyes appear larger and more prominent while de-emphasizing the body below shoulders.
For hot tub photography, above-angle shooting works particularly well because it captures the water’s surface, any floating props or decorative elements, and shows the full context of the hot tub environment. Stand on a sturdy deck chair, stepladder, or elevated deck area to achieve this angle safely, ensuring your footing is secure before leaning out over the tub with expensive camera equipment.
The subject should look up toward the camera rather than keeping their chin down, which can create unflattering double-chin effects. A slight upward gaze with a relaxed jaw and genuine smile creates the most pleasing results. The angle should be approximately 30 to 45 degrees above horizontal for the most flattering effect without becoming so steep it looks unnatural.
Group photos benefit tremendously from overhead angles because everyone remains visible regardless of positioning. This eliminates the front-to-back depth issues that cause people in back rows to be partially hidden by those in front. Everyone can arrange themselves in the hot tub naturally while still appearing clearly in the final image.
The Power of Posing Shoulders and Knees
Small adjustments to shoulder and knee positioning create dramatic improvements in how bodies photograph. Keeping shoulders back and down rather than hunched forward creates better posture, opens the chest, and projects confidence. This subtle change makes enormous differences in the overall appearance of both men and women in photos.
Angling your body approximately 45 degrees to the camera rather than facing it straight-on creates a more flattering silhouette for most body types. This three-quarter position slims the waist, creates dynamic diagonal lines that are more interesting than straight horizontal or vertical lines, and shows dimension rather than presenting the widest view of the body.
Bending one knee and keeping the other straight, even while seated, creates curves and breaks up the static horizontal line of sitting positions. The bent knee can be raised slightly above the water’s surface or simply bent while remaining submerged, depending on the effect you want. This asymmetrical positioning looks more dynamic and natural than both legs in identical positions.
Weight distribution matters even when you’re buoyant in water. Shift your weight slightly to one side rather than sitting perfectly centered and symmetrical, creating subtle angles through your torso that add visual interest. This slight shift, combined with a head tilt in the same direction, creates an S-curve through your body that photographers and artists have recognized as aesthetically pleasing for centuries.
Using Steam and Water to Your Advantage
Steam rising from your hot tub creates natural diffusion that can artfully obscure areas while adding ethereal, dreamy qualities to images. Cold weather or cool evenings increase steam production dramatically, giving you more control over this element. Strategically position yourself so steam drifts between your body and the camera, creating a soft-focus effect that feels artistic rather than out of focus.
Partial submersion in water naturally obscures the lower body while keeping the upper body and face clearly visible. Use the waterline as a compositional element, positioning it at visually pleasing points like just below the shoulders or at chest height rather than awkwardly at the midsection. Water’s reflective and refractive properties can also create interesting visual effects in photos.
Water droplets on skin catch light beautifully, creating highlights that add dimension and visual interest. Emerging slightly from the water so shoulders and upper chest are exposed allows water to run down skin in photogenic rivulets. Time your shot just after surfacing rather than immediately or several minutes later when skin has dried.
The water’s surface itself becomes a compositional element when shooting from certain angles. Reflections of surrounding landscapes, sky, or people can create interesting double images or abstract patterns. Calm water produces mirror-like reflections, while active jets create dynamic texture and movement in the frame.
Mastering Your Camera in a Challenging Environment
Hot tub environments present unique photographic challenges including steam, low light conditions, high contrast between lit and shadowed areas, and the constant threat of water damage to equipment. Understanding how to manage these challenges technically ensures consistent quality results rather than hoping for occasional lucky shots.
Phone vs DSLR in the Hot Tub
Smartphone cameras have advanced dramatically in recent years, offering capabilities that rival entry-level DSLR cameras for casual photography. Their convenience, built-in editing apps, and immediate sharing capabilities make them ideal for spontaneous hot tub photos. Modern phones include portrait modes that blur backgrounds, night modes that handle low light better, and waterproof ratings that provide peace of mind near water.
Invest in a quality waterproof case if using your phone for hot tub photography regularly. Cases rated IP68 or higher offer submersion protection, not just splash resistance, and many include clear front and back panels that maintain camera functionality. Test the case in a sink or shallow water before trusting it with your expensive device in the hot tub.
DSLR and mirrorless cameras offer superior control over settings like aperture, shutter speed, and ISO, allowing you to fine-tune exposure for challenging lighting conditions. Interchangeable lenses mean you can select the perfect focal length for your specific shot, whether that’s a wide-angle lens for group photos or a portrait lens that creates beautiful background blur.
The learning curve for DSLR cameras is steeper than phones, but the investment pays off in image quality and creative control. If you’re serious about hot tub photography beyond casual social media sharing, dedicating time to learn manual camera settings transforms what’s possible. Many DSLR cameras also offer weather-sealing that provides some moisture protection, though they should still be kept away from direct water contact.
Professional photographers often use both tools strategically, shooting candid moments and selfies with phones while setting up DSLR equipment for planned formal shots. This hybrid approach combines convenience with quality, ensuring you never miss spontaneous moments while still capturing high-quality images of planned poses.
Essential Settings for Low Light and Steam
Low light conditions require adjusting three fundamental camera settings: aperture, shutter speed, and ISO. Aperture controls how wide the lens opening is, with lower f-numbers like f/1.8 or f/2.8 allowing more light to reach the sensor. Wide apertures also create shallow depth of field, blurring backgrounds while keeping subjects sharp, which can help minimize distracting elements and create professional-looking results.
Shutter speed determines how long the sensor is exposed to light. Slower shutter speeds like 1/30 or 1/60 of a second allow more light but require steadier hands or a tripod to prevent motion blur. For hot tub photography where subjects are relatively still, you can use slower speeds than you’d need for action photography, though handheld shooting below 1/60 typically produces noticeable blur.
ISO measures the sensor’s sensitivity to light, with higher numbers making the sensor more sensitive. Modern cameras handle high ISO better than older models, but all cameras introduce noise or grain at very high values. Start at ISO 400 or 800 for evening hot tub photos and increase only if needed, balancing adequate exposure against acceptable noise levels.
Many cameras offer night or low-light modes that automatically adjust these settings for challenging conditions. These automatic modes provide good starting points, though manual adjustments often produce better results once you understand the relationships between settings. Experiment during non-critical times to learn what combinations work best for your specific equipment and lighting conditions.
Steam can fog lenses quickly when moving from cool air to the humid hot tub environment. Allow cameras to acclimate gradually rather than immediately pointing a cold lens at rising steam. Lens hoods help protect the front element from both fog and stray light that can reduce contrast. Keep a microfiber cloth handy for gentle wiping when condensation does occur, being careful not to scratch lens coatings.
Beyond the Pose: Capturing Details and Storytelling
Complete photo series tell richer stories than single images alone. Professional photographers working at resorts and spas always capture detail shots alongside standard poses because these images provide context, variety, and artistic interest that makes portfolios more compelling. Apply this same approach to your personal hot tub photography for more satisfying results.
Steam rising off water creates beautiful abstract images, especially when backlit during golden hour or shot against dark backgrounds at night. These atmospheric shots set the scene and establish mood before showing people. Include several steam close-ups in your collection for variety and to use as backgrounds for text in social media posts.
Hands holding mugs against the backdrop of the hot tub, close-ups of water jets bubbling, or artistic shots of robes and towels on deck create lifestyle context around the main posed images. These details help viewers imagine the complete experience rather than just seeing isolated poses. Detail shots also provide useful content for posting on days when you don’t have new posed photos.
The transition moments between hot tub and deck, like wrapped in a towel with steam rising behind you or testing water temperature with a hand, capture authentic experiences that pure posing cannot. These in-between moments often feel more genuine than formal poses, making them favorites for personal photo collections even if they’re less polished technically.
Experiment with creative angles and perspectives that wouldn’t work for standard poses. Shoot directly down into bubbling jets, capture reflections in still water, or photograph the hot tub from a distance showing its position in the broader landscape. These varied perspectives demonstrate photographic skill while showcasing your hot tub as both a wellness tool and an attractive backyard feature.
Maintaining Your Hot Tub for Picture-Perfect Results
Crystal-clear water is essential for professional-looking hot tub photos, making regular maintenance not just a health requirement but an aesthetic one as well. Cloudy or discolored water ruins otherwise perfect shots and requires extensive editing to make presentable. Following a consistent maintenance schedule ensures your hot tub is always photo-ready when opportunities arise.
Regular testing and balancing of water chemistry keeps water sparkling clear. Proper sanitizer levels, balanced pH, and adequate filtration remove the particles that cause cloudiness and staining. When planning a photo shoot, test your water the day before and make any necessary adjustments, allowing time for chemicals to fully circulate before your session. Understanding how to drain a hot tub becomes important when water quality declines beyond what chemical balancing can fix.
Filter cleaning directly impacts water clarity, as clogged filters cannot remove fine particles that make water appear hazy. Rinse filters weekly and deep clean them monthly according to manufacturer instructions. Replace filters annually or when they show signs of wear like torn fabric or crushed pleats that reduce filtration efficiency.
Skim debris from the water surface before photo sessions, as even small floating particles appear prominently in images. Keep a small net handy for quick touch-ups before shooting. Check for and remove any obvious signs of maintenance needs like waterline buildup, which can photograph as an unattractive ring around the tub’s interior.
Consider the timing of your maintenance activities relative to planned photo shoots. Shocking your hot tub or adding clarifiers increases water quality but may cause temporary cloudiness. Complete heavy maintenance at least 24 to 48 hours before important photos to allow water to settle and clarify completely. Visit Tub for comprehensive guides on maintaining pristine water quality year-round.
Seasonal Hot Tub Photography: Adapting to the Elements
Each season offers unique photographic opportunities and challenges for hot tub photography. Adapting your poses, timing, and technical approach to seasonal conditions ensures you can capture stunning images year-round while accounting for temperature extremes, changing light, and seasonal aesthetics.
Winter Wonderland Shots

Winter creates the most dramatic contrast between hot water and cold air, producing impressive amounts of steam that photograph beautifully against snowy backgrounds. The visual of relaxing in hot water while snowflakes fall or while surrounded by snow-covered landscapes creates powerful imagery that emphasizes the comfort and luxury of hot tub ownership.
Cold temperatures affect equipment as well as subjects. Camera batteries drain faster in cold weather, so carry spares and keep them warm in inside pockets when not in use. LCD screens may respond slowly or not at all in extreme cold, though images still capture normally. Allow equipment to warm gradually when returning indoors to prevent condensation damage.
Limit posing sessions during extreme cold to prevent overheating followed by dangerous chilling when exiting the water. Keep robes, towels, and slippers immediately accessible, and have warm indoor space available within steps. The health risks of cold exposure after heating in the hot tub require careful planning and quick transitions.
Snow and ice create photographic opportunities but also significant safety hazards. Clear pathways to and from the hot tub thoroughly, and apply ice melt products to prevent slips on frozen surfaces. Never attempt to pose standing on snowy or icy deck surfaces, as the risk of falling is too great to justify any photo.
Summer and Outdoor Entertainment
Summer photography benefits from longer daylight hours and comfortable ambient temperatures that allow extended photo sessions without weather concerns. The challenge becomes managing harsh midday sun and positioning your shoot during the more flattering light of morning or evening when possible.
Hot tubs positioned near pools create opportunities for combination photos that showcase your entire outdoor entertainment area. Stage these images to show the complete backyard resort experience, though be cautious of dividing viewer attention between too many elements.
Daytime summer shooting offers opportunities to incorporate bright, cheerful props like colorful beverages, fresh fruit platters, and vibrant flowers that might appear washed out in low light conditions. Summer styling tends toward lighter, brighter color palettes compared to the cozy, warm-toned aesthetic of winter photos.
Heat considerations become important during summer sessions. Ensure water temperature is reduced from typical winter settings to prevent overheating during extended posing in warm ambient air. Keep additional cool water nearby and limit session duration if temperatures are extreme.
Fall Foliage and Spring Blooms
Shoulder seasons offer some of the most beautiful natural backgrounds for hot tub photography. Fall foliage creates warm, rich color palettes that complement the cozy feeling of hot water, while spring flowers add freshness and vibrancy to images.
Time fall photography carefully to capture foliage at peak color in your region. This window often lasts only two to three weeks, creating urgency to shoot while colors are optimal. The warm tones of autumn leaves photograph beautifully during golden hour, creating harmonious color schemes throughout the image.
Spring presents challenges with unpredictable weather but rewards patience with fresh green growth and colorful blooms. Position your hot tub where flowering plants appear in the background, or use cut flowers as props to bring spring aesthetics into the frame.
Both seasons offer mild temperatures ideal for comfortable extended photo sessions without the extreme heat of summer or dangerous cold of winter. Take advantage of these perfect conditions to capture large variety of poses and compositions while weather cooperates.
Editing Your Hot Tub Photos for Maximum Impact
Even perfectly composed and exposed photos benefit from light editing that enhances their strengths while correcting minor flaws. Modern editing apps range from simple one-tap filters to sophisticated programs offering pixel-level control. Understanding basic editing principles helps you make photos look polished and professional without over-editing into artificial-looking results.
Basic Adjustments Every Photo Needs
Exposure adjustments brighten or darken the entire image, correcting for camera settings that didn’t quite capture the scene as you saw it. Most photos benefit from slight exposure increases that brighten faces and details without blowing out highlights into pure white areas without detail.
Contrast controls the difference between dark and light tones, with increased contrast creating more dramatic, punchy images and decreased contrast producing softer, more ethereal results. Hot tub photos often benefit from slight contrast increases that define features and add dimension to faces.
Saturation controls color intensity, with most social media-ready images benefiting from modest saturation boosts that make colors appear vibrant without becoming artificially garish. Be cautious with saturation on skin tones, as over-saturating turns people orange rather than healthy and glowing.
Sharpening adds crispness to edges and details, improving the perception of image quality even when the original was slightly soft. Apply sharpening conservatively, as too much creates unnatural halos around edges and emphasizes skin texture more than most people want. Many editing apps offer face-aware processing that sharpens eyes while softening skin.
Advanced Techniques for Stunning Results
Selective editing allows adjustments to specific areas rather than the entire image. Brighten faces that appear shadowed while leaving properly exposed backgrounds unchanged, or enhance the water’s blue tones without affecting skin tones. Masking tools in advanced editors like Adobe Lightroom or Photoshop enable precise control over which areas receive which adjustments.
Color grading creates cohesive aesthetic moods by adjusting specific color channels. Warm-toned edits enhance oranges and yellows while cooling blues for classic golden hour aesthetics. Cool-toned edits do the opposite, creating modern, clean looks popular on Instagram. Develop a consistent editing style that becomes recognizable across your photos.
Noise reduction smooths the grain that appears in high ISO photos, improving image quality from challenging low-light situations. Modern noise reduction algorithms preserve details while removing random pixel variations that create that grainy appearance. Balance noise reduction against sharpness, as aggressive noise reduction can make images appear soft or plasticky.
Background cleanup removes distracting elements that weren’t noticed during shooting. Healing and clone stamp tools eliminate stray debris, unwanted objects, or minor blemishes that draw attention from the main subject. Use these tools judiciously, as extensive manipulation crosses from enhancement into dishonest representation.
Sharing Your Hot Tub Photos on Social Media
Social media platforms each have their own cultures, optimal formats, and best practices that affect how your hot tub photos perform. Understanding these platform-specific factors helps you present content in ways that resonate with audiences and maximize engagement.
Platform-Specific Considerations
Instagram favors square or vertical 4:5 ratio images that fill mobile screens without cropping. The platform’s visual focus makes it ideal for hot tub photography, though its algorithms prioritize consistent posting schedules and high engagement rates. Use Instagram Stories for behind-the-scenes content and spontaneous shots, reserving your feed for the most polished, aesthetically cohesive images.
Facebook accommodates various image ratios but often displays photos at smaller sizes within busy feeds. Ensure your main subject is clearly visible even when images are downsized, avoiding compositions that rely on fine details only visible at full resolution. Facebook’s older demographic often appreciates more context and storytelling in captions compared to Instagram’s more image-focused culture.
Pinterest functions differently as a visual search engine where people discover and save ideas for future reference. Hot tub photos perform well when positioned as aspirational lifestyle content, home design inspiration, or wellness tips. Vertical images around 2:3 ratio perform best, and detailed descriptions with relevant keywords improve discoverability.
Caption and Hashtag Strategies
Captions provide context, personality, and searchability to your images. Balance informative descriptions with authentic voice, avoiding overly promotional language that feels like advertising rather than sharing. Questions in captions encourage comments, which social media algorithms interpret as engagement signals that boost post visibility.
Hashtags connect your content to broader conversations and help new audiences discover your photos. Research hot tub and related lifestyle hashtags to identify which ones are active but not so overwhelmingly large that your post disappears immediately. Combinations of broad tags like #hottub or #hottublife with more specific tags like #hottubposes or your location create multiple discovery pathways.
Storytelling in captions transforms simple photos into shareable content. Explain what made this moment special, share tips others can apply, or ask questions that invite conversation. Social media rewards authentic connection more than perfect images alone, making caption quality nearly as important as photo quality for engagement and growth.
Conclusion: Your Hot Tub, Your Story
Hot tub photography captures far more than simple pictures. These images document relaxation, celebrate relationships, showcase your home’s best features, and create lasting memories of special moments and everyday peace alike. The techniques covered in this guide transform casual snapshots into professional-quality images that you’ll treasure for years and proudly share with friends and family.
Remember that the best pose is always the one where you feel comfortable, relaxed, and genuinely happy. Technical perfection matters less than authentic emotion and real enjoyment of the moment. Use these posing and photography tips as tools to enhance what you’re already experiencing rather than as rigid rules that make photo sessions feel like work.
Experiment freely with different poses, lighting conditions, props, and compositions until you discover what works best for your unique hot tub, environment, and personal style. Photography skills improve with practice, so don’t be discouraged if early attempts don’t match your vision. Each session teaches you something new about angles, lighting, or posing that informs future sessions.
Your hot tub represents an investment in wellness, relaxation, and quality time with people you care about. Documenting these experiences through thoughtful photography creates a visual record of why that investment matters, capturing moments of joy, peace, and connection that make life richer. Whether you’re sharing on social media or keeping images private for personal enjoyment, these photos tell your unique story.
Frequently Asked Questions
How do you pose for a hot tub picture?
The most flattering hot tub poses involve leaning back comfortably, using props like beverages, and positioning your body at a slight angle rather than straight-on to the camera. Shoot from slightly above eye level and keep your shoulders back for better posture. Natural, relaxed expressions always photograph better than forced smiles, so focus on genuinely enjoying the moment.
What are some good props for hot tub pictures?
Shatterproof drinkware like acrylic champagne flutes or wine glasses, floating trays, waterproof books or magazines, plush towels, and stylish sunglasses all enhance hot tub photos. For added visual interest, bath bombs create colored water effects, while fresh flowers or fruit garnishes in drinks add natural beauty. Always prioritize safety by avoiding glass and ensuring electronics are properly protected.
What is the best time of day to take hot tub photos?
Golden hour, which occurs during the first hour after sunrise or the last hour before sunset, provides the most flattering natural light with warm tones and soft shadows. Nighttime photography creates moody, romantic aesthetics when using your hot tub’s LED lights or additional ambient lighting like lanterns or string lights. Avoid harsh midday sun unless you can create shade or use it artistically for backlit silhouettes.
How can I look more confident in hot tub photos?
Confidence comes from good posture and genuine comfort. Sit up straight with shoulders back rather than hunched forward, and find poses that feel natural to your body rather than copying positions that feel awkward. Focus on the actual relaxation and enjoyment of being in the hot tub rather than worrying about the camera. When you’re genuinely relaxed, that comfort shows in your expression and body language.
Can I use my phone to take good hot tub pictures?
Modern smartphones take excellent photos that rival dedicated cameras for most purposes. Use portrait mode to blur backgrounds professionally, and enable night mode for better low-light performance. Protect your phone with a waterproof case rated for submersion, not just splashes. The convenience of having your phone readily available often means you’ll capture more spontaneous moments than if you needed to set up complex camera equipment.
How do you take romantic couple pictures in a hot tub?
Focus on genuine connection rather than stiff, posed positions. Intimate embraces, forehead kisses, champagne toasts, and simply looking at each other while laughing create authentic romantic moments. Position yourselves close together with faces visible to the camera, and shoot during golden hour or with soft artificial lighting for the most flattering results. Candid moments of real interaction often produce better results than overly staged romantic poses.
What should I caption a hot tub photo?
Choose captions that match your photo’s mood and your authentic voice. Simple options include “Soaking up the good life,” “Hot tub therapy,” “Golden hour vibes,” or “Making memories.” For more engagement, ask questions like “What’s your ideal hot tub temperature?” or tell a brief story about what made this particular soak special. Authenticity resonates better than generic or overly promotional language.
How do you deal with steam and fog on the camera lens?
Let your camera acclimate to the humid environment gradually before shooting to minimize condensation. If the lens does fog, wipe it gently with a clean microfiber cloth designed for optics. Lens hoods help protect the front element from both fog and stray light. Alternatively, embrace the steam as an artistic element that creates dreamy, soft-focus effects in your images rather than fighting against it.