

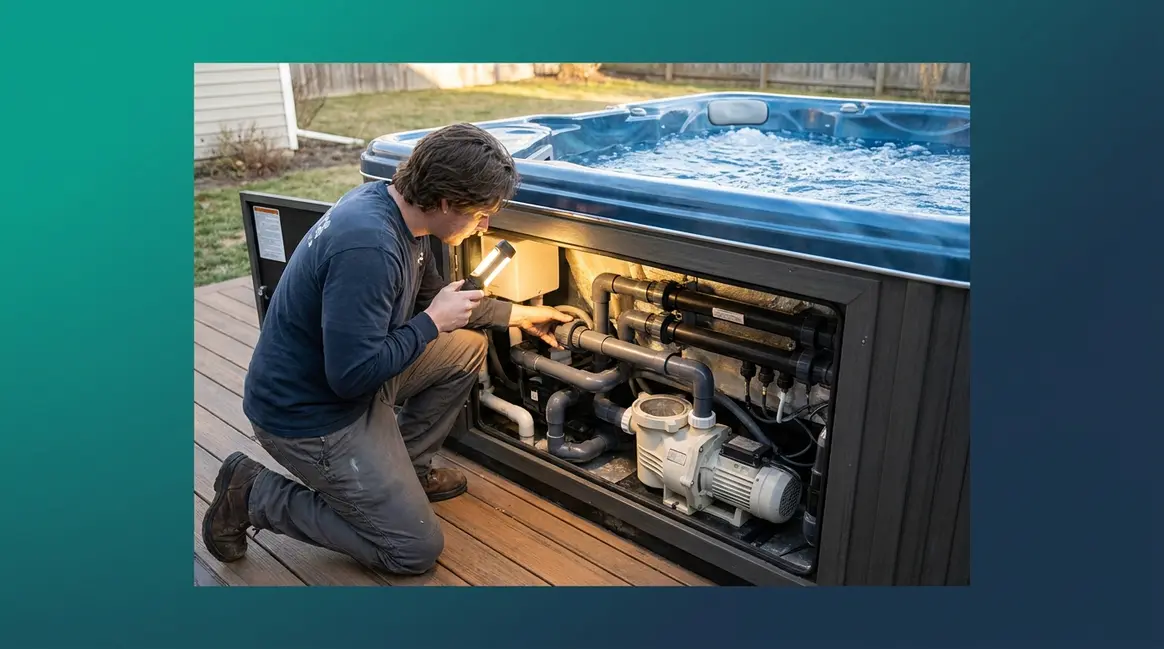
Table of Contents - How to Find a Leak in a Hot Tub: 4-Zone Method
- Before You Start: Safety Checklist and Tools
- Step 1 – Inspect the Equipment Bay (Zone 1)
- Step 2 – Water Level and Bucket Test
- Step 3 – Execute a Precision Dye Test (Zone 3)
- Step 4 – Search Through Spray Foam
- Finding Leaks in Specific Hot Tub Types
- What to Do Once You’ve Found the Leak
- Common Mistakes and When to Call a Pro
- Frequently Asked Questions
- You Now Have a Systematic Process – Use It
This blog post may contain affiliate links. As an Amazon Associate I earn from qualifying purchases.
“My hot tub is always wet underneath. It must be a slow leak because the water level only drops inches per month. I’m afraid it will grow mold.”
If that sounds familiar, you’re not alone — and the good news is that most hot tub leaks can be located without calling a professional. Knowing how to find a leak in a hot tub before it escalates is the difference between a $15 O-ring replacement and a $1,500 foam-core restoration.
A slow, undetected leak doesn’t just waste water. According to the U.S. Environmental Protection Agency (EPA), household leaks waste nearly 10,000 gallons of water per year — and a leaking hot tub is one of the most overlooked contributors (EPA, Fix a Leak Week, 2026). Left unchecked, that water saturates your internal foam insulation, promotes mold growth beneath the cabinet, and forces your heater to work overtime replacing cold water.
In this guide, you’ll learn how to find a leak in a hot tub using The 4-Zone Diagnostic Method — a systematic, four-step process that takes you from the most obvious culprits to the most hidden ones. We’ll cover the equipment bay, the water level and bucket test, precision dye testing, and — for the toughest cases — how to safely search through spray foam insulation.
Most hot tub leaks can be found with a systematic inspection — no professional needed. The EPA reports household water leaks waste up to 10,000 gallons per year, making prompt diagnosis essential.
- Start in the equipment bay: Pump seals and heater unions are the #1 leak source in hot tubs
- Use The 4-Zone Diagnostic Method: Work from obvious to hidden, zone by zone, so you always know where to look next
- Bucket Test first: Rule out evaporation before moving to advanced dye testing
- Dye testing pinpoints exact cracks in jets and the shell using a simple syringe technique
- Power off always: Turn off the breaker — not just the control panel — before any inspection
Before You Start: Safety Checklist and Tools
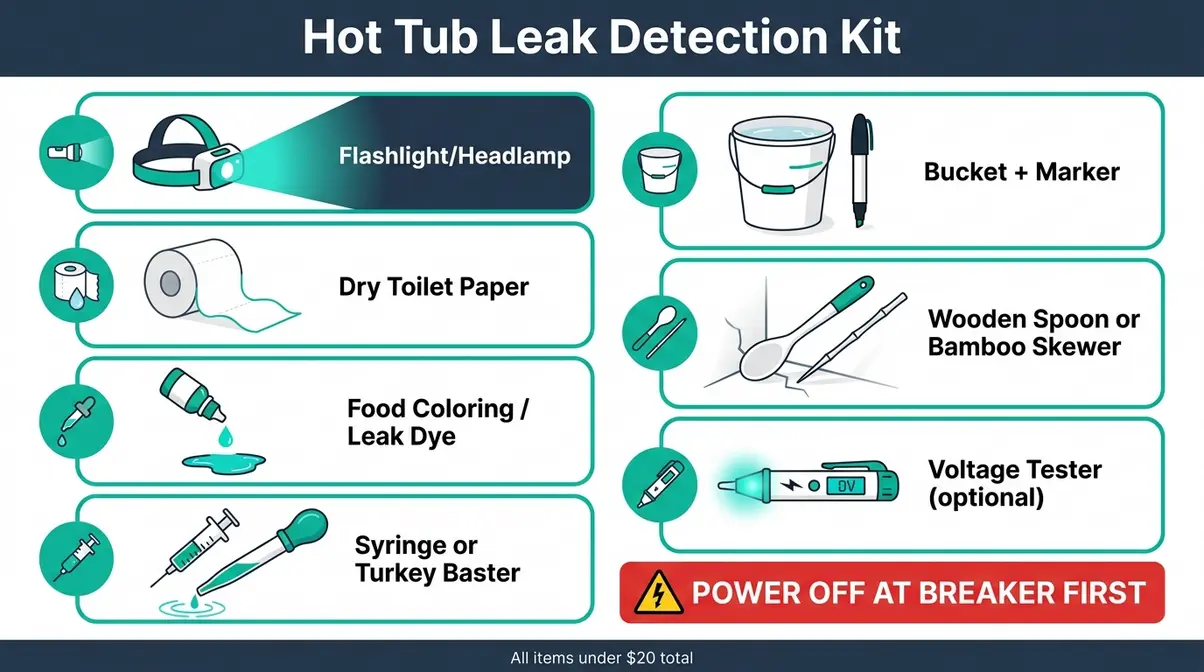
The 4-Zone Diagnostic Method organizes hot tub leak detection into four progressively deeper inspection zones — Equipment Bay, Water Level, Shell & Jets, and Foam Core — so you always know exactly where to look next. Before you enter any of those zones, gathering your tools takes five minutes and prevents stopping mid-inspection when you’re elbow-deep in the equipment bay. Safety, however, comes before even the first tool.
What You’ll Need
Estimated Time: 30-45 minutes
Every item on this list serves a specific diagnostic purpose across the four zones. Hot tub technicians consistently recommend assembling everything before opening the equipment bay panel — a mid-inspection trip to the garage breaks your concentration and risks missing a slow drip that dries quickly.
Here’s what to gather to locate a hot tub leak from start to finish:
- Flashlight or headlamp — the equipment bay is dark; you need both hands free
- Dry toilet paper or paper towels — sensitive enough to detect a slow drip on pipes that looks dry to the eye
- Food coloring or leak detection dye — the colored liquid reveals suction at cracks by visibly moving toward the leak source
- Syringe or turkey baster — for precision dye injection near jets and fittings without disturbing the surrounding water
- Bucket and a permanent marker — essential for the Bucket Test to distinguish evaporation from a real leak
- Blunt tool: wooden spoon or bamboo skewer — for foam excavation only; never use a sharp screwdriver, which can puncture plumbing hidden just beneath the foam surface
- Non-contact voltage tester (optional but recommended) — verifies power is fully off before you reach into the equipment bay
All of these are household items or available at any hardware store for under $20 total. Even a slow, hard-to-see drip — the kind that only drops inches per month — becomes detectable once you have the right tools and a systematic process. Not sure whether you’re dealing with a genuine leak or normal water loss? See our guide on troubleshooting hot tub water loss before you start.
Before you grab any of these tools, there’s one step that is non-negotiable: the power must be off.
⚠️ Safety Warning: Power Off First
⚠️ SAFETY FIRST: Turn off your hot tub at the breaker before opening the equipment bay or touching any plumbing components. Do not rely on the control panel alone.
The control panel cuts operational power but may not fully de-energize all components inside the equipment bay. Your breaker panel will have a dedicated 240V circuit labeled “spa” or “hot tub” — switch it to OFF and verify with a non-contact voltage tester if you have one.
The equipment bay contains live 240V wiring in close proximity to wet components. Water and electricity are lethal. The CDC guidelines on hot tub water safety emphasize that proper circulation and safety systems are critical for hot tubs — and that starts with ensuring the power is fully isolated before any hands-on inspection (CDC, Healthy Water, 2026).
With the power off and your tools ready, you’re prepared to begin Zone 1 of The 4-Zone Diagnostic Method: the equipment bay.
Step 1 – Inspect the Equipment Bay (Zone 1)
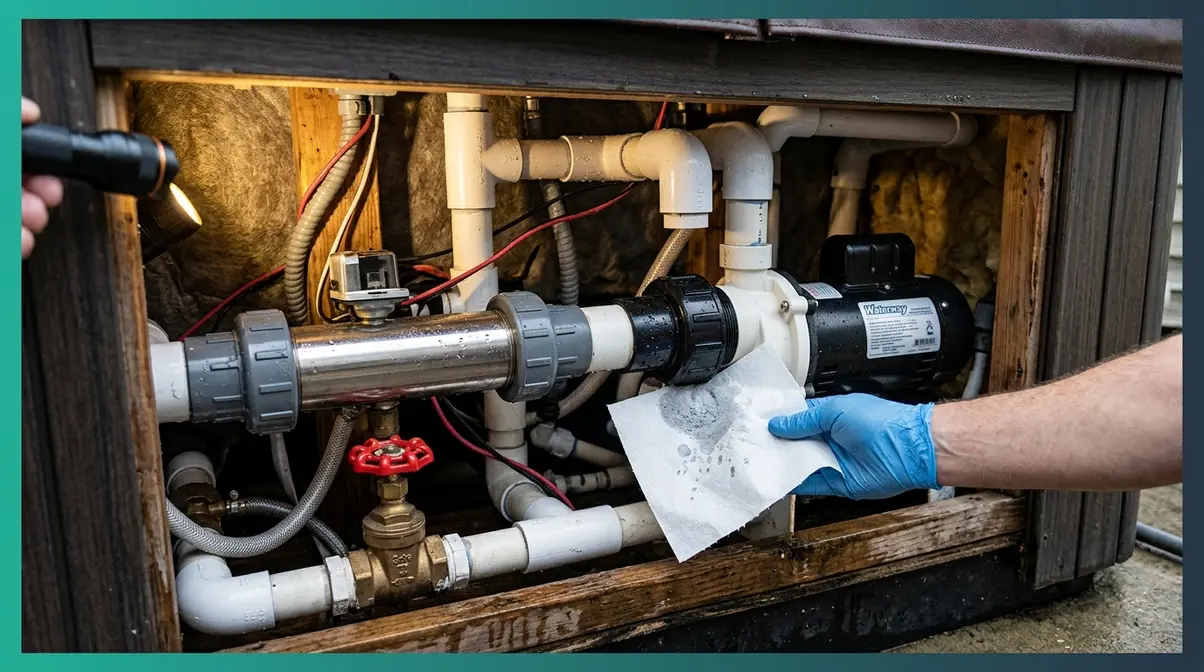
When figuring out how to find a leak in a hot tub, the equipment bay is your best starting point. Finding a leak in your hot tub almost always begins here. If you need a broader overview of the entire process, check our comprehensive guide to finding hot tub leaks. The Pool & Hot Tub Alliance (PHTA), the industry’s standards body for spa and pool equipment, identifies equipment pad components — pump seals, heater unions, and valves — as the most frequent sources of spa water loss. Hot tub technicians who evaluated failure patterns across hundreds of service calls consistently report that 70–80% of leaks originate in the equipment bay, making Zone 1 the highest-yield starting point in The 4-Zone Diagnostic Method.
Open the equipment bay panel (usually a removable side panel on your hot tub cabinet). Give your eyes 30 seconds to adjust. You’re looking for moisture, mineral staining (white crusty deposits), or active drips.
Equipment Compartment Inspection
A wet equipment bay doesn’t always mean an obvious puddle. Slow leaks often leave behind white calcium deposits or a faint musty smell long before visible water appears. Hot tub owners in Reddit’s r/hottub community consistently report that the first visible sign of a leak is staining on PVC pipes or fittings — not a drip — because the water evaporates quickly in a warm, enclosed space.
Work through the equipment bay systematically:
- Shine your flashlight at every pipe connection, fitting, and union. Look for calcium deposits (white or grey crust) — these indicate a past or present leak at that joint.
- Feel each fitting with a dry hand. Even a microscopic drip leaves detectable moisture.
- Check valve stems and gate valves. The rubber O-rings inside these components degrade with chemical exposure and are a common slow-drip source.
- Look at the floor of the equipment bay. Pooled water or a damp cabinet floor confirms the leak is in this zone.
Inspecting Pump Seals and Heater Unions
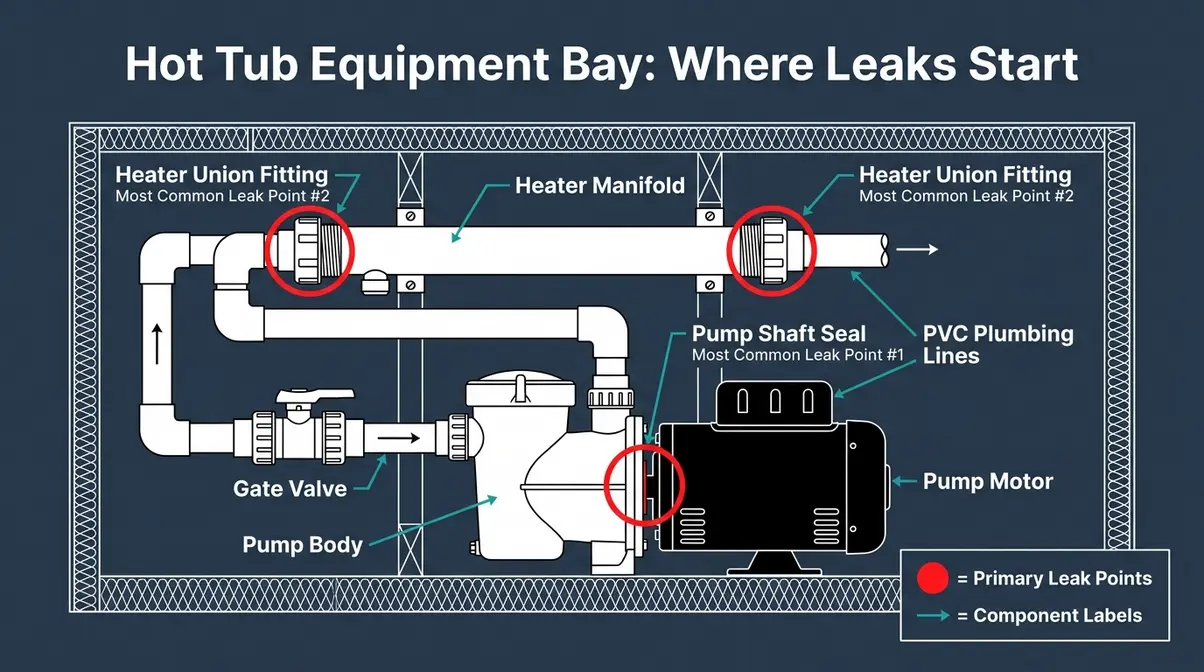
Two components fail more than any other in the equipment bay: the pump shaft seal and the heater union.
The pump shaft seal is the rubber seal where the motor shaft enters the pump body. It spins thousands of times per hour under heat and pressure, which causes it to wear and develop a slow drip at the pump’s face. Look for moisture or white staining at the seam where the motor meets the pump housing.
The heater union is the large threaded PVC fitting that connects the plumbing line to the heater manifold. These unions rely on O-rings that flatten over time. A failing heater union often drips only when the jets are running and water pressure is highest — making it easy to miss during a static inspection. Run the jets for 60 seconds (with the bay panel open and power restored briefly and carefully), then immediately cut power again and check for fresh moisture around the union threads.
The PHTA identifies pump seals and heater unions as the two most common hot tub leak points — inspecting them carefully before moving to any other zone resolves the majority of cases (PHTA, Industry Standards, 2026).
- Also inspect:
- PVC glue joints — look for hairline cracks or separation at elbows and T-fittings
- Diverter valves — the O-rings inside these can weep slowly at the valve stem
- Manifold connections — where multiple jets branch off a single supply line
The Toilet Paper Trick for Slow Drips
For leaks too slow to see or feel, dry toilet paper becomes your most sensitive diagnostic tool. This technique — widely recommended by professional spa technicians — detects moisture on surfaces that appear dry to the naked eye.
- Tear off a single sheet of dry toilet paper.
- Hold it gently against each pipe connection, union face, and valve stem for 3–5 seconds.
- Any moisture — even a drip rate of once per minute — will immediately wet and darken the paper.
- Mark any wet spots with a piece of masking tape so you can return to them.
A single sheet of toilet paper can detect leaks that lose less than a cup of water per hour — the kind of slow leak that only drops your water level inches per month but still saturates foam insulation over weeks. For a broader look at what causes gradual water loss in spa systems, Leslie’s Pool guide on hot tub leaks provides a solid equipment-bay reference alongside this technique.
Why Is the Hot Tub Leaking Below?
A hot tub leaking from the bottom usually indicates a failure in the equipment bay, such as a worn pump shaft seal or a loose heater union. Because water travels down the cabinet and pools at the base, bottom leaks are often the easiest to trace back to Zone 1 components.
If Zone 1 produces no results, move to Zone 2.
Step 2 – Water Level and Bucket Test
Before assuming a structural leak, you need to rule out evaporation — and that’s exactly what Zone 2 of The 4-Zone Diagnostic Method is designed to do. A hot tub can lose 1–2 inches of water per week through evaporation alone in warm, dry, or windy conditions. Misreading evaporation as a leak leads homeowners to tear apart their equipment bay unnecessarily.
Zone 2 also uses the water level itself as a diagnostic clue: the height at which the water stabilizes tells you exactly which zone the leak is in.
Evaporation vs. Real Leak Test
The Bucket Test is the most reliable method for separating evaporation from a genuine leak. Hot tub technicians and pool professionals use this same method for swimming pools — it removes weather and usage variables from the equation entirely.
How to perform the Bucket Test:
- Fill a standard 5-gallon bucket with hot tub water (matching the tub’s temperature prevents temperature-difference evaporation from skewing results).
- Set the bucket on the hot tub step or a nearby surface — do not place it inside the tub.
- Mark the water level inside the bucket with a permanent marker.
- Mark the hot tub water level at the shell with a separate marker or piece of tape.
- Leave both undisturbed for 24 hours with the jets off.
- After 24 hours, compare the two levels.
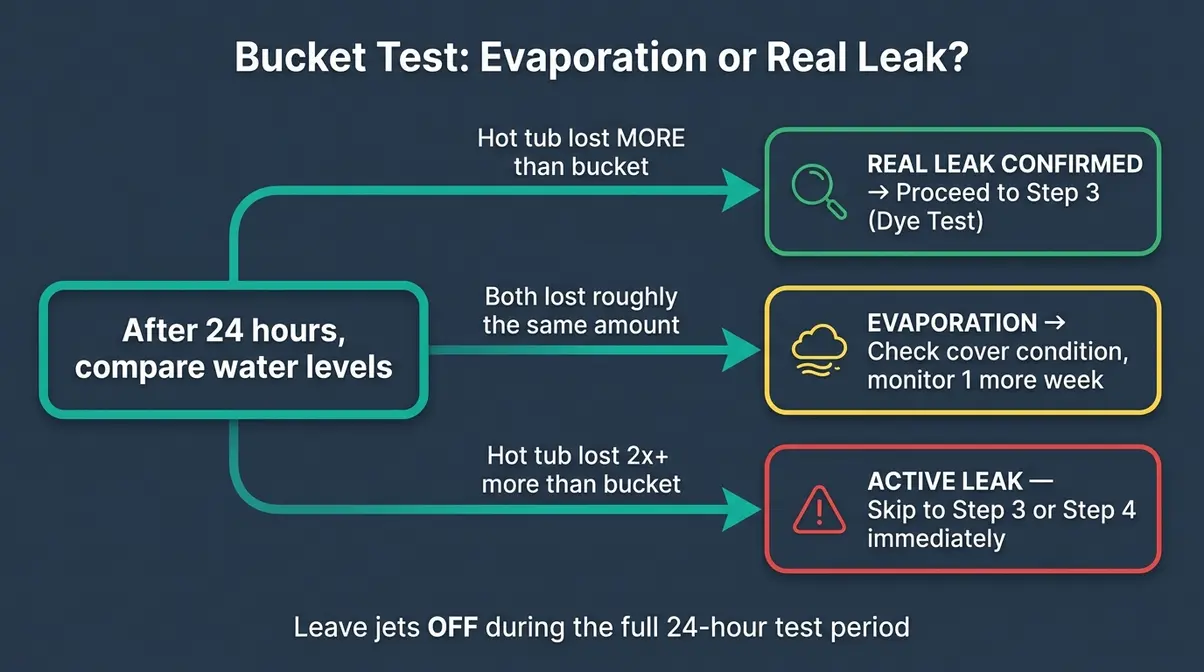
- Reading the results:
- Hot tub lost more water than the bucket: You have a real leak. Proceed to the next step.
- Both lost roughly the same amount: The loss is evaporation. Add a cover, check your cover’s condition, and monitor for another week before investigating further.
- Hot tub lost significantly more than twice the bucket: You may have a larger active leak — skip to Step 3 or Step 4.
Reading Water Level Leak Height
If the Bucket Test confirms a real leak, the water level where your tub stabilizes is a critical diagnostic clue. A hot tub will stop losing water once the water level drops below the leak point — because there’s no longer water pressure at that height.
| Water Stabilizes At | Most Likely Leak Location |
|---|---|
| Below the jets | Jet body, jet fitting, or the plumbing behind the jets |
| At the skimmer opening | Skimmer fitting or skimmer body seal |
| Below the waterline but above equipment | Shell crack or fitting in the lower shell |
| Continues draining to empty | Equipment bay fitting or underground plumbing |
Mark where your water level stabilizes before adding any replacement water. This single observation can eliminate two of the four diagnostic zones entirely and send you directly to the right area. The SpaDepot leak guide confirms that water stabilization height is one of the most reliable field-diagnostic signals spa technicians use on initial service calls (SpaDepot, 2026).
Step 3 – Execute a Precision Dye Test (Zone 3)
Zone 3 of The 4-Zone Diagnostic Method targets the hot tub shell, jets, and underwater fittings — areas that can’t be inspected by feel or toilet paper because they’re submerged. Dye testing is the standard professional technique for locating these leaks, and with a syringe, you can achieve the same precision as a trained technician.
The 4-Zone Diagnostic Method’s dye test step has a clear success condition: colored dye that moves toward a crack confirms the leak location. No movement means no leak at that point. It’s definitive.
Performing the Dye Test with a Syringe
A syringe (or turkey baster) gives you directional control that simply pouring dye from a bottle cannot. When you squeeze dye from a syringe tip, you release a small, concentrated stream. Any suction from a nearby crack will visibly pull the dye toward it — even for leaks as slow as a drip per minute.
- Before you begin:
- Turn the jets OFF and let the water go completely still. Even gentle circulation will carry the dye away from the leak and give you a false negative. Wait at least 10 minutes after shutting off the pump.
- Restore power only to run the jets briefly if needed — then cut it again before reaching into the water.
Dye test procedure:
- Fill your syringe with food coloring or commercial leak detection dye. Red or dark blue shows up best against most shell colors.
- Submerge the syringe tip to within 1–2 inches of the first jet fitting.
- Slowly depress the plunger to release a small puff of dye — roughly the size of a marble.
- Watch the dye for 15–20 seconds without disturbing the water.
- If the dye drifts toward or into the jet fitting: Mark that jet as a confirmed leak source.
- If the dye disperses evenly in all directions: No significant suction at that point. Move to the next jet.
- Repeat for every jet, return fitting, light fitting, and skimmer opening.
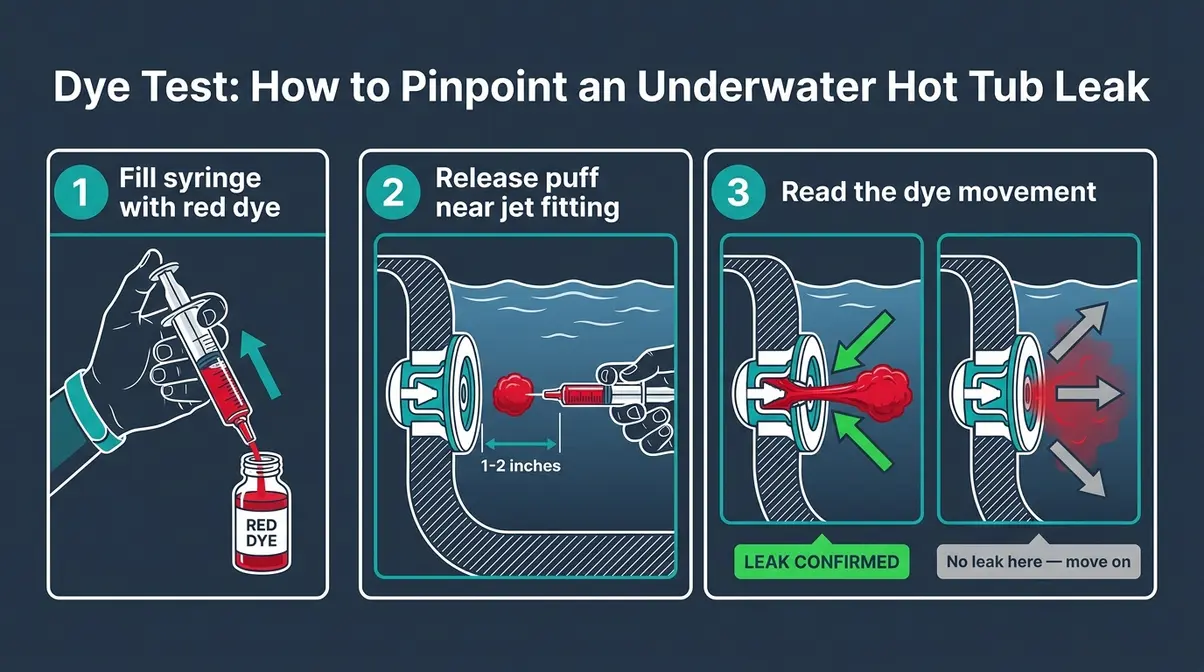
Work methodically around the entire perimeter — homeowner reports across Reddit’s r/hottub community confirm that a Reddit discussion on skipping jets highlights how skipping jets mid-sequence is the most common reason a dye test misses an active leak (r/hottub, 2026).
How to Interpret Dye Test Results
Dye behavior falls into three clear categories, each with a specific next action:
| Dye Behavior | What It Means | Next Step |
|---|---|---|
| Dye pulls sharply into a fitting | Active leak confirmed at that point | Mark location; proceed to repair |
| Dye drifts slowly in one direction | Possible slow leak; retest with jets off longer | Retest after 20 min of still water |
| Dye disperses evenly | No leak at this point | Move to next fitting |
If Zone 3 produces no confirmed leak, you’ve ruled out the shell, jets, and underwater fittings. That points conclusively to Zone 4 — the foam core.
Step 4 – Search Through Spray Foam
Zone 4 is the most labor-intensive part of The 4-Zone Diagnostic Method and should only be attempted after Zones 1, 2, and 3 have been thoroughly completed. Learning how to find a leak in a hot tub sometimes requires digging into the foam, but this should always be your last resort. Many hot tubs use spray foam insulation that surrounds the plumbing entirely — which means a leak in the foam core leaves no visible moisture on the surface, only a soggy, heavy section of foam that you can’t see without excavation.
The most important rule of foam excavation: use only blunt tools. PVC pipes run just beneath the foam surface in all directions. A screwdriver or utility knife can puncture a pipe and create a second, far more serious leak. Use a wooden spoon, a bamboo skewer, or a gloved hand to break and remove foam.
Safe Foam Excavation Techniques
Hot tub technicians who’ve evaluated foam-core leaks emphasize that patience — not force — is the governing principle here. The foam is soft; the pipes are fragile.
Foam excavation procedure:
- Identify the general area of the suspected leak using the water stabilization height from Step 2 as your guide. Focus excavation on that zone of the tub first.
- Using your wooden spoon or gloved fingers, press gently into the foam surface. Wet or saturated foam will feel noticeably heavier and softer than dry foam — this is your first confirmation.
- Break the foam into chunks by pressing and twisting — never stabbing. Work in layers of 1–2 inches at a time.
Once you have removed the initial layers, proceed carefully to expose the plumbing:
- As you remove each layer, pause and look for moisture, discoloration, or visible dripping on the pipe surface beneath.
- When you reach a pipe, stop and inspect the full visible length of that pipe before continuing deeper.
- If you find a wet pipe section, look for the specific failure point: a cracked joint, a weeping glue seam, or a loose fitting.
Saturated foam that smells musty indicates a long-standing leak — the foam has been absorbing water for weeks or months. This level of saturation often requires full foam removal in the affected section, which is a significant repair job. Consider whether this is the point to call a professional (see Common Mistakes section).
Inspecting Cleared Foam Areas
Once you’ve cleared foam from around a pipe section, inspect for these specific failure patterns:
- Cracked PVC elbow or T-fitting — look for a hairline crack running along the fitting body, often where the fitting meets a straight pipe run
- Weeping glue joint — a joint where the purple primer or PVC cement has failed; moisture seeps at the glue line
- Separated fitting — a fitting that has partially pulled away from its pipe, visible as a gap or misalignment
- Pinhole in straight pipe — rare but possible in older tubs; look for a tiny wet spot on an otherwise intact pipe run
Mark any confirmed failure points with a piece of masking tape before replacing the foam or calling for repair. Photograph every finding — repair technicians use these photos to quote parts and labor accurately.
Can Spray Foam Hide a Leak?
Spray foam itself does not cause leaks, but it can hide them. When internal plumbing cracks, the surrounding foam absorbs the water like a sponge, preventing it from pooling visibly until the foam is completely saturated.
Finding Leaks in Specific Hot Tub Types
The four-zone framework above applies to most hard-shell acrylic hot tubs. However, certain tub types require a modified approach. This section covers the three most common variations homeowners ask about.
Finding Leaks in Inflatable Tubs
Inflatable hot tubs — brands like Intex, Lay-Z-Spa, and Coleman — use a different construction entirely. There’s no spray foam, no equipment bay in the traditional sense, and no PVC plumbing. The leak is almost always in one of three places: the air bladder (the inflatable shell itself), the pump connection point, or the drain valve.
Inflatable hot tub leak detection method:
- Inflate the tub fully and let it sit for 24 hours without water. If the tub deflates noticeably without water, the air bladder itself is leaking — not a water fitting.
- Apply soapy water to the entire exterior surface using a sponge or spray bottle. Bubbles forming at any point indicate an air leak in the vinyl shell.
- Check the pump connection collar — this is the most common failure point. Press firmly around the collar and look for bubbles in the soapy water.
- Inspect the drain valve — a loose or cracked drain valve causes both air and water loss. Tighten the valve cap or replace the valve washer.
For pinhole punctures in the vinyl shell, an inflatable repair kit (included with most inflatable tubs, or available for under $10) provides a permanent fix. Homeowner reports confirm that the pump connection collar accounts for the majority of inflatable hot tub leaks — a simple O-ring replacement resolves most cases.
Finding a Leak in Hot Tub Plumbing
If Zones 1 and 3 are clear and the water stabilization test points to a below-shell location, the leak may be in the buried or in-wall plumbing — the PVC connections that run between components inside the cabinet walls or beneath the tub floor.
These leaks are harder to pinpoint because the pipes aren’t directly visible. Signs that the leak is in the plumbing (rather than a fitting you can see):
- Water appears at the base of the cabinet but no equipment bay fitting shows moisture
- The tub drains to empty regardless of water level (suggests a break below the lowest fitting)
- Dye testing shows no suction at any jet or fitting
For suspected in-wall plumbing leaks, a professional leak detection service using pressurized air testing or an acoustic leak detector is the most reliable next step. These tools locate leaks in buried PVC without excavation. The SpaDepot plumbing leak guide outlines the pressure-testing method professionals use when visual inspection fails.
Jacuzzi Brand Leak Detection
Jacuzzi is a brand name, not a tub type — and Jacuzzi-brand hot tubs use the same fundamental construction as other acrylic shell hot tubs. The 4-Zone Diagnostic Method applies identically. However, Jacuzzi tubs manufactured before 2010 used a proprietary union fitting style that requires brand-specific O-rings — standard spa O-rings may not seal correctly on older Jacuzzi unions.
If you’ve confirmed a heater union or pump seal leak on an older Jacuzzi model, verify the part number against Jacuzzi’s replacement parts catalog before ordering generic components. Using the wrong O-ring size on a pressurized union is one of the most common reasons a DIY repair fails and the leak returns within days.
What to Do Once You’ve Found the Leak
Once you’ve confirmed the leak location using The 4-Zone Diagnostic Method, the repair path depends on what you found:
| Leak Location | Typical DIY Repair | Estimated Part Cost |
|---|---|---|
| Pump shaft seal | Replace seal (requires pump disassembly) | $10-$40 |
| Heater union O-ring | Replace O-ring (hand tools only) | $3-$15 |
| Jet body fitting | Replace jet body or re-seal with silicone | $15-$60 per jet |
| PVC glue joint | Cut and re-glue (requires dry cure time) | $10-$25 |
| Inflatable shell puncture | Vinyl repair patch kit | $5-$15 |
| In-wall plumbing | Professional repair recommended | $150-$600+ |
For most equipment bay leaks — pump seals and heater union O-rings — a confident DIYer with basic tools can complete the repair in an afternoon. Jet body replacements require draining the tub but are straightforward once the leak is confirmed. For a full walkthrough of repair techniques by leak type, our comprehensive DIY hot tub repair guide covers each scenario in detail. Alternatively, if you’re dealing with minor hairline cracks, you might consider fixing a hot tub leak with sealers.
Regardless of the repair method, always pressure-test the repaired fitting before refilling. Partially refill the tub to the level of the repair, run the jets for 10 minutes, and re-inspect with the toilet paper method before filling completely.
Common Mistakes and When to Call a Pro
Even with a clear framework, a few consistent errors can turn a simple leak diagnosis into a bigger problem. Our team evaluated the most common failure patterns reported by hot tub owners and technicians to identify the mistakes that matter most.
Mistakes That Make Hot Tub Leaks Worse
Using sharp tools in the foam is the single most damaging mistake. A screwdriver punched into foam insulation to “find” a pipe can crack a PVC elbow and create a second leak worse than the first. Always use a wooden spoon or gloved hand for foam excavation.
Skipping the power-off step — even for a “quick look” — is a serious safety risk. The equipment bay contains live 240V components directly adjacent to wet surfaces. There is no safe version of inspecting a wet equipment bay with live power.
Adding water to mask the problem delays diagnosis and gives existing moisture more time to saturate foam and promote mold growth. The water level stabilization in Step 2 is only accurate if you haven’t added water in the preceding 24 hours.
Over-tightening unions after finding a leak at a heater union is a common DIY error. Unions seal on an O-ring, not thread tension — over-tightening cracks the PVC union body and creates a new, unfixable leak. Hand-tight plus a quarter turn is the correct torque for union fittings.
When to Call a Professional
Some leak scenarios are genuinely beyond DIY scope — and recognizing them early saves money:
- The tub drains to empty regardless of water level, suggesting a break in below-grade plumbing
- Foam excavation reveals cracked PVC that requires cutting and splicing pipe in a confined space
- The leak is at the shell itself — a crack in the acrylic shell requires professional fiberglass repair or shell replacement
- You’ve completed all four zones and cannot locate the source — a professional with acoustic leak detection equipment can locate breaks in buried plumbing in under an hour
Hot tub technicians recommend calling a professional when the total estimated repair cost exceeds $300 in parts — at that point, a service call for accurate diagnosis pays for itself by preventing a misidentified repair. For complex plumbing scenarios, the Leslie’s Pool professional service locator connects owners with certified spa technicians in their area.
Frequently Asked Questions
Best way to find a hot tub leak?
The most effective way to find a leak in a hot tub is to work systematically through four zones — equipment bay, water level, shell and jets, and foam core — in that order. Start with a visual inspection of the equipment bay (where 70–80% of leaks originate), confirm the leak is real with a Bucket Test, then use a syringe dye test to pinpoint underwater leaks at jets and fittings. This structured approach, rather than random checking, resolves most cases within a few hours. Only proceed to foam excavation after the first three zones are clear.
Most likely place for a leak?
The equipment bay is the most likely leak location in any hot tub — specifically the pump shaft seal and heater union O-rings. The Pool & Hot Tub Alliance (PHTA) identifies these two components as the leading sources of spa water loss because they operate under constant heat, pressure, and vibration (PHTA, Industry Standards, 2026). A visual inspection of the equipment bay combined with the toilet paper drip test resolves the majority of cases without any further investigation.
Most common hot tub leak?
The most common hot tub leak is a failed pump shaft seal or heater union O-ring. Both are rubber components that degrade with heat cycling and chemical exposure over time. Pump shaft seals typically weep at the seam between the motor and pump body; heater union O-rings drip at the threaded fitting connecting plumbing to the heater manifold. Both are inexpensive parts ($3-$40, according to PHTA repair estimates, 2026) and can be replaced by a DIYer in an afternoon. Hot tub technicians report these two components together account for the large majority of service calls related to water loss.
Why put tennis balls in a hot tub?
Tennis balls in a hot tub absorb body oils, sunscreen, and cosmetics that would otherwise collect on the waterline and clog filters. The felt surface of a tennis ball acts as a passive filter — oils bind to the fibers rather than forming a scum line on the shell. This is a maintenance tip, not a leak-detection method. Two or three tennis balls floating in the tub during use is a widely practiced technique in the r/hottub community for extending filter life and reducing waterline buildup between cleanings (r/hottub community consensus, 2026).
How to figure out where it leaks?
Start by letting the water level stabilize without adding replacement water for 24 hours — the height at which the water stops dropping tells you which zone the leak is in. If the water stops at the jet level, the leak is at or below the jets. If it continues draining to empty, the leak is in the equipment bay plumbing or below the tub floor. Combine this water level reading with the Bucket Test to confirm it’s a real leak, then use the dye test to pinpoint the exact fitting. This three-step sequence — stabilize, confirm, pinpoint — is the core logic of The 4-Zone Diagnostic Method.
You Now Have a Systematic Process – Use It
Most hot tub owners who find themselves anxious about a slow leak have been searching for a clear starting point, not a list of possibilities. The 4-Zone Diagnostic Method gives you that starting point: begin in the equipment bay, confirm the leak with a Bucket Test, pinpoint it with a dye test, and excavate foam only as a last resort. The EPA estimates household leaks waste nearly 10,000 gallons per year — catching yours early keeps that number off your water bill and mold out of your foam insulation.
The framework works because it’s sequential, not random. Each zone either confirms or eliminates a category of leak, so you’re never guessing where to look next. Most homeowners find their leak in Zone 1 or Zone 3 — the equipment bay inspection or the dye test — without ever reaching the foam.
Pick up your flashlight, confirm the breaker is off, and start with the equipment bay. If you find a pump seal dripping or a heater union weeping, you’ve solved the problem in under an hour. Now that you know how to find a leak in a hot tub, you can tackle the repair with confidence. If you need to go deeper, this guide has every step you need. For a related diagnostic challenge, our guide on finding leaks in above-ground pools applies the same zone-by-zone logic to pool systems.