Table of Contents - Why Is My Hot Tub Losing Water? | Leak Detection & Quick Fixes
This blog post may contain affiliate links. As an Amazon Associate I earn from qualifying purchases.
Why Is My Hot Tub Losing Water? | Leak Detection & Quick Fixes
How to Tell If Your Hot Tub Is Losing Water (Troubleshooting Guide)

Signs of gradual water loss
- Consistent water level drops – A steadily sinking water line, especially when nobody’s been splashing around lately, usually spells trouble.
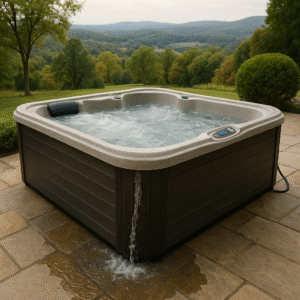
- Unexplainable puddles – Finding wet spots around your spa base? Those little puddles tell a big story, particularly when your jets are bubbling away.
- Sudden changes in chemical levels – When your perfectly balanced chemicals go haywire overnight, water might be escaping through a hidden leak.
- Unusually high water bills – Constantly topping off your tub? Your wallet might notice before you do.
How much water loss is normal
| Water Loss Rate | Likely Cause | Action Needed |
|---|---|---|
| 1-2 inches/week | Normal evaporation | Regular monitoring; ensure cover is used |
| 2-3 inches/week | Excessive evaporation | Check environmental factors; test for leaks |
| 3+ inches/week | Potential leak | Perform leak test or call professional |
- Temperature (both water and air)
- Humidity levels
- Wind conditions
- Surface area exposure
- Frequency of use
- Cover quality and fit
Why evaporation isn’t always the cause
Usage patternsEquipment issuesSeasonal changes
How to Test for a Leak in Your Hot Tub
Step-by-step leak test method
- Turn off the power supply completely – safety first!
- Make sure your control panel is totally inactive
- If your tub has a water shut-off valve, turn it off
- Fill your hot tub to its normal “ready-to-soak” level
- Pop off those side panels to peek at the equipment area
- Examine pipes and joints – any looseness or damage?
- Check those gaskets and O-rings around key parts
- Give fittings a quick inspection and gentle tighten if they seem loose
- Look for soggy insulation foam inside the cabinet – a telltale clue!
Marking the waterline
- Fill your tub to its happy place (normal operating level)
- Use a waterproof marker or tape to mark exactly where the water sits
- Cover your tub to keep evaporation from crashing the party
- Leave your tub alone for a full 24 hours – no peeking!
- Come back and see if the water’s playing limbo under your mark
Do’s and Don’ts of Marking the Waterline
Do’s
- Use waterproof markers or tape
- Mark multiple spots around the tub
- Take a photo for reference
- Cover the tub during testing
- Wait a full 24 hours for results
Don’ts
- Use materials that could dissolve in water
- Rely on just one marking point
- Disturb the water during testing
- Leave the tub open to evaporation
- Rush the testing process
Testing with and without the pump running
With Pump Off:
- Fill the tub and mark the waterline
- Make sure all power is completely off
- Play the waiting game for 24 hours
- Check where the water level decides to stop dropping
With Pump Running:
- Top up your tub to hit that original mark
- Fire up the pump and jets
- Watch for rapid water vanishing acts
- Look for sneaky sprays or drips from pressurized connections
Common Places Where Hot Tubs Leak
Pump and motor seals
- Safety first! Turn off all power before you start poking around
- Grab a flashlight and look for drips coming from these trouble spots:
- Shaft seal – This little ring hugs your motor shaft and can fail if your pump ever ran dry
- Union fittings – Those big white rings connecting your pump need their O-rings to stay happy
- Volute – The fancy name for the housing around your impeller – it can crack if it freezes
Heater and plumbing connections
- Plumbing unions that connect to the heater
- Pressure switches or sensors getting moody
- The heater assembly itself deciding to retire early
Jets, valves, and fittings
| Component | Leak Cause | Quick Fix |
|---|---|---|
| Jets | Gaskets gone bad | Replace gasket or tighten locknut |
| Diverter valves | O-rings worn out | Give O-rings yearly grease massage |
| Waterfall valves | Cracked valve body | Time for a whole new valve |
| Plumbing connections | Loose fittings | Hand-tighten (no tools needed!) |
Cracks in the shell or acrylic surface
- Spider web patterns that could signal structural issues
- Black spots along cracks (water’s calling card)
- Mysterious bumps in the footwell that might mean water damage underneath
DIY Fixes for Minor Hot Tub Leaks
Tightening loose fittings
- Turn off all power to your hot tub (safety first!)
- Find the unions (those big white rings) on both sides of your pump and heater
- Run your hand underneath to feel for any sneaky drips
- Give any wet unions a gentle clockwise twist
- Use only your hands – no wrenches needed!
Using waterproof sealants
- Drain the water below your leak spot
- Clean and dry the area (water and sealant are not friends!)
- Apply a marine-grade epoxy or specialized hot tub sealant
Do This!
- Take out filter cartridges first
- Shake the bottle like you mean it
- Let it circulate 6-8 hours
- Wait 48 hours before normal use
Don’t Do This!
- Use with sand filters without setting to recirculate
- Dump in extra hoping for better results
- Hop in for a soak before the leak stops
- Expect miracles for gaping holes
Replacing worn gaskets or O-rings
- Power down and unplug your hot tub
- Close the gate valves if you have them (saves draining the whole tub!)
- Unscrew the union connecting to your pump or heater
- Check the O-ring for any cracks or stretching
- Pop in an exact-sized replacement
- Add a dab of silicone lubricant to the new O-ring (never use petroleum jelly – it’s an O-ring’s worst enemy!)
When to drain the tub before repair
- Yes, drain required for:
- Shell cracks or sneaky pinholes
- Skimmer body repairs
- Major plumbing surgery
- Heater element gasket replacements
- No draining needed for:
- Union tightening (phew!)
- Using liquid sealants
- Some valve repairs
When to Call a Professional Technician
Leaks that persist after DIY fixes
- Professional techs bring specialized FreshWater IQ tools and training to the table
- Experts can use fancy ultrasonic leak detectors to sniff out sneaky leaks
- Running a leaking tub risks serious damage to your spa’s vital organs – insulation, electrical bits, and frame
Do’s and Don’ts When Dealing with Persistent Leaks
Do’s
- Shut down the system immediately
- Document all previous repair attempts
- Take photos of visible issues
- Request detailed estimates
Don’ts
- Continue running the tub with unknown leaks
- Attempt increasingly invasive DIY fixes
- Ignore small leaks hoping they’ll resolve
- Choose the cheapest option without research
Electrical or internal shell issues
- Immediately shut down your hot tub if you notice tripped breakers, flickering lights, or weird pump noises
- Keep an eye out for water near electrical components – a recipe for disaster!
- Does your GFCI keep tripping? That’s your spa’s way of waving a red flag
Warranty considerations before repair
- DIY repairs often send warranties straight to the shredder
- Many Caldera Spas and other brands only honor warranties with certified tech repairs
- Expect travel fees from some dealers ($50-$100) even for warranty calls
Final Thoughts
FAQs
Q1. How much water loss is normal for a hot tub?Q2. What are some common signs of a hot tub leak?Q3. How can I test for a leak in my hot tub?Q4. What are some DIY fixes for minor hot tub leaks?Q5. When should I call a professional for my leaking hot tub?


