Table of Contents - Hot Tub in Garage Setup Guide: NEC, CFM & Floor Load
- Safety, Permits, and Prerequisites
- Step 1: Assess Feasibility, Space, and Permits
- Step 2: Prepare the Garage Floor for Heavy Loads
- Step 3: Install Ventilation and Moisture Control
- Step 4: Meet Electrical and Plumbing Requirements
- Step 5: Delivery, Setup, and Maintenance
- Common Garage Hot Tub Installation Mistakes
- Frequently Asked Questions
- Getting Your Garage Hot Tub Installation Right
This blog post may contain affiliate links. As an Amazon Associate I earn from qualifying purchases.
A hot tub in garage setup guide sounds simple until you realize three separate systems can each independently cause catastrophic failure. The floor can crack under 6,000 pounds of water and fiberglass. Mold can colonize your walls within 30 days of first fill. A single wiring mistake near water can be fatal. Most online guides address one of these risks. This guide addresses all three — simultaneously — because a garage hot tub only works when structural support, ventilation, and electrical are all correctly sized together.
That principle is The 3-System Rule: you cannot optimize one system in isolation. Undersized ventilation ruins a perfectly installed floor. Perfect electrical work fails if moisture corrodes the panel. Every section of this guide is built around that framework, giving you the exact numbers — CFM formulas, PSI thresholds, NEC clearances — that generic advice leaves out.
“Most hot tubs are built for outdoor or big spaces. If you plan on putting it in a small space, be sure to have enough ventilation space around your spa cabinet.” — Hot tub owner, community forum
Installing a hot tub in garage spaces requires coordinating structural, ventilation, and electrical systems — the 3-System Rule — to avoid floor failure, mold, and electrical hazards.
- Floor Load: A filled hot tub weighs 3,000–6,000 lbs; verify your concrete slab supports ≥ 40 PSI before installation
- Ventilation: Use the CFM formula (room volume × air changes per hour ÷ 60) to size your exhaust fan; target 8–10 ACH for hot tub spaces
- Electrical: NEC Article 680 requires a dedicated 240V/50A GFCI-protected circuit and a disconnect located 5+ feet from the water’s edge — all work must be performed by a licensed electrician
- Permits: Most jurisdictions require electrical, plumbing, and structural permits before installation begins
Safety, Permits, and Prerequisites

A garage hot tub installation involves real physical danger — not theoretical risk. Before prepping a garage or ordering a single component, two non-negotiable requirements must be in place: a clear safety framework and a complete permit package.
Electrical Safety Disclaimer
⚠️ SAFETY NOTICE — LICENSED ELECTRICIAN REQUIRED
All electrical work for a hot tub installation — including circuit installation, GFCI breaker wiring, disconnect mounting, and bonding — must be performed by a licensed electrician. Hot tubs operate at 240V near water. According to the Consumer Product Safety Commission (CPSC), electric shock drowning and electrocution remain leading causes of hot tub fatalities, and the majority involve improper wiring or missing GFCI protection. Never perform DIY electrical work on a hot tub circuit. This guide describes what code requires — not how to wire it yourself.
This disclaimer applies to every electrical reference in this guide. When Step 4 describes GFCI circuit requirements, that information is for planning conversations with your electrician — not a DIY wiring tutorial.
What You’ll Need Before Installation
Gather these items before beginning any physical work:
- Permits: Contact your local building department for electrical, plumbing, and structural permits. Most jurisdictions require all three for an indoor hot tub. Prairie Electric notes that permit requirements vary significantly by municipality, so confirm your local codes before purchasing equipment.
- Structural assessment: If your garage floor shows visible cracks, settling, or unevenness greater than ¼ inch per 4 feet, consult a structural engineer before proceeding.
- Licensed electrician (contracted): Have your electrician review the installation plan before floor work begins — conduit routing decisions affect where pads and sub-bases are placed.
- Measurements: Garage interior dimensions (length × width × ceiling height), door opening width, and door height.
- Hot tub specifications: Dry weight, filled weight, footprint dimensions, and electrical requirements from the manufacturer’s spec sheet.
- Tools and materials: Tape measure, 4-foot level, moisture meter, concrete crack filler, vapor barrier sheeting (6-mil polyethylene minimum), and a dedicated notebook for tracking permit numbers and inspection dates.
Estimated prep time: 1–2 weeks to gather permits, contractor quotes, and materials before physical installation begins.
Step 1: Assess Feasibility, Space, and Permits

A garage hot tub installation is genuinely viable — but only for garages that meet specific structural, spatial, and regulatory thresholds. For a broader overview, refer to our comprehensive guide to garage hot tub setup. Skipping this feasibility step is the single most common reason installations fail or get red-tagged by inspectors.
Pros and Cons of a Garage Hot Tub
Understanding both sides helps you make a confident decision rather than discovering problems mid-installation. You should also weigh these against other considerations for indoor hot tub placement.
Advantages of a garage hot tub:
- Year-round use without weather exposure. Unlike an outdoor installation, your garage protects the tub from UV degradation, freeze-thaw cycles, and debris. This typically extends cover and cabinet life by 3–5 years.
- Privacy. No neighbors, no sightlines, no outdoor lighting requirements.
- Lower heating costs in a semi-heated space. A garage that stays above 40°F significantly reduces the tub’s heating load compared to fully outdoor installations in cold climates.
- Security. Locking the garage door protects an expensive asset.
- No outdoor pad or landscaping costs. You’re using existing concrete — often the most expensive part of an outdoor installation.
Disadvantages and honest risks:
- Moisture damage is inevitable without proper ventilation. A hot tub evaporates 1–3 gallons of water per day during normal use. In an enclosed garage, that moisture attacks drywall, ceiling joists, stored tools, and the garage door opener’s electrical components within months.
- Chemical odors concentrate indoors. Chlorine and bromine off-gas in any space. In an outdoor setting, this dissipates immediately. In a closed garage, it builds to levels that can irritate airways with regular use.
- Ongoing maintenance is more demanding. Water chemistry in an enclosed space requires more frequent testing because evaporation concentrates chemicals faster.
- Why do so many people get rid of hot tubs? According to real owner surveys, the top three reasons are high operating costs (electricity and chemicals), maintenance fatigue, and lifestyle changes. A garage installation adds a fourth: inadequate ventilation that damages the space and creates a mold remediation bill that exceeds the tub’s value.
The honest verdict: a garage hot tub is an excellent choice for homeowners who commit to the full 3-System Rule installation from day one. Cutting corners on any of the three systems turns an asset into a liability.
Space, Clearance, and Permit Requirements
Minimum clearance requirements:
Professional installers recommend leaving at least 2 feet of clearance on all sides of the hot tub cabinet for service access. This is both a practical maintenance requirement and a code expectation in many jurisdictions. Jacuzzi’s official installation guidance also specifies minimum clearances around the cabinet perimeter for proper airflow around the equipment bay.
- Measure your garage’s interior dimensions wall-to-wall.
- Subtract the hot tub’s footprint dimensions (from spec sheet).
- Subtract 24 inches on each side for service clearance.
- The remaining space must be positive — if it’s zero or negative, the tub is too large for that garage.
- Add 36 inches in front of the control panel side for operation access.
- Verify ceiling height: most hot tubs require 7.5–8 feet of overhead clearance when the cover is open on its hinge.
Permit checklist:
| Permit Type | Typical Jurisdiction Requirement | Notes |
|---|---|---|
| Electrical permit | Required in virtually all jurisdictions | Covers 240V circuit and GFCI disconnect |
| Plumbing permit | Required where fill/drain connects to home supply | May be waived for garden hose fill |
| Building/structural permit | Required in many jurisdictions | Covers floor load documentation |
| Zoning approval | Varies | Some zones restrict enclosed water features |
Contact your local building department with the tub’s spec sheet in hand. Most offices can confirm requirements in a single visit or phone call.
Choosing the Right Hot Tub Type for Your Garage
Your garage’s electrical panel capacity is the primary decision driver here.
- Plug-and-play hot tubs (120V):
- Require a standard 20A GFCI-protected outlet — no panel upgrade needed.
- Typically seat 2–4 people; water capacity 150–300 gallons.
- Heating is slower (4–8 hours to reach temperature) and less powerful.
- Best for: garages with limited panel capacity, renters, or lower-budget installations.
- Limitation: In a cold garage, 120V heaters struggle to maintain temperature when ambient temps drop below 40°F.
- Hard-wired 240V hot tubs:
- Require a dedicated 240V/50A circuit (most models) installed by a licensed electrician.
- Seat 4–8 people; water capacity 300–500 gallons.
- Heat faster and maintain temperature more efficiently in cold environments.
- Best for: permanent garage installations with adequate panel capacity.
- Limitation: Higher upfront electrical cost ($800–$2,500 for the circuit installation depending on panel distance).
Recommendation: For a permanent garage installation intended for regular year-round use, a 240V hard-wired tub is the more practical long-term choice. The heating performance difference matters significantly in a semi-heated garage during winter months.
Step 2: Prepare the Garage Floor for Heavy Loads

The floor is the foundation of the entire 3-System Rule. A filled hot tub weighs between 3,000 and 6,000 pounds depending on size and water capacity (verified across manufacturer specifications from Jacuzzi, Hot Spring, and Bullfrog for standard residential models). That load is concentrated on a relatively small footprint — typically 60–100 square feet. Getting this step wrong doesn’t produce a gradual problem; it produces a sudden, catastrophic one.
Checking Your Concrete Slab’s Load Capacity
A standard residential concrete slab typically supports 40–80 pounds per square inch (PSI) under normal conditions (Penn State Extension, 2023). The key variable is whether your specific slab was poured to residential or commercial specifications, and whether it has degraded over time.
How to calculate your floor load requirement:
- Find your hot tub’s maximum filled weight on the spec sheet (include water + occupants for worst-case: add 175 lbs per person at maximum capacity).
- Measure the hot tub’s base footprint in square inches (length × width, both in inches).
- Divide filled weight by footprint area: PSI = Total Weight ÷ Square Inches of Footprint.
- Compare to your slab’s rated capacity. If unknown, assume the residential minimum of 40 PSI and verify with a structural engineer if your calculation exceeds 35 PSI (leaving a 5 PSI safety margin).
- If the slab shows cracks wider than 1/8 inch, significant settling, or heaving, consult a licensed structural engineer before proceeding — do not assume the floor is adequate.
- Worked example:
- Hot tub filled weight: 4,800 lbs (including 4 occupants at 175 lbs each = 700 lbs + 4,100 lbs water/tub)
- Footprint: 84 inches × 84 inches = 7,056 square inches
- PSI = 4,800 ÷ 7,056 = 0.68 PSI — well within residential slab capacity
Note: Most residential hot tub footprints distribute weight so efficiently that point-load PSI is rarely the concern. The greater risk is differential settling — one corner of the slab sinking more than another over time — which is why crack inspection matters more than raw PSI math for most installations.

Leveling a Sloped Garage Floor
Garage floors are intentionally sloped for drainage — typically ⅛ to ¼ inch per foot toward the door. A hot tub requires a level base within ¼ inch across the full footprint; an unlevel installation stresses the shell, misaligns jets, and causes uneven wear on the pump seals.
- Set a 4-foot level across the proposed installation area in multiple directions (front-to-back, side-to-side, and both diagonals).
- Record the high and low points. Calculate total elevation difference across the tub’s footprint.
- For slopes under ½ inch total: use adjustable hot tub base pads or composite shims rated for the tub’s weight.
- For slopes between ½ inch and 2 inches: pour a self-leveling concrete overlay (Quikrete Self-Leveling Floor Resurfacer or equivalent). Allow full cure time — 24 hours before foot traffic, 72 hours before placing the tub.
- For slopes exceeding 2 inches: consult a concrete contractor. Grinding or full re-pour may be required.
- After leveling, re-check with the 4-foot level. Confirm ≤ ¼ inch variance before proceeding.
Note: Never use wood shims under a hot tub. Wood compresses under sustained load and degrades rapidly in the moisture-heavy garage environment a hot tub creates.
Installing a Hot Tub Pad and Insulated Sub-Base
Cold concrete pulls heat from the tub’s base continuously. When choosing the right hot tub foundation pad, ensure it provides adequate insulation. If you are also considering outdoor alternatives, installing a hot tub on a paver base requires different preparation. In a garage that drops below 50°F, an uninsulated base can increase your monthly heating cost by 15–25% compared to an insulated installation (DOE Building Technologies Office, 2024 residential efficiency guidelines).
- Clean the leveled concrete surface thoroughly — remove oil stains, dust, and loose material.
- Apply a moisture barrier: roll out 6-mil polyethylene sheeting across the full footprint plus 12 inches on each side. Tape seams with moisture-barrier tape.
- Install rigid foam insulation boards (2-inch XPS foam, rated R-10 minimum) over the moisture barrier. Cut to fit the tub footprint precisely.
- Place a hot tub equipment pad or composite spa pad over the insulation. These pads distribute weight evenly and protect the foam from point loads under the tub’s base frame.
- Alternatively, use a pre-manufactured insulated hot tub base system (EZ Pad, Dura-Base, or equivalent) that integrates all three layers.
- Verify the completed assembly is still level to within ¼ inch before placing the tub.

Drainage and Floor Protection
Drainage planning is frequently skipped until the first water change — at which point homeowners discover that 400 gallons of water has nowhere to go except the garage door gap.
- Locate your floor drain (if present). Most garages with a floor drain have it positioned near the center or door. Confirm it connects to a storm drain or sump, not a sanitary sewer — hot tub chemicals are regulated in some municipalities.
- If no floor drain exists: Plan for submersible pump drainage. A ¾-HP submersible pump can drain a 400-gallon tub in approximately 20–30 minutes through a garden hose routed to a driveway drain or yard area.
- Install a floor slope channel around the tub perimeter if possible — a shallow concrete channel (1 inch deep, 4 inches wide) sloped toward the drain catches splash and overflow before it spreads.
- Apply epoxy floor coating to the area around the tub. Epoxy seals the concrete against water absorption, prevents mold growth in the concrete pores, and makes cleanup faster.
- Place a non-slip rubber mat around the tub perimeter for safety — wet concrete is a fall hazard.
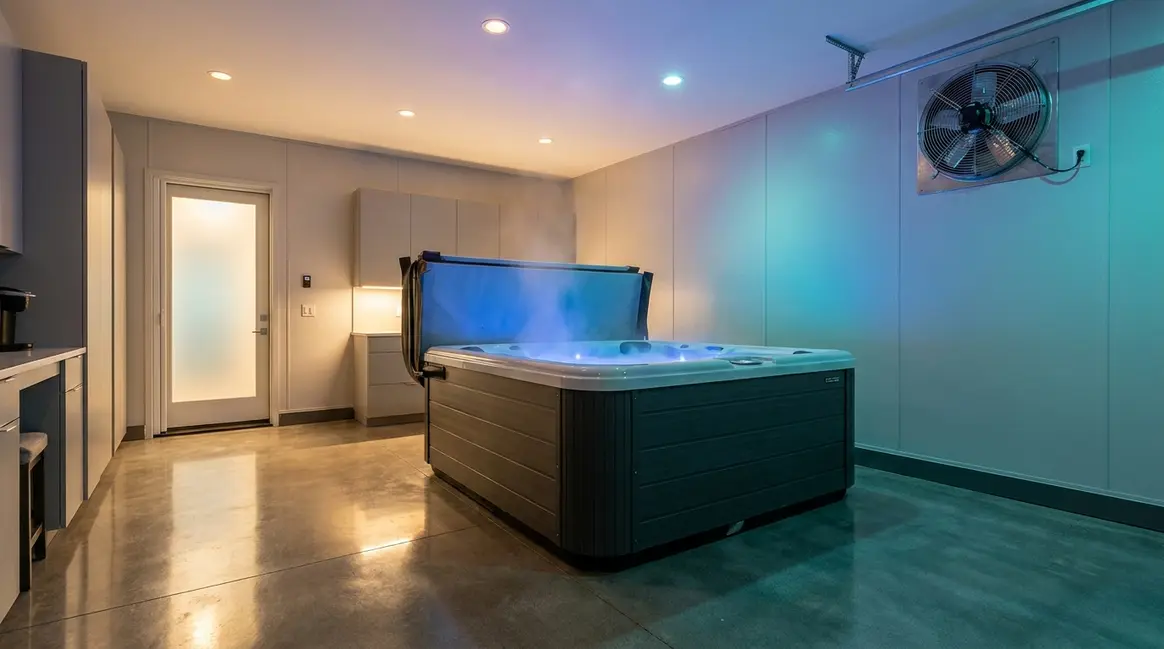
Step 3: Install Ventilation and Moisture Control

Ventilation is the most technically demanding part of the 3-System Rule — and the one most homeowners get wrong. The O-Care blog on hot tub placement notes that inadequate ventilation is the leading cause of garage hot tub installation failures, producing mold damage that costs more to remediate than the tub is worth. “Adequate” is not a feeling; it’s a calculation.
Calculating Exhaust Fan CFM
CFM (cubic feet per minute) is the standard unit for measuring exhaust fan airflow capacity. The correct formula, based on ASHRAE ventilation standards for indoor aquatic environments, is:
CFM = (Room Volume × Air Changes Per Hour) ÷ 60
- Where:
- Room Volume = Length (ft) × Width (ft) × Height (ft)
- Air Changes Per Hour (ACH) = 8–10 for hot tub spaces (ASHRAE Standard 62.1 recommends 6–10 ACH for indoor spa environments; use 10 ACH for enclosed garages with limited natural ventilation)
- Worked example — standard 2-car garage:
- Dimensions: 20 ft × 22 ft × 9 ft ceiling
- Room volume: 20 × 22 × 9 = 3,960 cubic feet
- Target ACH: 10
- CFM = (3,960 × 10) ÷ 60 = 660 CFM
For this garage, you need an exhaust fan rated at 660 CFM minimum. Size up to the next standard fan rating (typically 700 or 750 CFM) to account for duct friction losses.

Installation steps:
- Select an exhaust fan rated at your calculated CFM or higher. Choose a model rated for wet/damp locations (bathroom exhaust fans are not rated for this application — use an industrial or commercial-grade unit).
- Position the exhaust fan high on the wall opposite the garage door — heat and moisture rise, so high placement captures the most humid air.
- Install an intake vent (louvered, with insect screen) low on the garage door or an exterior wall. This creates a cross-ventilation pattern: fresh air enters low, moist air exits high.
- Wire the exhaust fan to a humidistat (a humidity-sensing switch) set to activate at 60% relative humidity. This automates ventilation without requiring manual operation after every soak.
- Run the exhaust fan for at least 30 minutes after each hot tub use, even if the humidistat has not triggered.
The EPA advises keeping indoor relative humidity below 60% to prevent mold growth (EPA, Indoor Air Quality). In a garage with an active hot tub, hitting that target requires the exhaust system described above — passive ventilation through a cracked garage door is not sufficient.
Installing a Vapor Barrier
A vapor barrier is your second line of defense after active ventilation — it prevents moisture from migrating into wall cavities and ceiling assemblies where it cannot evaporate.
- Walls: If your garage has drywall, replace standard drywall within 6 feet of the tub with cement board or moisture-resistant (MR) drywall (often called “green board” or “purple board”). Standard drywall absorbs moisture and supports mold growth within weeks in a hot tub environment.
- Vapor barrier installation: Staple 6-mil polyethylene sheeting to wall studs before applying any wall surface material. Overlap seams by 12 inches and tape with vapor-barrier tape. This prevents moisture infiltration into the wall cavity.
- Ceiling: Apply moisture-resistant paint (or cement board) to the ceiling directly above the tub. Hot steam rises directly into the ceiling structure — this is the highest-risk surface in the garage.
- Paint: Finish all exposed surfaces within 8 feet of the tub with mold-resistant paint (products containing antimicrobial additives). This is not a substitute for the vapor barrier — it’s an additional layer of mold and mildew protection.
- Inspect all penetrations (electrical conduit, plumbing pipes, HVAC ducts) where they pass through walls or ceiling. Seal each penetration with non-shrink waterproof caulk to prevent moisture migration through gaps.
Using a Dehumidifier and Thermal Hot Tub Cover
Even a correctly sized exhaust fan cannot maintain humidity targets during high-use periods (multiple soaks per day, parties, etc.). A supplemental dehumidifier bridges that gap.
Dehumidifier sizing: For a 2-car garage (440 square feet), a 70-pint/day dehumidifier is the appropriate size for spaces with high moisture loads (DOE dehumidifier sizing guidelines, 2023). Position it on the opposite wall from the tub for maximum air circulation coverage.
Thermal hot tub cover discipline is equally important. The cover is not just for heat retention — it is your primary moisture control tool. A high-quality thermal cover (R-12 or higher insulation rating, with a tight perimeter seal) reduces evaporation by approximately 95% when the tub is not in use. Industry best practice is to replace the cover within 5 seconds of exiting the tub and within 10 minutes of a soak session ending.
Cover maintenance: Inspect the foam core annually for waterlogging. A waterlogged cover loses insulation value and becomes a moisture source rather than a moisture barrier — replace it immediately when the core begins to absorb water.
Protecting Ceilings, Drywall, and Stored Items
Moisture damage in a garage hot tub installation does not stay confined to the area around the tub. Convection currents carry humid air to every corner of the space.
- Relocate moisture-sensitive items before the tub’s first fill: cardboard boxes, paper documents, unsealed wooden furniture, and power tools with unprotected metal parts. Store these in sealed plastic bins or a different location.
- Protect your garage door opener: Moisture corrodes the motor housing and circuit board of standard garage door openers. Install a sealed plastic cover over the opener unit or upgrade to a unit with a weather-resistant housing.
- Inspect ceiling joists if your garage has living space above. Consult a structural engineer if the ceiling shows any signs of previous water damage — adding a hot tub below a compromised ceiling assembly is a structural risk.
- Seal the concrete block or CMU walls (if applicable) with a penetrating masonry sealer before installation. Concrete block is porous and wicks moisture from the interior air into the wall assembly.
Step 4: Meet Electrical and Plumbing Requirements
⚠️ REMINDER — LICENSED ELECTRICIAN REQUIRED FOR ALL ELECTRICAL WORK IN THIS SECTION. The specifications below are planning information for conversations with your licensed electrician — not a DIY wiring guide. NEC Article 680 governs all electrical installations for hot tubs and spas. Violations can result in electrocution, fire, failed inspection, and voided homeowner’s insurance.
The electrical system is where the 3-System Rule has its highest consequence for failure. Reviewing essential hot tub electrical specifications and safety is a critical first step. Water and electricity are a lethal combination, and the NEC requirements for hot tub installations are among the most specific in residential electrical code.
Hard-Shell vs. Plug-and-Play Power
Understanding your tub type’s electrical needs before purchasing avoids costly surprises.
| Feature | Plug-and-Play (120V) | Hard-Wired (240V) |
|---|---|---|
| Circuit | 20A dedicated GFCI circuit | 50A dedicated GFCI circuit (most models) |
| Voltage | 120V | 240V |
| Heater power | 1 kW (slow heating) | 4–6 kW (fast heating) |
| Electrician required? | Yes — for GFCI outlet install | Yes — full circuit installation |
| Panel upgrade likely? | No | Possible (if panel is near capacity) |
| Installation cost (electrical only) | $200–$600 | $800–$2,500 |
| Best for | Temporary/occasional use | Permanent year-round installation |
Important: Even plug-and-play hot tubs require a dedicated circuit. Sharing a circuit with other garage appliances creates overload risk and is a code violation in most jurisdictions.
Installing a GFCI-Protected Dedicated Circuit
A GFCI (Ground Fault Circuit Interrupter) is a safety device that detects current leakage as small as 5 milliamps and cuts power within 1/40th of a second — fast enough to prevent electrocution in most scenarios. The CPSC credits GFCI protection with preventing the majority of electric shock drowning incidents in residential spa and hot tub settings.
Your licensed electrician will perform these steps — this list is for your planning and verification:
- Panel assessment: Confirm the main electrical panel has sufficient capacity for a new 50A dedicated circuit (240V tub) or 20A circuit (120V tub). A licensed electrician will perform a load calculation.
- Circuit installation: Run a dedicated circuit from the panel to the disconnect box location. For 240V/50A circuits, this typically requires 6-gauge wire (AWG 6). All wiring must run in conduit within the garage environment.
- Disconnect box installation: Install a lockable disconnect box within sight of the hot tub but at least 5 feet from the water’s edge (NEC Article 680.12). This allows emergency power cutoff without approaching the water.
- GFCI breaker installation: Install a 50A GFCI breaker in the main panel (not just a GFCI outlet). For hot tub circuits, a breaker-level GFCI is required by NEC Article 680 — an outlet-level GFCI alone is not sufficient.
- Bonding: All metal components within 5 feet of the hot tub — including the tub’s metal frame, nearby pipes, and any metal conduit — must be bonded together with a continuous 8 AWG solid copper bonding wire. Bonding equalizes potential between metal surfaces and prevents shock from stray current (NEC Article 680.26).

NEC Article 680 Clearances
NEC Article 680 is the governing electrical code for all permanently installed swimming pools, hot tubs, and spas in the United States (National Fire Protection Association, NFPA 70, 2023 edition). Key requirements your electrician must satisfy:
- Receptacle clearance: No 120V receptacles within 6 feet of the hot tub’s inside wall. Receptacles between 6 and 10 feet must be GFCI-protected.
- Luminaire clearance: No light fixtures within 7.5 feet of the water surface measured vertically, unless specifically listed for wet locations and installed per manufacturer instructions.
- Disconnect location: The disconnect must be accessible to the user, within sight of the equipment, and not less than 5 feet from the inside wall of the hot tub.
- Equipotential bonding: All metallic parts of the hot tub structure and any metal within 5 feet must be bonded (NEC 680.26).
- GFCI protection: All 120V and 240V circuits supplying hot tub equipment must have GFCI protection at the circuit breaker level.
Consult the NFPA 70 (National Electrical Code) for the full text. Your local jurisdiction may adopt amendments — your electrician and building inspector will confirm local variations.
Filling and Draining Without a Floor Drain
A 400-gallon hot tub requires a plan for both filling and draining before the first startup. Implementing safe hot tub draining and plumbing practices prevents water damage.
- Filling:
- Use a standard garden hose connected to an indoor cold-water supply. Fill slowly — allow 4–6 hours for a standard 400-gallon tub.
- Fill through the filter housing (not over the open tub edge) to prevent air lock in the plumbing lines. Consult your owner’s manual for the correct fill point.
- Do not connect to a hot water supply — cold fill allows proper chemical balancing from the start.
- Draining (without a floor drain):
- Use a ¾-HP submersible pump with a garden hose outlet. Lower the pump into the footwell of the tub.
- Route the drain hose to a driveway drain, yard area, or municipal storm drain (confirm local regulations — chemically treated water may require dilution or neutralization before discharge).
- A ¾-HP pump will drain approximately 60 gallons per minute, emptying a 400-gallon tub in roughly 7 minutes.
- After the pump can no longer prime, use a wet/dry shop vacuum to remove the final 5–10 gallons from the footwell.
- Wipe the shell dry with a clean towel to prevent mineral scale during the dry period.
Step 5: Delivery, Setup, and Maintenance

The physical installation of a hot tub in a garage requires more logistical planning than most homeowners anticipate. A 6-foot-wide, 800-pound dry-weight hot tub does not navigate corners gracefully.
Delivery Day: Measuring Access and Logistics
Delivery failures are expensive — a tub that cannot enter the garage requires a crane or rescheduling, both of which add $500–$1,500 in costs. For a broader look at the process, review our step-by-step hot tub installation guide.
- Measure the garage door opening precisely: width and height. Standard single garage doors are 8 feet wide and 7 feet tall. Standard double doors are 16 feet wide. Most hot tubs are 7–8 feet square — a tight fit through an 8-foot door that requires precise angling.
- Measure the tub’s diagonal: For a square tub, diagonal = side length × 1.414. An 84-inch (7-foot) square tub has a diagonal of approximately 119 inches (9.9 feet) — wider than a standard single garage door. This tub requires either a double door or tipping the tub on its side during entry.
- Confirm tipping clearance: Can the tub be tipped vertically? Height of the tub on its side must be less than the door opening width. Confirm with your delivery team before delivery day.
- Clear the delivery path: Remove vehicles, bikes, shelving, and any obstacles from the driveway to the final placement location. Delivery teams use dollies and skates — the path must be clear and flat.
- Protect the floor during delivery: Lay down moving blankets or plywood sheets along the delivery path to protect the epoxy floor coating and prevent the dolly from scratching the concrete.
- Have the electrician present on delivery day (or scheduled for the same day) — the tub must be connected to power before the delivery crew leaves so they can assist with final positioning adjustments.
Professional installers recommend scheduling delivery for a weekday morning — delivery crews are fresher, and you have the full day to address any surprises before the weekend.
First Fill, Startup, and Chemical Balance
- Complete all electrical inspection sign-offs before filling. Do not fill the tub until the electrical permit has been inspected and approved.
- Fill the tub through the filter housing (as described in Step 4).
- Power on the tub and allow it to circulate for 30 minutes before adding any chemicals — this purges air from the lines and allows the system to reach operating temperature.
- Test the water with a test strip or digital tester. Record baseline readings for pH, alkalinity, and hardness.
- Balance in this order: Total Alkalinity first (target 80–120 ppm), then pH (target 7.4–7.6), then Calcium Hardness (target 150–250 ppm), then Sanitizer (chlorine: 3–5 ppm; bromine: 3–6 ppm).
- Run the jets for 20 minutes after adding chemicals to ensure even distribution.
- Retest after 4 hours and adjust as needed before the first soak.
- Place the thermal cover immediately after balancing — this locks in heat and prevents chemical off-gassing into the garage air.
- First-fill startup checklist:
- [ ] Electrical inspection approved
- [ ] All jets and fittings hand-tightened
- [ ] Filter cartridge installed
- [ ] Cover hinges and lifter installed
- [ ] Water balanced before first use
- [ ] Exhaust fan operational and humidistat tested
Ongoing Maintenance and Chemical Odor Management
Chemical odors in an enclosed garage space are a significant quality-of-life issue that separates a well-maintained installation from an unpleasant one. For a deeper dive into water chemistry, consult our complete hot tub maintenance guide.
Odor management strategies:
- Bromine over chlorine for enclosed spaces. Bromine produces fewer volatile compounds than chlorine at equivalent sanitizer levels, resulting in noticeably lower odor in enclosed environments. O-Care’s hot tub placement guide recommends bromine or mineral-based systems specifically for indoor and garage hot tub installations.
- Saltwater systems (salt-chlorine generators) produce chlorine on demand from dissolved salt, eliminating the need to add granular chlorine manually. The result is lower peak chlorine concentrations and significantly reduced odor.
- Shock weekly. Non-chlorine oxidizer shock (potassium monopersulfate) breaks down organic compounds that cause combined chlorine (chloramines) — the primary source of harsh chemical odor — without adding chlorine load to the water.
- Run the exhaust fan during and for 30 minutes after every soak. This is non-negotiable for odor control in an enclosed garage.
- Test water chemistry twice per week in a garage hot tub — more frequently than outdoor installations because evaporation concentrates chemicals faster in an enclosed environment.
Maintenance schedule:
| Frequency | Task |
|---|---|
| After each use | Replace cover within 10 minutes; run exhaust fan 30 min |
| Twice weekly | Test and balance water chemistry |
| Weekly | Add oxidizer shock; rinse filter with garden hose |
| Monthly | Deep-clean filter with filter cleaner solution; inspect cover seal |
| Quarterly | Drain, clean shell, and refill with fresh water |
| Annually | Inspect cover foam core; service pump and heater; test GFCI breaker |
Common Garage Hot Tub Installation Mistakes
Understanding where garage hot tub installations fail is as important as knowing the correct steps. These are the patterns that professional installers see repeatedly — and that homeowners only discover after significant damage has occurred.
Top 5 Installation Mistakes to Avoid
Mistake 1: Skipping the ventilation calculation and guessing at fan size.
The most common mistake. Homeowners install a standard bathroom exhaust fan (50–110 CFM) in a 3,960 cubic foot garage that requires 660 CFM. The result: humidity consistently above 70%, mold on the ceiling within 60–90 days, and drywall damage that costs $3,000–$8,000 to remediate. Fix: Use the CFM formula before purchasing any fan.
Mistake 2: Not pulling permits.
Unpermitted electrical work on a 240V hot tub circuit is both illegal and dangerous — it also voids homeowner’s insurance coverage for any related damage or injury. Many homeowners discover this only when filing a claim. Fix: Pull all three permits (electrical, plumbing, structural) before any work begins.
Mistake 3: Using standard drywall near the tub.
Standard drywall absorbs moisture, supports mold growth, and delaminates within months in a hot tub environment. Professional installers consistently see this failure in DIY garage installations. Fix: Use cement board or MR drywall for all surfaces within 6 feet of the water.
Mistake 4: Installing without a dedicated circuit.
Sharing a hot tub circuit with garage lighting, a refrigerator, or power tools creates overload conditions that trip breakers, damage the tub’s electronics, and — in worst cases — cause wiring fires. Fix: Every hot tub, including plug-and-play models, requires a dedicated circuit.
Mistake 5: Neglecting the vapor barrier behind walls.
Applying moisture-resistant paint without a vapor barrier behind the wall surface is insufficient. Moisture migrates through paint into wall cavities where it cannot evaporate — producing invisible mold growth in the stud bays. Fix: Install 6-mil polyethylene sheeting behind any wall surface within 8 feet of the tub.

When to Call a Professional
The 3-System Rule is designed to help you plan intelligently — but some elements of a garage hot tub installation are not appropriate for DIY execution, regardless of skill level.
- Call a licensed electrician when:
- Installing any circuit for a hot tub (120V or 240V) — no exceptions
- Your main electrical panel is more than 20 years old or shows signs of corrosion
- The panel is located within 5 feet of the proposed tub location (NEC clearance concerns)
- Any existing wiring in the garage runs through areas where moisture exposure is possible
- Call a structural engineer when:
- The concrete slab shows cracks wider than 1/8 inch, significant settling, or heaving
- There is living space above the garage and the ceiling shows previous water damage
- The garage was built before 1980 and has no documentation of slab thickness or reinforcement
- Call a licensed plumber when:
- You want a permanent fill line connected to the home’s water supply
- Local regulations require permitted plumbing for hot tub drain connections
- The drain plan routes to a sanitary sewer (chemically treated water discharge regulations apply)
The 3-System Rule reminder: Even if you are confident in your structural and ventilation planning, the electrical system is the one where professional execution is non-negotiable. The CPSC data on hot tub electrocutions consistently points to improper wiring as the primary cause — and licensed electricians carry liability insurance that protects you if something goes wrong.

Frequently Asked Questions
Is it a good idea to put a hot tub in a garage?
A garage hot tub is an excellent choice when all three systems — structural, ventilation, and electrical — are correctly sized and installed. Garages offer year-round use, privacy, and protection from UV degradation that extends tub life by 3–5 years compared to outdoor installations. The primary risk is inadequate ventilation producing mold damage, which is entirely preventable with a properly sized exhaust fan (calculated using the CFM formula) and a vapor barrier system. Homeowners who commit to the full installation process consistently report high satisfaction with the outcome.
Where should you NOT put a hot tub?
Avoid placing a hot tub in any space that cannot meet the 3-System Rule requirements. Specifically: do not install a hot tub in a garage with a cracked or settling slab (consult a structural engineer first), a garage with no exterior wall access for exhaust ventilation, a garage where the electrical panel cannot support a dedicated circuit without a full upgrade, or any space with less than 2 feet of clearance on all sides of the cabinet. Mainelytubs.com also advises against placement directly beneath HVAC air returns, which can distribute chemical odors throughout the home.
How do you ventilate a garage for a hot tub?
Proper garage ventilation requires a mechanically exhausted system sized to achieve 8–10 air changes per hour (ACH). Use the formula: CFM = (Room Volume × ACH) ÷ 60. For a standard 2-car garage (3,960 cubic feet), this produces a minimum of 660 CFM. Install the exhaust fan high on the wall opposite the garage door, with a low intake vent for cross-ventilation. Wire the fan to a humidistat set at 60% relative humidity (EPA indoor air quality guideline). Passive ventilation through a cracked door is not sufficient for regular hot tub use in an enclosed space.
What are the electrical requirements for a garage hot tub?
Most 240V hot tubs require a dedicated 50A GFCI-protected circuit installed by a licensed electrician. NEC Article 680 governs all hot tub electrical installations and requires: a lockable disconnect box within sight of the tub and at least 5 feet from the water’s edge; a GFCI breaker at the panel level (not just an outlet GFCI); equipotential bonding of all metal components within 5 feet of the tub; and no standard receptacles within 6 feet of the tub’s inside wall. Plug-and-play 120V tubs require a dedicated 20A GFCI circuit. All electrical work must be performed by a licensed electrician — no exceptions.
How do you prepare a garage floor for a hot tub?
Start with a structural assessment, then level, insulate, and protect. Check the concrete slab for cracks wider than 1/8 inch and consult a structural engineer if any are present. Use a 4-foot level to measure slope — garage floors typically slope ¼ inch per foot toward the door, which must be corrected to within ¼ inch across the tub’s footprint using self-leveling concrete overlay or rated shims. Install a moisture barrier (6-mil polyethylene), rigid foam insulation (R-10 minimum), and a composite spa pad over the leveled surface. Finish with epoxy floor coating around the perimeter for moisture protection and easy cleanup.
Why do so many people get rid of their hot tubs?
The top reasons are operating costs, maintenance fatigue, and lifestyle changes — not regret about the purchase itself. Electricity costs for a 240V hot tub average $50–$150/month depending on climate, insulation quality, and usage frequency (according to HomeGuide’s 2026 national averages). Chemical costs add $20–$60/month. For garage installations specifically, inadequate ventilation is a leading cause of premature abandonment: when mold damage appears or chemical odors become unbearable, the cost of remediation often exceeds the tub’s resale value, making removal the practical choice. The solution is not to avoid the installation — it is to execute the ventilation and moisture control steps correctly from day one.
Getting Your Garage Hot Tub Installation Right
For cautious homeowners planning a garage hot tub installation, the 3-System Rule is the framework that separates successful, long-lasting setups from expensive failures. Structural support, ventilation, and electrical systems must all be correctly sized — not one or two of them, all three. A filled hot tub weighing up to 6,000 pounds demands verified floor capacity. A garage producing 1–3 gallons of daily evaporation demands a 660+ CFM exhaust system. A 240V circuit near water demands a licensed electrician and full NEC Article 680 compliance. These are not suggestions — they are the minimum requirements for a safe installation.
The 3-System Rule works because it forces simultaneous planning. Homeowners who address each system in isolation consistently miss the interactions: the vapor barrier that must go behind the drywall before the exhaust fan is installed, the sub-base insulation that must be positioned before the electrician routes conduit, the permit that must be approved before the first fill. Treating this as one integrated project rather than three separate tasks is the difference between a 20-year asset and a 2-year remediation bill.
Start with your feasibility assessment and permits this week. Schedule your electrician consultation before ordering the tub — the panel capacity assessment determines which tub type you can install. Pull your permits before any physical work begins. When the delivery crew arrives, your floor will be ready, your ventilation will be sized, and your electrician will be scheduled. That is what a fully supported, correctly planned garage hot tub installation looks like.