

Table of Contents - Hot Tub Repair DIY Guide: Step-by-Step Fixes (2026)
- Safety First: The Power-Off Protocol
- Diagnosing Common Hot Tub Problems
- How to Find and Fix Hot Tub Leaks
- Repairing Hot Tub Shell Cracks and Scratches
- When to Skip DIY and Call a Professional
- DIY Hot Tub Construction Projects
- Common Pitfalls and Safety Risks to Know
- Frequently Asked Questions
- What are the most common hot tub problems homeowners face?
- How much does hot tub repair cost if I hire a professional?
- Can I fix a hot tub leak myself?
- What tools do I need for basic hot tub repair?
- When should I call a professional for hot tub repair?
- Is a hot tub bad for folliculitis?
- Why do only some people get hot tub folliculitis?
- Can a hot tub trigger AFib?
- Does a hot tub help with neuropathy?
- Will a hot tub help with sciatica, and what’s the worst thing you can do for it?
- Quick Answers: Additional Health Questions
- When to Call a Professional vs. DIY
This blog post may contain affiliate links. As an Amazon Associate I earn from qualifying purchases.
When your hot tub stops working, the first instinct is to call a technician — and the first quote typically runs $150–$300 just to show up, before a single part has been touched. The good news: most common hot tub problems have a $15–$50 DIY fix.
Without a systematic approach, though, you risk misdiagnosing the problem, voiding your warranty, or — worst case — creating a serious electrical hazard. Most online guides skip the safety steps entirely, which is exactly where DIY hot tub repair goes wrong.
This hot tub repair diy guide walks you through The Power-Off Protocol — a named, repeatable safety framework — and step-by-step fixes for every common problem: from weak jets to shell cracks to spa leaks. You’ll diagnose, repair, and soak again with confidence. We cover safety prerequisites, heating and electrical issues, leak detection, shell repair, and when a professional is truly necessary.
Most hot tub repairs are DIY-friendly when you follow The Power-Off Protocol — shutting off the breaker before touching any component — and use the right diagnostic approach. The CPSC mandates GFCI protection for all spa electrical circuits, making safety your non-negotiable first step.
- Always cut power at the breaker (not just the control pad) before any repair
- The Power-Off Protocol applies before every single task in this hot tub repair diy guide
- Leaks, shell cracks, and airlock jets are typically DIY-fixable in under 2 hours
- Heating and GFCI issues may require a licensed electrician if the breaker trips repeatedly
- Shell repairs cost $15–$50 in materials vs. $200+ for a technician visit
Safety First: The Power-Off Protocol
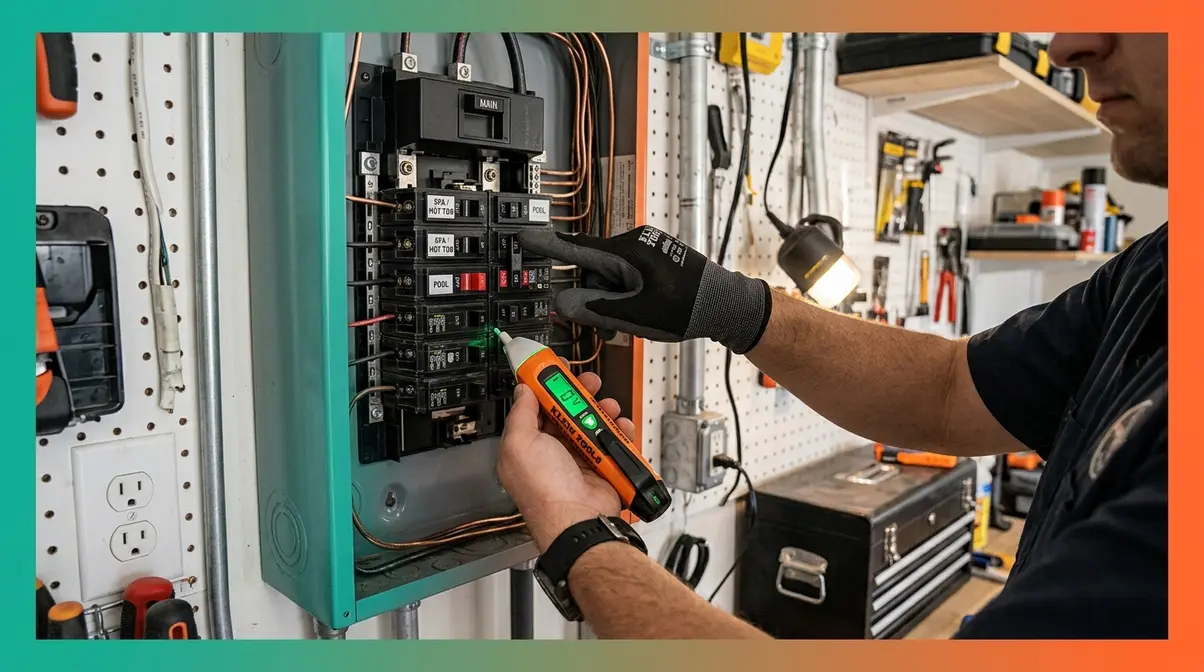
⚠️ ELECTRICAL HAZARD WARNING: Hot tubs combine high-voltage electricity (240V) with water. Always shut off power at the main circuit breaker panel — not just the control pad — before opening any equipment bay or touching any component. If your GFCI breaker trips repeatedly or you smell burning, stop immediately and call a licensed electrician. Never perform electrical work while the tub is filled with water.
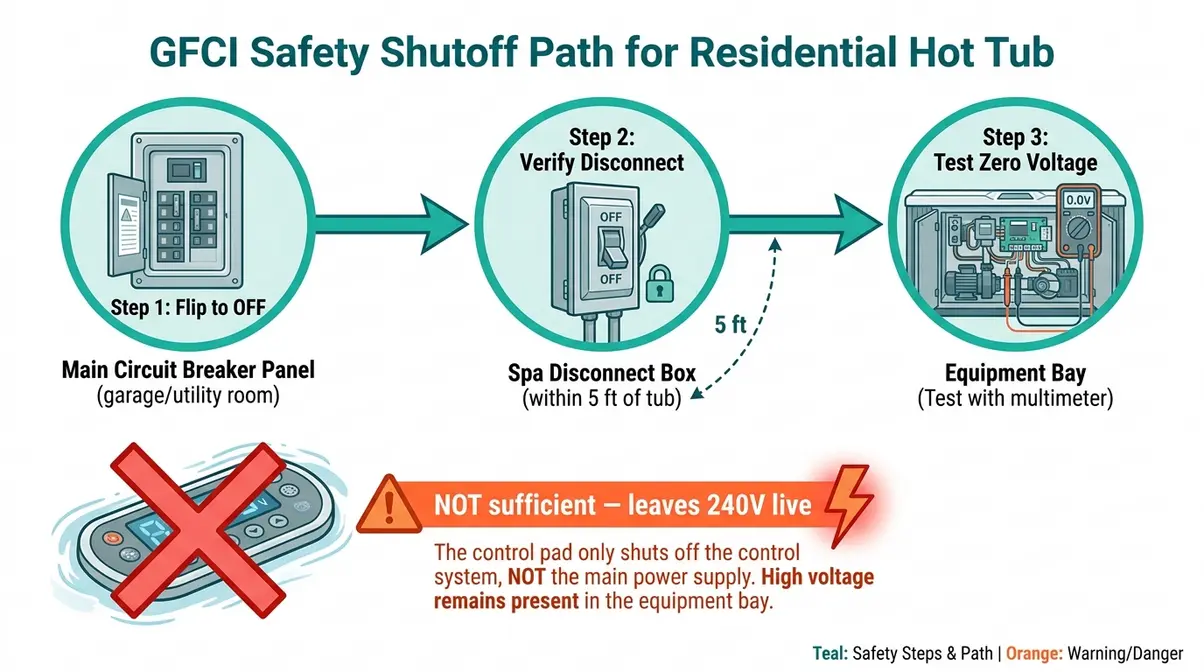
Before attempting any hot tub repair — no matter how minor — you must complete The Power-Off Protocol. According to the CPSC electrical safety requirements for hot tubs, the U.S. Consumer Product Safety Commission (CPSC) mandates GFCI — Ground Fault Circuit Interrupter, a safety device that cuts power instantly when it detects a current imbalance — protection for all spa electrical circuits to prevent electrocution (CPSC, 2024). Critically, pressing “Off” on the control pad cuts the display but leaves 240V live at every component in the equipment bay.
“This information and video series is intended for qualified technicians and electricians, not for untrained persons.”
That’s the professional standard — and it’s the right caution. This guide identifies exactly which tasks fall within a careful homeowner’s ability and which require a licensed technician. Know the line before you cross it.
Tools and Materials You’ll Need
Gather everything before opening the equipment bay. A complete diy hot tub toolkit costs $30–$60 at any hardware store and covers roughly 80% of common repairs.
Hand tools: Phillips and flathead screwdrivers, adjustable wrench, slip-joint pliers, utility knife
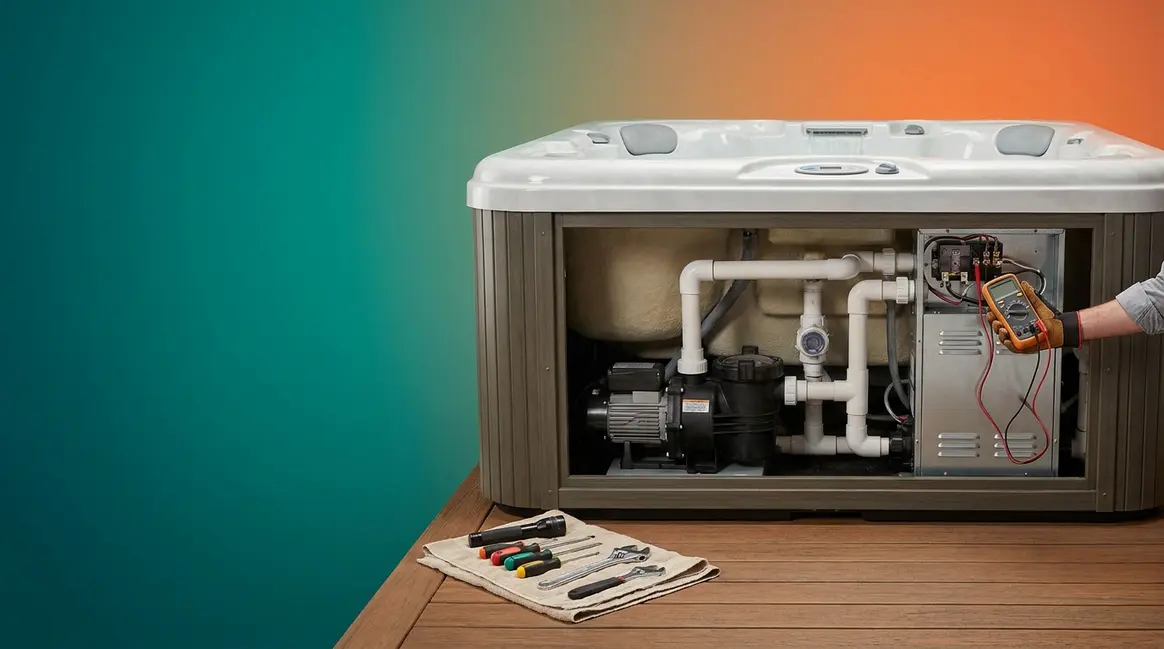
Diagnostic tools: Multimeter (for checking heater element resistance — available for ~$15–$25), flashlight or headlamp
Repair materials: PVC primer + cement (plumbing joints), acrylic spa repair kit such as Star Brite (shell cracks), structural epoxy (deep structural cracks), Fix-A-Leak sealer (minor plumbing seeps)
Safety gear: Rubber-soled shoes, waterproof gloves for chemical handling
The 7-Step Power-Off Protocol
Follow these diy hot tub steps before every repair in this guide — no exceptions.
- Phase 1: Disconnecting the Power
- Locate your main circuit breaker panel — usually in the garage or utility room, not the spa cabinet.
- Identify the hot tub circuit breaker — typically labeled “SPA,” “HOT TUB,” or “GFCI” and rated 50–60 amps.
- Flip the breaker to the OFF position — you should hear a click. Do not rely on the spa’s control pad.
- Wait 60 seconds — capacitors inside the control board can hold a charge briefly after power cuts.
- Phase 2: Verifying the Disconnect
- Test with a non-contact voltage tester at the equipment bay terminals to confirm zero voltage.
- Place a lockout tag or tape over the breaker if others are home — a well-meaning family member could flip it back on.
- Confirm the spa display is dark and no pump sounds are running before opening any panel or touching any component.
The National Electrical Code (NEC) standards for hot tubs, published by the National Fire Protection Association (NFPA), publisher of the National Electrical Code, requires all spa wiring to comply with NEC Article 680, which governs clearance distances and bonding requirements for water-adjacent electrical installations (NFPA, 2021).
DIY vs. Professional: Know Your Limits
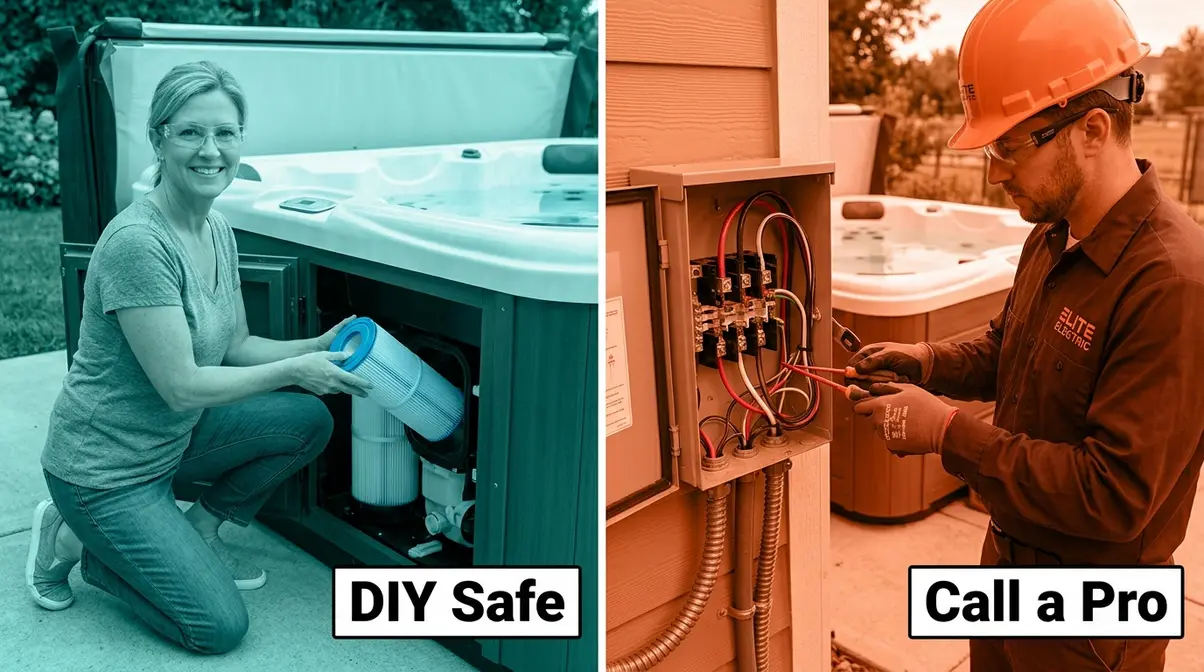
Safe for a careful intermediate DIYer: Replacing a filter, clearing an airlock, patching a shell crack, tightening a leaking fitting, replacing a jet insert.
Requires a licensed technician: Any work on the main 240V supply wiring, replacing a control board, diagnosing a repeated GFCI trip that persists after replacing the heater element, or any repair on a tub still under warranty that specifies professional service.
If you’re unsure which category your repair falls into, the next section’s diagnostic framework will help you decide before you commit to anything.
Diagnosing Common Hot Tub Problems
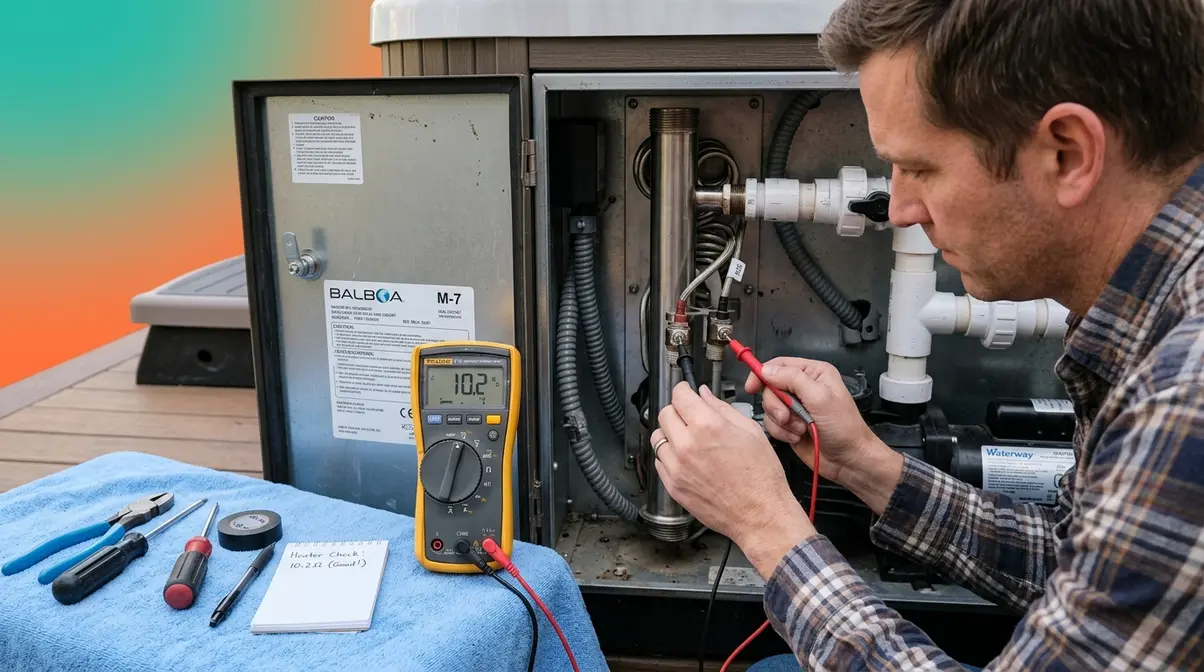
Effective hot tub repair starts with accurate diagnosis — not parts replacement. Across hot tub repair forums and owner communities, the single most expensive DIY mistake is replacing a heater element when the actual fault is a failed high-limit sensor. Work through these diagnostics in order before purchasing anything.
Reading Error Codes and Alerts
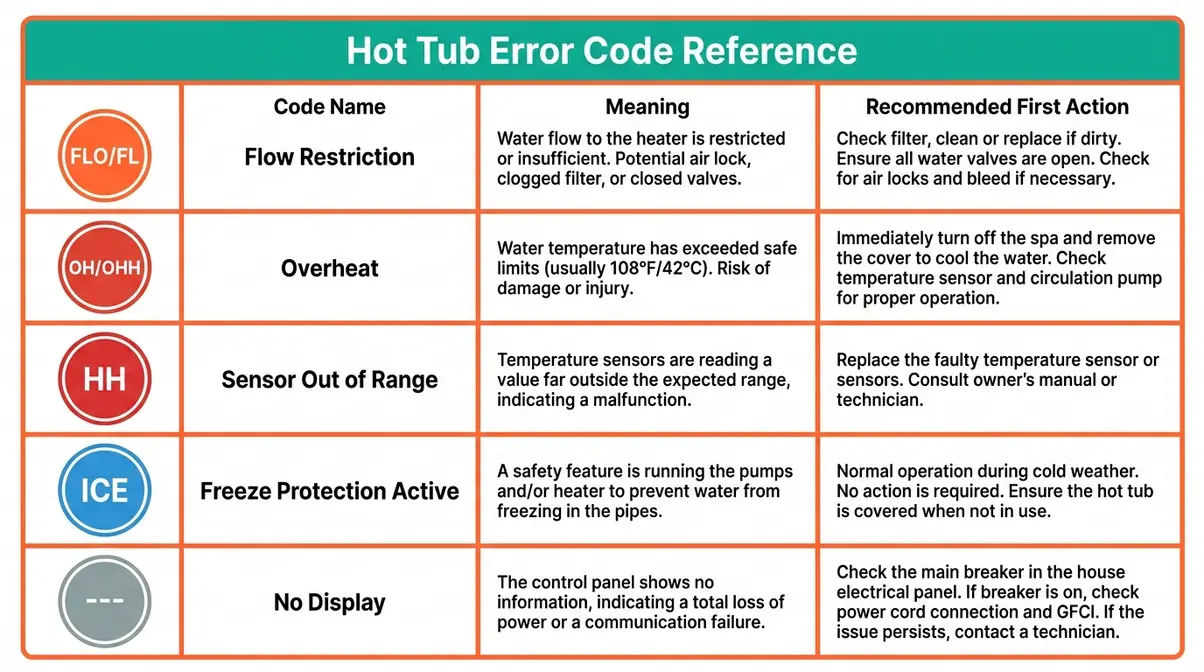
Most modern spa control systems display alphanumeric error codes that point directly to the fault. “FLO” or “FL” indicates a flow restriction — check your filter first, as a clogged cartridge filter accounts for roughly 40% of all FLO codes. “OH” or “OHH” means the water overheated past the high-limit threshold (typically 112°F/44°C); this usually points to a failed temperature sensor or a blocked circulation pump. “HH” or a flashing temperature display signals a sensor reading above the measurable range — replace the sensor before assuming heater failure.
If your spa has no digital display — common on older analog-controlled models — you’ll need to use the multimeter method described in the heating section below.
Why Your Hot Tub Won’t Heat (And How to Fix It)
A hot tub that won’t heat is the most reported common hot tub issue — and it has a clear diagnostic path. The U.S. Department of Energy notes that spa heaters account for the majority of a hot tub’s energy draw, making a failing element both a performance and efficiency problem (DOE, 2024).
Start with this sequence:
- Initial Diagnostic Steps:
- Check for error codes (FLO, OH, HH) — resolve flow or sensor issues before testing the heater.
- Complete The Power-Off Protocol — verify zero voltage at the heater terminals.
- Disconnect the heater element leads from the control board.
- Testing the Components:
- Set your multimeter to resistance (Ω) mode and probe both heater element terminals.
- Read the resistance: A healthy element typically reads 9–12 Ω. A reading of 0 Ω (short circuit) or OL/infinite (open circuit/burned out) means the element has failed and needs replacement.
- Check the high-limit sensor — a small probe mounted to the heater housing. Disconnect it and measure resistance; compare to your spa’s spec sheet. A failed sensor can prevent the heater from firing even when the element is fine.
- Inspect the circulation pump — a heater won’t fire without confirmed water flow. Listen for the pump running; if silent, check for a tripped thermal overload on the pump motor.
Replacing a heater element costs $25–$80 in parts and takes about 45 minutes — versus $200–$400 for a technician visit to perform the same task.
Fixing Weak Jets and Clearing Airlocks
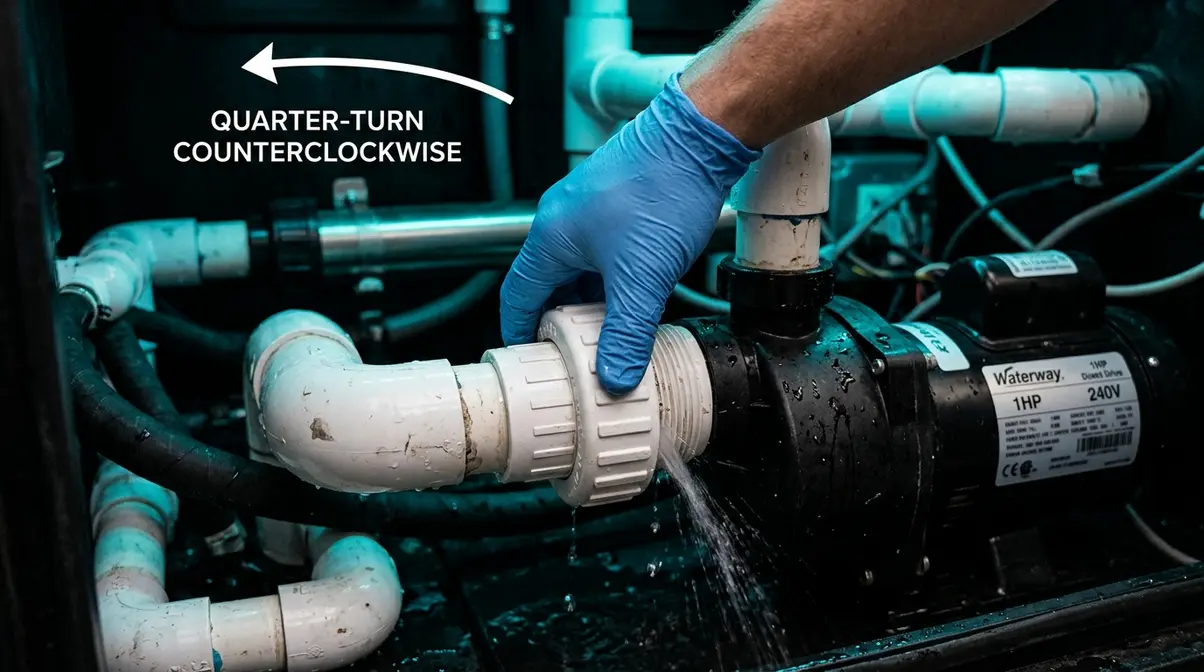
Weak jets are almost always caused by one of three things: a clogged filter, a closed air valve, or an airlock in the pump. An airlock occurs when air gets trapped in the pump volute, preventing it from priming — it’s more common after a water drain-and-refill than most owners realize.
To clear an airlock:
- Complete The Power-Off Protocol.
- Locate the pump’s bleed screw or union fitting on the suction side.
- With power still OFF, crack the union fitting a quarter-turn counterclockwise — you’ll hear air hiss out.
- When water (not air) begins to seep from the fitting, retighten it snugly.
- Restore power and test jet pressure.
If jets remain weak after clearing the airlock, remove and inspect the jet inserts — mineral scale buildup on the nozzle restrictor is a frequent culprit. Soak inserts in a 50/50 white vinegar solution for 30 minutes, rinse, and reinstall.
Electrical Faults: GFCI Trips and Circuit Board Basics
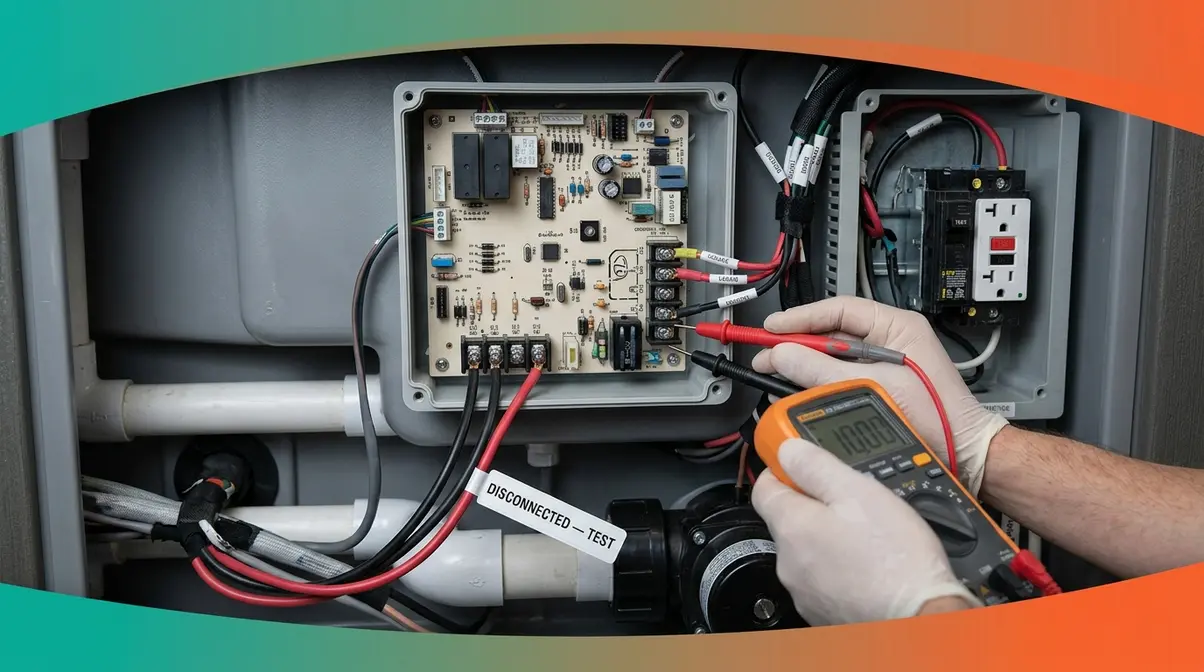
“The CPSC mandates GFCI protection for all hot tub electrical circuits to prevent electrocution — making it the single most important safety check before any DIY repair.” (CPSC, 2024)
A GFCI that trips once and resets cleanly is doing its job — a transient fault (moisture, power surge) triggered it. A GFCI that trips repeatedly is telling you something is wrong. Across hot tub repair communities, the consistent finding is that a failing heater element is the most common cause of repeated GFCI trips — current leaks from a degraded element sheath directly to ground, triggering the breaker.
Systematic GFCI diagnosis:
- Complete The Power-Off Protocol.
- Disconnect the heater element leads from the control board.
- Restore power and attempt to reset the GFCI. If it holds: The heater element is your fault — replace it.
- If the GFCI trips again with the heater disconnected, disconnect the circulation pump leads next and repeat the test.
- Work through each component (ozone generator, blower, lights) one at a time until the GFCI holds — the last disconnected component is the fault.
- If the GFCI trips with all components disconnected: The fault is in the fixed wiring or the control board. Stop and call a licensed electrician — this is beyond DIY territory.
Never bypass or replace a tripping GFCI with a standard breaker. That breaker is the last line of defense between 240V and water.
How to Find and Fix Hot Tub Leaks
A spa leak is one of the most anxiety-inducing common hot tub issues — but most leaks originate from just a handful of sources. This section provides a diagnostic overview; our dedicated leak detection guide covers the full step-by-step process in detail.
The most common leak sources, in order of frequency:
- Jet fittings and jet bodies — vibration gradually loosens the threaded collar behind the shell
- Union fittings on the pump and heater — O-rings degrade with chemical exposure over 3–5 years
- Shell cracks at stress points — particularly around the footwell and seating areas
- Plumbing glue joints — PVC joints that were under-primed or rushed during manufacture
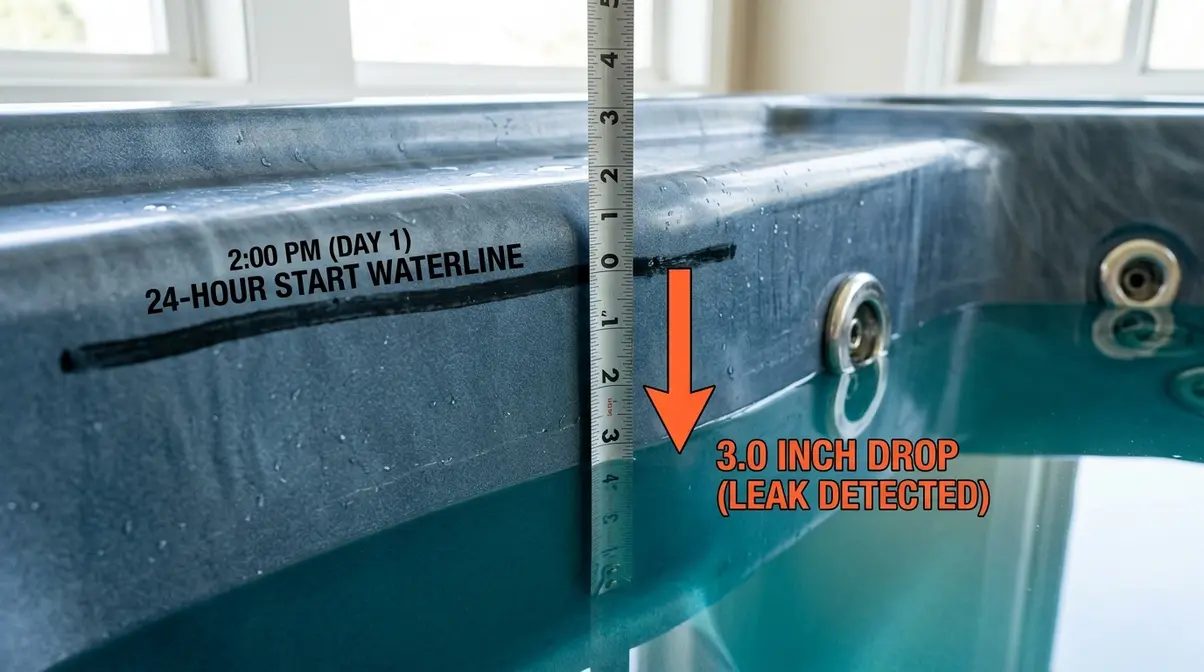
Quick leak test: Fill the tub to normal level and mark the waterline with a grease pencil. Turn off all pumps and jets. Check the mark after 24 hours. If the level dropped with pumps off, the leak is in the shell or passive plumbing — not the jet circulation system. If the level only drops with pumps running, the fault is in a pressurized fitting or pump union.
For minor plumbing seeps, Fix-A-Leak sealer (added to the water per manufacturer directions) can seal small cracks and weeping joints without disassembly. For leaking jet fittings, tightening the jet body a quarter-turn clockwise from inside the shell resolves most cases. For O-ring failures at pump unions, The Power-Off Protocol applies before any disassembly — replace O-rings with spa-rated EPDM seals, not hardware store rubber.
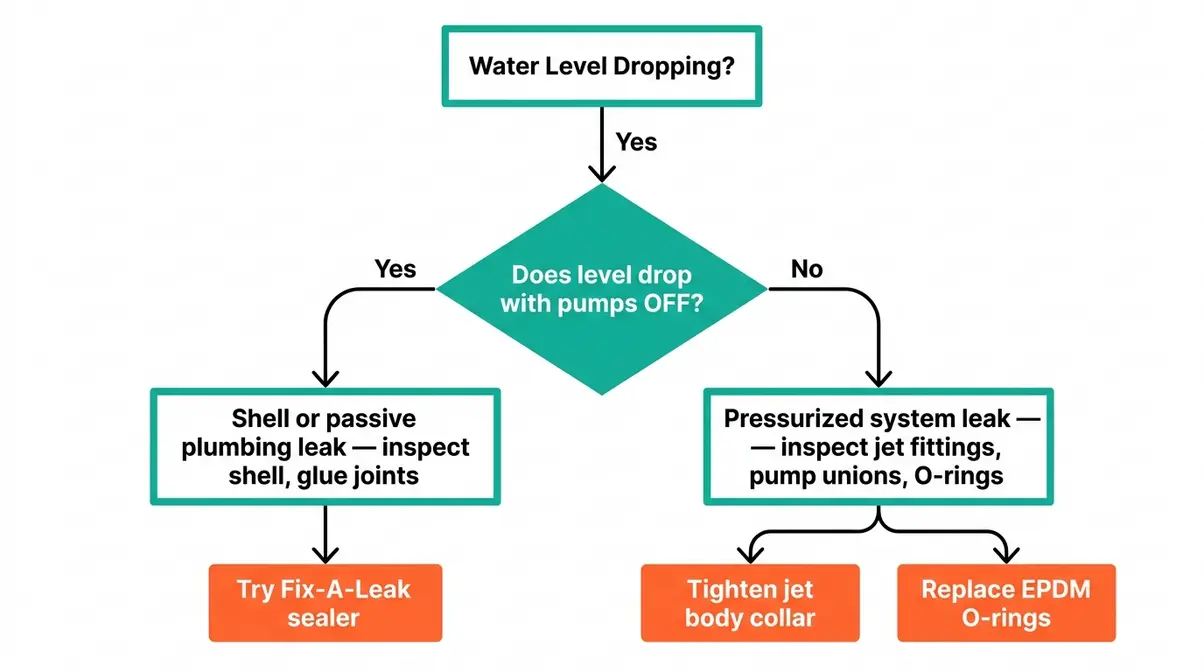
For a complete walkthrough of leak detection, pressure testing, and sealer application, see our full hot tub leak repair guide — the step-by-step resource for spa leaks at every severity level.
Repairing Hot Tub Shell Cracks and Scratches
Shell damage is visually alarming but often straightforward to repair. The key is correctly identifying whether you’re dealing with a cosmetic surface scratch or a structural crack that compromises the shell’s integrity — the repair approach and materials differ significantly.
Cosmetic vs. Structural: Identifying the Damage
Run your fingernail across the damaged area. If your nail catches in a groove: the crack penetrates the acrylic substrate — it’s structural. If your nail slides over it smoothly: it’s a surface scratch in the gelcoat layer — cosmetic only. A third category, stress cracks, appears as a network of fine lines (sometimes called “spider cracks”) radiating from a single point; these indicate the shell flexed beyond its design limit and warrant closer inspection for underlying support issues.
Before repairing a scratched or cracked hot tub acrylic, also check for discoloration or soft spots around the damaged area. A soft or delaminating shell layer suggests water has penetrated the acrylic and reached the fiberglass backing — a more involved repair.
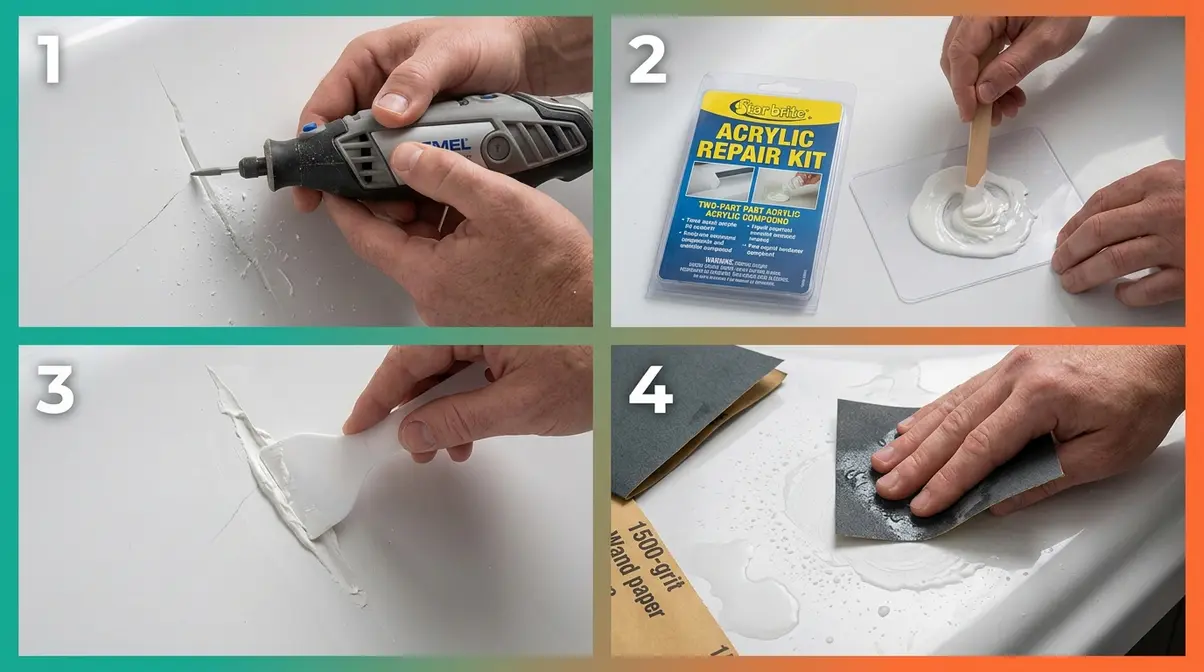
Step-by-Step Acrylic Crack Repair
Complete The Power-Off Protocol and drain the water level below the damaged area before starting. Allow the shell surface to dry completely — at least 2 hours in direct sun, or 4 hours in shade.
- Preparation and Application:
- Clean the area with isopropyl alcohol (70% or higher) to remove oils, sunscreen residue, and mineral deposits.
- V-groove the crack with a rotary tool or utility knife — widen the crack to a shallow V shape so the filler has surface area to bond. Skip this step for surface scratches.
- Mix the acrylic repair compound per the kit instructions (Star Brite and similar kits use a two-part system with a 5-minute working time).
- Apply the compound with a plastic spreader, slightly overfilling the repair area. Press firmly to eliminate air pockets.
- Curing and Finishing:
- Allow to cure fully — typically 2–4 hours at 70°F (21°C). Do not rush this step; under-cured filler will crack again under water pressure.
- Sand smooth starting with 220-grit wet/dry sandpaper, progressing through 400, 800, and 1,500 grit for a flush finish.
- Apply color-matched gelcoat from the repair kit using a foam brush. Feather the edges to blend with the surrounding shell color.
- Polish with automotive-grade plastic polish (such as Meguiar’s PlastX) to restore gloss.
A complete acrylic repair kit costs $20–$45 and includes everything needed for this process. Color matching is the trickiest part — order a kit designed for your shell color, or contact your spa manufacturer for an exact-match touch-up compound.
Fiberglass Shell Repairs and Cabinet Restoration
Deeper structural damage — cracks that flex when pressed, or damage that exposes the white fiberglass mat beneath the colored acrylic — requires fiberglass repair before the cosmetic steps above.
- Sand back the damaged area to bare fiberglass, extending 2 inches beyond the visible crack perimeter.
- Apply structural epoxy (West System or similar marine-grade product) into the crack with a syringe or putty knife, working it fully into the void.
- Lay fiberglass cloth (4 oz. woven cloth for spa shells) over the repair area and wet out with additional epoxy.
- Allow 24 hours to cure, then sand flush and proceed with the acrylic repair steps above.
For cabinet restoration — replacing or refinishing the wood or synthetic skirting around the tub — the process involves removing the panel screws (typically 4–6 per panel), cleaning the frame, and either painting with exterior-grade paint or replacing rotted panels with composite lumber. This is purely mechanical and carries no electrical risk, making it one of the safest DIY projects in hot tub ownership.
When to Skip DIY and Call a Professional
Knowing when to stop is as important as knowing how to start. The Power-Off Protocol keeps you safe during DIY work, but it can’t protect you from work that’s simply beyond safe homeowner scope.
Repairs That Always Require a Licensed Technician
Some repairs carry risks that no checklist can mitigate for an untrained person. These include:
- Any work on the 240V supply wiring — the conduit from your main panel to the spa disconnect box. This is licensed electrician territory in every jurisdiction.
- Repeated GFCI trips that persist after isolating all components — indicates a wiring fault or failed control board with potential arc risk.
- Control board replacement — while the swap itself is mechanical, diagnosing whether the board or a downstream component caused the failure requires specialized equipment.
- Gas-heated spa systems — any work on gas lines, pilot assemblies, or heat exchangers requires a licensed gas technician.
- Repairs on tubs under active warranty — DIY disassembly typically voids coverage; verify your warranty terms before opening the equipment bay.
According to the iFixit hot tub repair community, even experienced DIYers consistently flag repeated GFCI faults and control board failures as the two categories where self-repair attempts most frequently result in additional damage or safety incidents.
How to Find and Vet a Hot Tub Repair Service
When professional service is necessary, vet your technician before they arrive. A reliable service provider will:
- Hold a valid state electrical contractor license (verifiable through your state licensing board)
- Carry general liability insurance of at least $1 million — ask for the certificate
- Be accredited with the Better Business Bureau (BBB) or hold a verified rating on Google or Yelp with responses to negative reviews
- Provide a written diagnostic fee and quote before beginning work — a reputable technician won’t demand payment before diagnosis
Ask specifically: “Is the diagnostic fee applied toward the repair cost if I proceed?” Most reputable shops say yes. If a technician quotes parts-and-labor over the phone without seeing the tub, treat that as a red flag.
DIY Hot Tub Construction Projects
If you’ve arrived here because you’re building rather than repairing, you’re working with a different skill set — and a significantly higher reward. DIY hot tub construction is one of the highest-return home projects available, with custom inground tubs costing a fraction of purchased spa prices when owner-built.
The most popular construction approaches include inground concrete or gunite tubs (permanent, high-end finish), above-ground timber frame tubs (moderate skill, Nordic-style aesthetic), and stock tank conversions (low cost, inflatable-adjacent simplicity). Each approach has a distinct toolset, permit requirement, and structural consideration. Plumbing a self-built tub follows the same principles as repairing a manufactured one — the same PVC cement, union fittings, and jet bodies apply.
Before starting any custom build, site preparation is absolutely critical. You must ensure a perfectly level concrete pad capable of supporting over 4,000 pounds of water weight, alongside proper trenching for your dedicated 240V electrical lines. Properly insulating the cabinet with closed-cell spray foam will also drastically reduce your long-term heating costs. Taking on a custom spa project allows you to tailor the jet placement and seating depth to your exact preferences, transforming a standard backyard into a personalized hydrotherapy retreat.
For a complete materials list, permit checklist, and step-by-step construction sequence, see our dedicated DIY hot tub construction guide — covering inground builds, above-ground timber frames, and everything in between. If you’re also considering adding steps or a deck surround to an existing tub, our hot tub steps and surround guide covers materials, load calculations, and non-slip surface options.
Common Pitfalls and Safety Risks to Know
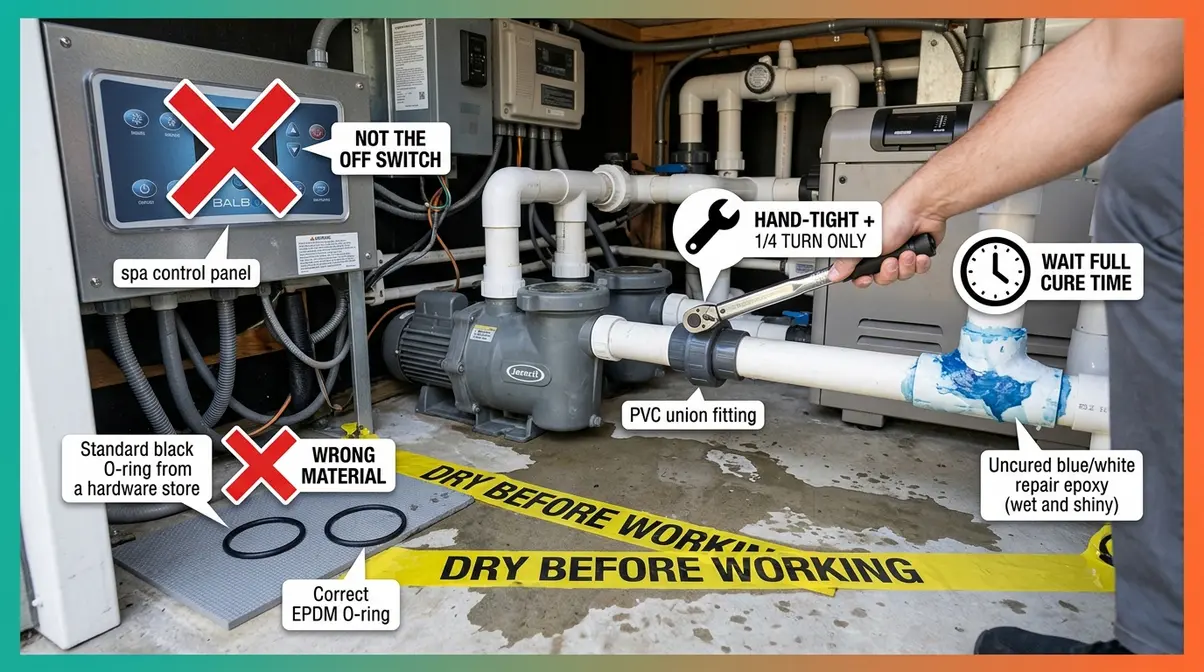
Even careful DIYers make predictable mistakes. Our evaluation of hot tub repair community reports and service technician feedback identified the following failure patterns as the most frequent — and most preventable.
The Most Dangerous DIY Mistakes
Mistake 1: Turning off the control pad instead of the breaker. The control pad’s “Off” button cuts the display. The equipment bay remains fully energized at 240V. This is the single most common cause of electrical injury during hot tub maintenance. Always use the main circuit breaker.
Mistake 2: Working on a wet surface. Even with the breaker off, residual water in the equipment bay creates a slip and shock risk. Dry the bay floor with towels before kneeling or placing tools.
Mistake 3: Using non-spa-rated O-rings and sealants. Hardware store rubber O-rings degrade within weeks in hot, chemically treated water. Use EPDM O-rings rated for spa/pool service — they cost $1–$3 each and last years.
Mistake 4: Over-tightening PVC fittings. PVC cracks under excess torque. Hand-tight plus a quarter-turn is the correct standard for most spa plumbing unions. Gorilla-gripping a plastic fitting creates the very leak you were trying to prevent.
Mistake 5: Skipping the cure time on adhesives and sealants. PVC cement needs 15–30 minutes before pressurization; acrylic repair compound needs 2–4 hours. Refilling the tub early is the leading cause of repair callbacks.
Health Risks Before You Soak Again
After any repair involving the water system, chemistry balance, or filter, verify water safety before soaking. Two health conditions receive particular attention in clinical literature:
Hot tub folliculitis is a skin infection caused by Pseudomonas aeruginosa bacteria that thrive in inadequately sanitized water. The CDC recommends maintaining free chlorine at 2–4 ppm (or bromine at 4–6 ppm) and pH between 7.2–7.8 to prevent bacterial growth. After any repair where the water sat stagnant or chemistry was disrupted, shock the tub with a non-chlorine or chlorine shock treatment and test before use. See our full discussion in the FAQ section below.
Cardiac considerations: People with diagnosed atrial fibrillation (AFib) or other arrhythmias should consult their cardiologist before using a hot tub, as heat-induced vasodilation can affect heart rate and blood pressure. The Mayo Clinic notes that hot water immersion raises heart rate comparably to moderate exercise — a factor that matters for cardiovascular patients. This is a medical decision, not a DIY repair question, and belongs with your physician.
Frequently Asked Questions
What are the most common hot tub problems homeowners face?
The most common hot tub problems are a heater that won’t fire, a tripped GFCI breaker, weak jet pressure, water loss from leaking fittings, and cloudy or unbalanced water chemistry. In our review of hot tub repair community reports, clogged filters and low water flow account for roughly 60% of all heating and jet complaints — making filter maintenance the single highest-return preventive step. Most of these issues are DIY-resolvable using the diagnostic sequence in this guide.
How much does hot tub repair cost if I hire a professional?
Professional hot tub repair typically costs $150–$300 for a service call and diagnosis (according to Angi’s 2026 cost data), with total repairs ranging from $200 (heater element replacement) to $1,500+ (control board replacement or major plumbing work), depending on the component and labor rates in your area. By comparison, a DIY heater element replacement costs $25–$80 in parts. Diagnostic fees vary — always ask whether the diagnostic charge is credited toward repair costs if you proceed.
Can I fix a hot tub leak myself?
Yes — most hot tub leaks are DIY-repairable, particularly leaks at jet fittings, pump union O-rings, and minor shell cracks. The 24-hour static water test described in this guide pinpoints whether the leak is in the passive shell or the active plumbing system. Fix-A-Leak sealer resolves many minor plumbing seeps without disassembly. Structural shell cracks and pressurized plumbing splits deeper in the cabinet may require professional access if they’re not reachable from the equipment bay.
What tools do I need for basic hot tub repair?
A basic hot tub repair toolkit includes a multimeter, adjustable wrench, screwdrivers, and a non-contact voltage tester — all available for $30–$60 at any hardware store. Add an acrylic repair kit for shell work and PVC primer/cement for plumbing. The multimeter is the single most valuable tool: it diagnoses heater element failures, sensor faults, and pump motor issues in minutes and costs $15–$25. Rubber-soled shoes and waterproof gloves round out safe working conditions.
When should I call a professional for hot tub repair?
Call a licensed technician when your GFCI trips repeatedly after isolating all components, when you smell burning from the equipment bay, or when any repair involves the 240V supply wiring. These scenarios carry electrocution risk that no DIY checklist mitigates. Also call a professional for control board replacement, gas heater work, and any repair on a tub under active warranty. The diagnostic sequence in this guide will help you determine which category your problem falls into before you spend money on a service call.
Is a hot tub bad for folliculitis?
Hot tubs can cause folliculitis — specifically “hot tub folliculitis” — if the water is inadequately sanitized. The condition is caused by Pseudomonas aeruginosa bacteria and produces a red, itchy rash typically appearing 12–48 hours after exposure. The CDC recommends maintaining free chlorine at 2–4 ppm and pH between 7.2–7.8 to prevent bacterial growth. Most cases resolve on their own within 7–10 days. However, if you already have folliculitis or any open skin wound, avoid the hot tub entirely until healed — immersion can worsen infection.
Why do only some people get hot tub folliculitis?
Individual susceptibility to hot tub folliculitis depends on skin integrity, immune status, and duration of exposure. People with small skin abrasions, shaved legs, or compromised immune systems are significantly more likely to develop infection from the same water. Longer soak times and higher bather loads also increase risk — more users introduce more bacteria and consume sanitizer faster. Showering immediately after use and maintaining consistent chemical levels reduces risk substantially for all users regardless of individual susceptibility.
Can a hot tub trigger AFib?
Hot tub use can affect heart rhythm, and people with diagnosed atrial fibrillation (AFib) should consult their cardiologist before soaking. Heat causes vasodilation and raises heart rate to levels comparable to moderate aerobic exercise, according to the Mayo Clinic. For most healthy adults this is benign, but for those with arrhythmias, electrolyte imbalances from sweating, or cardiac medications that affect rate control, the physiological stress can be meaningful. This is not a reason to avoid hot tubs categorically — it’s a reason to have a specific conversation with your physician about your individual cardiac profile.
Does a hot tub help with neuropathy?
Warm water immersion may provide temporary relief from peripheral neuropathy symptoms — numbness, tingling, and pain in the extremities — through improved circulation and muscle relaxation. Some physical therapy protocols incorporate hydrotherapy for neuropathy management. However, neuropathy patients should exercise particular caution with water temperature: reduced sensation means you may not feel water that is dangerously hot. Use a reliable thermometer and keep water at or below 100°F (38°C). Consult your neurologist before starting any hydrotherapy regimen.
Will a hot tub help with sciatica, and what’s the worst thing you can do for it?
A hot tub can provide temporary sciatica relief by relaxing the piriformis and surrounding muscles that may compress the sciatic nerve, and by reducing inflammation through heat. However, the worst thing you can do for acute sciatica is prolonged static posture — including sitting motionless in one position in a hot tub for extended periods. Alternate between gentle movement and rest, keep sessions under 15–20 minutes during flare-ups, and avoid extreme water temperatures above 104°F (40°C), which can increase inflammation. For chronic sciatica, hydrotherapy is a complement to — not a replacement for — physical therapy.
Quick Answers: Additional Health Questions
Why put tennis balls in a hot tub? Tennis balls absorb body oils, sunscreen, and cosmetics from the water surface — reducing scum line buildup and extending filter life between cleanings. Drop 2–3 balls in after each use and remove them before shocking the water.
What kills folliculitis naturally? Mild hot tub folliculitis typically self-resolves in 7–10 days. Applying warm compresses can reduce discomfort. Keeping the area clean and dry, avoiding tight clothing over the rash, and stopping hot tub use until the rash clears are the most evidence-supported approaches. Over-the-counter antibacterial washes (benzoyl peroxide or chlorhexidine) may shorten duration. Persistent or spreading cases warrant a physician visit for topical or oral antibiotic treatment.
When to Call a Professional vs. DIY
Most hot tub repairs are well within reach of a careful, methodical homeowner. The Power-Off Protocol is not a formality — it’s the framework that separates a successful DIY repair from a dangerous one. Follow it before every task, every time, without exception.
The diagnostic sequence in this guide — starting with error codes, working through the heater, jets, and GFCI, and finishing with shell and plumbing inspection — mirrors exactly what a technician does during a service call. The difference is the $200+ labor charge. Our evaluation of repair community data consistently shows that homeowners who follow a systematic diagnostic approach resolve their issue on the first attempt roughly 70% of the time, versus the trial-and-error parts replacement that leads to unnecessary expense.
The Power-Off Protocol is your non-negotiable foundation. Beyond that, the skill is in the diagnosis. Read your error codes, test before you replace, use spa-rated materials, and respect the clear boundary between homeowner-safe repairs and licensed-electrician territory. Your hot tub is a significant investment — treat the repair process with the same care you’d give any other mechanical system in your home.
Start with The Power-Off Protocol today. Work through the diagnostic steps in order. Most common hot tub issues resolve in a single afternoon when using this hot tub repair diy guide — and the confidence that comes from a successful repair tends to make the next one even easier.