Table of Contents - How to Remove a Hot Tub From a Deck: DIY Guide
- Before You Begin: Tools, Safety Gear, and Electrical Precautions
- DIY vs. Professional Removal: Costs and Feasibility
- How to Remove a Hot Tub From a Deck: Step-by-Step
- How to Repair Your Deck After Removing a Hot Tub
- How to Dispose of Your Old Hot Tub
- Common Mistakes and How to Avoid Them
- Frequently Asked Questions
- Wrapping Up: Your Three-Trade Removal Plan
This blog post may contain affiliate links. As an Amazon Associate I earn from qualifying purchases.
That in-deck hot tub — the one that’s been sunken into your deck for years — isn’t just an eyesore. It’s a structural liability, a rot accelerator, and a 700-pound problem that seems to get heavier every time you look at it. If you’ve already decided it has to go, knowing how to remove a hot tub from a deck safely and affordably is the only thing standing between you and reclaimed outdoor space.
Every week it stays put, moisture is working its way under the shell, into the joists, and through the decking boards. The mental load compounds with the rot. This guide draws on NEC electrical standards, OSHA lifting guidelines, and the collective experience of homeowners who have tackled this exact project — so you get a clear, honest path from “this thing needs to go” to a restored, functional deck.
By the end, you’ll know exactly how to safely disconnect, demolish or hoist, and dispose of your hot tub — and how to repair the deck it leaves behind. The guide covers preparation, both removal methods, post-removal deck restoration, and responsible disposal.
Removing an in-deck hot tub requires three distinct trades — electrical (hire a licensed pro), demolition (DIY-able with the right tools), and deck carpentry (post-removal repair). Most empty hot tubs weigh 500–1,000 lbs, making the cutting method the most practical DIY approach for sunken installations.
- The Three-Trade Rule: Outsource electrical disconnection; own the demo and the deck repair.
- Two removal methods: Lift the tub out whole (surface-mounted) or cut it into 50–100 lb sections (sunken/in-deck).
- Professional removal costs: $150–$600+, depending on deck integration complexity.
- Deck restoration required: The hole left by a sunken tub needs joist assessment and board replacement.
- Scrap value exists: Motors, pumps, and copper wiring can offset disposal costs.
Before You Begin: Tools, Safety Gear, and Electrical Precautions

Preparation separates a smooth removal from an emergency room visit. Before you touch the hot tub, you need the right tools staged, the right PPE on your body, and a clear understanding of which parts of this job you must hand off to a licensed professional.
Required Tools and Equipment
Homeowners who have completed this project consistently report that having tools organized into categories — cutting, lifting, and finishing — before the job starts prevents costly mid-project trips to the hardware store.
- Cutting and Demolition:
- Reciprocating saw (Sawzall) with bi-metal blades — essential for cutting through fiberglass, foam, and wood framing
- Oscillating multi-tool — for tight corners and panel fasteners
- Circular saw — for deck board cuts during restoration
- Utility knife — scoring foam insulation layers
- Pry bar and hammer — removing cabinet panels and decking boards
- Lifting and Moving:
- Appliance dolly or furniture dollies (2–3 for whole-tub removal)
- Moving straps or lifting straps rated to 1,000+ lbs
- 4×4 lumber pieces (for leveraging and blocking)
- Come-along ratchet winch (optional but helpful for sunken tubs)
- Electrical and Plumbing:
- Non-contact voltage tester — verify power is off before any work
- Adjustable wrenches and pipe cutters — for disconnecting plumbing lines
- Wire nuts and electrical tape — for capping wires after disconnection (by the electrician)
- Finishing and Deck Repair:
- Drill/driver with bits
- Tape measure, speed square, chalk line
- Joist hanger hardware and structural screws
- Pressure-treated lumber (matching existing deck framing dimensions)

Personal Protective Equipment (PPE)
Fiberglass and foam are the two hazards most DIYers underestimate on this job. Cutting a hot tub shell releases fine fiberglass particles that embed in skin and lung tissue. The foam insulation layer — often 3–6 inches thick — crumbles into irritating dust. Treat this like an asbestos-adjacent job in terms of respiratory protection.
Required PPE and the hazard each item addresses:
| PPE Item | Hazard It Addresses |
|---|---|
| N95 or P100 respirator | Fiberglass particles and foam dust — respiratory damage |
| Safety glasses or goggles | Flying fiberglass shards — eye injury |
| Heavy-duty work gloves (leather or cut-resistant) | Sharp fiberglass edges — hand lacerations |
| Long sleeves and pants (disposable Tyvek suit preferred) | Fiberglass skin contact — persistent itching and irritation |
| Steel-toed boots | Falling sections (50–100 lbs each) — foot crush injury |
| Hearing protection | Reciprocating saw noise — hearing damage over sustained use |
Don’t skip the respirator to “just finish one cut.” Fiberglass particles are microscopic — you won’t feel the exposure until hours later when your lungs are already irritated.
Electrical Safety: Why You Need a Licensed Electrician
⚠️ SAFETY DISCLAIMER — READ BEFORE PROCEEDING: Hot tub electrical systems operate on 240-volt dedicated circuits. Contact with live 240V wiring can cause cardiac arrest, severe burns, or death. Do not attempt to disconnect the electrical supply yourself. NEC Article 680 (NFPA 70) governs all hot tub wiring and requires that all electrical work on these systems be performed by a licensed electrician. This is not a suggestion — in most jurisdictions, it is the law, and unpermitted electrical work can void homeowner’s insurance and create liability during a future home sale.
- A licensed electrician will:
- Shut off the dedicated 240V breaker and lock it out (LOTO procedure)
- Verify zero voltage at the disconnect panel with a calibrated meter
- Physically disconnect and cap all wiring at the load center
- Remove or secure the GFCI disconnect box
- Document the disconnection for permit purposes (if required locally)
Electrician cost for hot tub disconnection typically runs $75–$200 for a straightforward job — the single best money you’ll spend on this entire project. If you are unsure about any electrical component, stop and call a licensed electrician immediately.

DIY vs. Professional Removal: Costs and Feasibility

Knowing which parts of this job to own and which to outsource is the core of The Three-Trade Rule. Electrical always goes to a pro. But for demolition and deck carpentry, the DIY path is genuinely viable — if you go in with realistic expectations about time, tools, and physical effort.
How much does it cost to remove a hot tub from a deck?

Professional hot tub removal costs vary significantly based on deck integration. According to College Hunks Hauling Junk, full-service hot tub removal and disposal typically runs $150–$600+ as of 2026, with in-deck or sunken installations pushing toward the higher end due to the additional labor required to cut the unit out.
| Removal Scenario | Estimated Cost Range |
|---|---|
| Freestanding tub, easy access | $150–$300 |
| Deck-mounted tub, moderate access | $250–$450 |
| Sunken in-deck tub (cutting required) | $400–$700+ |
| Electrician disconnection only | $75–$200 |
| DIY (tools + dump fees + dumpster rental) | $100–$350 |
The DIY route is most cost-effective when you already own a reciprocating saw, have a truck or trailer for hauling, and can get two or three helpers for a day. Factor in dumpster rental ($250–$450 for a 10-yard bin) or junk hauler fees if you don’t have a vehicle rated for the load.
Pros and Cons of DIY Removal
- DIY Advantages:
- Significant cost savings — $300–$500 vs. full professional service
- You control the timeline (no scheduling delays)
- Deck restoration can be done at your own pace
- Salvageable components (motors, pumps, wiring) are yours to scrap or sell
- DIY Limitations:
- Physical demand is real — even in 50-lb sections, repeated heavy lifting is exhausting
- Fiberglass cutting is messy and requires full PPE discipline
- Mistakes in deck joist assessment can create structural problems that cost more to fix later
- You’re still paying an electrician regardless
Our evaluation of DIY forum accounts and contractor community discussions found that the most common regret is underestimating the foam insulation volume — a single hot tub can produce 10–15 contractor bags of foam debris. Plan for debris volume, not just weight.
When to Call a Professional
DIY is not always the right call. Call a professional removal service when:
- The tub is sunken below deck level with less than 18 inches of clearance on any side — cutting in extreme confinement is a safety risk
- Your deck shows significant structural rot — walking on compromised joists with demo equipment is dangerous
- You have no helpers — this job requires a minimum of two people for every stage
- Local regulations require permits for demolition — check with your municipality before starting
- The electrical panel is unfamiliar or appears modified — unusual wiring configurations require an electrician before any other work begins

How to Remove a Hot Tub From a Deck: Step-by-Step

This section covers the complete removal sequence, from draining to final extraction. Steps 1 through 4 apply to both methods. Step 5 splits into Method A (whole-tub lift) and Method B (demolition cutting), depending on your specific deck configuration.
Step 1 — Drain the Hot Tub Completely

An empty hot tub weighs 500–800 lbs. A full one can weigh 2,500–5,000 lbs (ACMA, 2024). Draining is non-negotiable before any movement attempt.
- Connect a garden hose to the drain spigot (typically located on the equipment panel side)
- Run the hose to a suitable drainage point — away from the foundation, toward a lawn or storm drain (check local ordinances on treated water discharge)
- Allow 45–90 minutes for full drainage, depending on tub volume
- Once drained, remove the filter cartridges and leave the drain valve open
- Use a wet/dry shop vac to remove residual water from the footwell and any low points in the shell
Expected outcome: The shell will feel noticeably lighter when you push on the rim. Leave it to air-dry for 24 hours if conditions allow — a wet fiberglass shell is slippery and heavier than necessary.
Step 2 — Disconnect the Electrical Supply
⚠️ STOP. Do not proceed with this step yourself. As detailed in the prerequisites section, NEC Article 680 (NFPA 70) requires a licensed electrician for all hot tub electrical disconnection work. Call your electrician before touching any wiring, conduit, or the GFCI disconnect box. Confirm with a non-contact voltage tester that all circuits are dead before proceeding to Step 3 — even after the electrician has finished.
- The electrician will:
- Shut off and lock out the 240V breaker at the main panel
- Test for zero voltage at the disconnect and at the tub’s equipment bay
- Disconnect and cap all wiring at the load center
- Remove the GFCI disconnect box or leave it capped per local code
- Provide confirmation (verbal or written) that the system is de-energized
Do not skip this step or abbreviate it. A 240V shock at typical hot tub amperage (50–60A) is almost certainly fatal.
Step 3 — Remove the Cover, Cabinet Panels, and Plumbing
With power confirmed off and the tub drained, begin disassembly from the outside in.
- Remove the cover and set it aside — covers are typically foam-filled vinyl and can be disposed of separately
- Unscrew or pry off the cabinet panels (usually 4–6 screws per panel, sometimes snap-fit clips)
- Photograph all plumbing and equipment connections before disconnecting anything — this helps if you need to identify components for scrapping
- Use adjustable wrenches to disconnect the pump unions and heater connections
- Cut any remaining plumbing lines with a pipe cutter or utility knife
- Remove the equipment (pump, heater, blower, control box) — set aside for scrapping
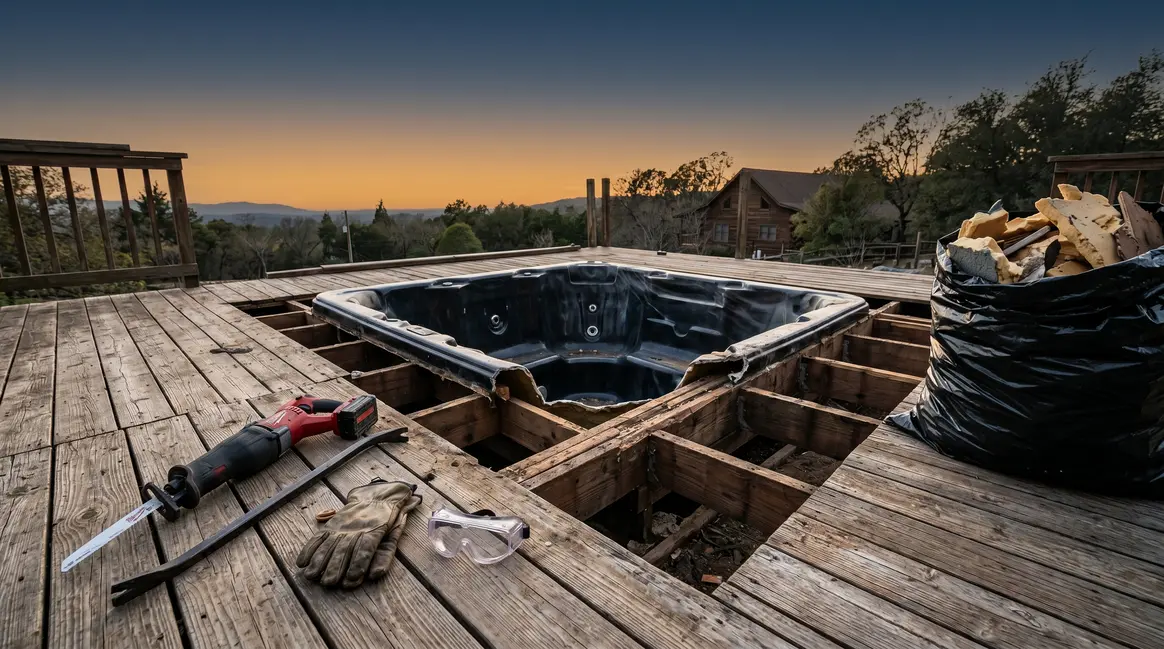
Expected outcome: You now have an empty fiberglass shell sitting on the deck framing, with no attached mechanical or electrical components. This is the point where your removal method choice matters.
Step 4 — Plan Your Removal Path
Your extraction plan depends on one critical question: Is the tub surface-mounted (sitting on top of the deck framing) or sunken in-deck (its rim flush with or below the deck surface)?
Surface-mounted tubs have clearance underneath and around the perimeter. You can potentially slide or tip the shell to access it with dollies or a crane lift.
Sunken in-deck tubs are framed directly into the deck structure. The shell rim is flush with — or recessed below — the deck boards. There is no “underneath” to access. These almost always require Method B (demolition).
- Check your path for:
- Gate width and door clearances (can a dolly make it through?)
- Overhead clearances (crane lifts need 15–20 feet minimum)
- Weight-bearing capacity of the deck path — loaded dollies are heavy
- Stairs or grade changes between the deck and the street/dumpster
Method A — Lifting the Hot Tub Out Whole
Best for: Surface-mounted tubs with adequate clearance, access to a crane or equipment lift, and a clear exit path.
Most homeowners who go this route rent a crane or call a rigging company — attempting to manually tip and slide a 600-lb shell across a deck without proper equipment causes more deck damage than the removal itself.
Whole-lift removal steps:
- Attach heavy-duty lifting straps (rated to 1,500 lbs minimum) around the shell perimeter — two straps in parallel, one at each third of the tub’s length
- Use 4×4 lumber blocks to elevate the shell 4–6 inches off the deck frame, creating clearance for strap positioning
- Coordinate with the crane operator on the lift point — center of gravity is typically toward the equipment bay end (heavier)
- Lift slowly and pause at 12 inches of clearance to verify strap stability before full extraction
- Lower onto a flatbed trailer or the ground — have helpers guide the swing
- Remove the shell from the property and proceed to disposal
Cost note: Equipment crane rental typically runs $300–$600 for a half-day. Add rigging labor if you don’t have experience with crane operations.
Across DIY forums and contractor communities, the consistent advice for whole-lift attempts is to never try it with fewer than four helpers and always use rated lifting equipment — not ratchet straps repurposed from a truck bed.
Method B — The Demolition Method (Cutting Into Sections)
Best for: Sunken in-deck hot tubs, tight spaces, limited access, or any situation where whole-tub extraction is physically impossible.
This is the method most experienced DIYers and contractors choose for in-deck installations — and for good reason.
“I have seen units cut into manageable sized chunks with a reciprocating saw and hauled off in 50 to 100 pound sections.” — r/hottub community member
That’s exactly the right approach. The goal is to reduce a 700-lb monolith into sections light enough for two people to carry to a dumpster.
Demolition cutting steps:
- Mark your cut lines on the shell exterior with chalk or a marker — plan cuts that create sections no larger than 24″×24″ to keep each piece under 60–80 lbs
- Set your reciprocating saw (Sawzall) to medium speed with a bi-metal blade — do not use a wood-only blade, as the fiberglass and foam will dull it within two cuts
- Start cuts at the top rim and work downward — cutting the shell into horizontal “rings” first, then vertical sections within each ring
- Keep cuts away from the deck joists below — use a depth guide or cut at an angle to avoid cutting into structural framing
- As each section is freed, immediately move it to the dumpster or staging area — don’t let cut pieces accumulate in the workspace
- Once the shell is sectioned, remove the foam insulation layer (it will come off in chunks and slabs — bag it immediately in contractor bags)
- Cut any remaining base frame or mounting brackets that are attached to the deck framing
- Sweep and vacuum the work area before assessing the deck structure below
Foam handling note: The foam insulation in most hot tubs is polyurethane — not regulated hazardous waste, but not accepted at all landfills. Call your local waste facility before disposal day to confirm acceptance. Most municipal landfills and construction debris facilities accept it in contractor bags.
How to Repair Your Deck After Removing a Hot Tub
Removing the tub reveals the real scope of the project. What’s underneath is almost never pretty — and the bigger the tub and the longer it sat there, the more work the deck restoration will require. This section is the one most removal guides skip entirely. Don’t.
Assessing the Structural Damage
Before touching a single board, get down under the deck (or lean over the opening) and assess the framing with a flashlight and a screwdriver. The screwdriver test is simple: probe the joists, beam faces, and ledger board. If the screwdriver sinks in with light pressure, the wood is compromised.
What to look for:
- Surface rot — discoloration, soft spots, or visible fungal growth on joist surfaces
- End grain rot — especially at joist hanger connections where moisture collects
- Joist deflection — joists that sag or flex more than 1/4 inch under hand pressure indicate over-span or load damage
- Fastener corrosion — rust-stained joist hangers or structural screws that have lost their holding power
- Ledger separation — the board that connects your deck to the house; moisture damage here is the most serious finding
Standard residential decks are designed to carry 40 pounds per square foot (psf) live load (American Wood Council, Deck Construction Guide). A filled hot tub can exceed 100 psf — meaning many decks were never properly engineered for the load they carried. Expect to find some damage.
How to Sister Damaged Joists
Joist sistering — attaching a new board alongside a damaged one — is the standard repair for joists that show rot or deflection but are not completely failed. It’s a manageable DIY repair if the damage is limited to one or two joists. For widespread damage (more than 30% of the framing in the hot tub bay), consult a structural carpenter or deck contractor.
Joist sistering steps:
- Cut a new pressure-treated joist to the same length as the damaged one — match the lumber dimensions exactly (typically 2×8 or 2×10)
- Apply a bead of construction adhesive to the face of the damaged joist
- Position the new joist flush against the damaged one, crown up (slight bow facing upward)
- Fasten with structural screws or 3-inch framing nails every 12 inches in a staggered pattern — top and bottom flange alternating
- Install new joist hangers at both ends of the sistered pair — use the hanger size rated for the doubled joist width
- Verify the sistered joist is level with adjacent framing before fastening the hangers permanently
Materials needed: Pressure-treated lumber (same dimensions as existing joists), structural screws (GRK or equivalent), joist hangers (Simpson Strong-Tie LUS series or equivalent), construction adhesive.
Joist sistering adds full load capacity equivalent to a new joist — the American Wood Council’s span tables confirm that properly sistered joists restore the structural rating of the original framing when installed correctly.
Replacing Decking Boards and Finishing the Surface
With the framing repaired, you’re ready to close the opening. The goal is a deck surface that looks intentional — not patched.
Board replacement steps:
- Measure the opening left by the hot tub bay — length, width, and the spacing between existing boards
- Purchase decking boards in the same species and profile as your existing deck if possible — composite decking is easier to match than weathered pressure-treated wood
- Cut boards to length, leaving a 1/8-inch gap between each board for drainage
- Fasten with deck screws through the face, or use hidden fasteners if your existing deck uses them — consistency matters for appearance
- If the existing deck has significant weathering, consider sanding and refinishing the entire deck surface after patching — a color mismatch between new and old boards is the most common visual complaint from homeowners who skip this step
Finishing tip: New pressure-treated wood needs 6–12 months to dry before accepting most stains. Apply a clear water repellent immediately after installation, then return with your finish stain the following season.
How to Dispose of Your Old Hot Tub
Once the tub is in sections (or out of the yard whole), you have options — and some of them pay you back.
Scrapping Valuable Components for Cash
Before anything goes in the dumpster, sort the components. Hot tub equipment contains real scrap value that most homeowners throw away without realizing it.
Scrap-worthy components and approximate values (2026 estimates — verify with your local scrap yard):
| Component | Material | Approx. Scrap Value |
|---|---|---|
| Pump motor(s) | Copper windings + steel | $8–$25 each |
| Heater element | Copper and stainless | $5–$15 |
| Control box wiring | Copper wire | $5–$20 |
| PVC plumbing | Low scrap value | Minimal |
| Fiberglass shell | No scrap value | Disposal cost only |
| Steel frame/base | Structural steel | $10–$30 |
Scrap metal prices fluctuate with commodity markets — check iScrap App or call your local yard before hauling. A full hot tub’s worth of metal components can realistically offset $50–$100 in disposal costs.
Are hot tubs worth scrapping? For the metal components, yes — particularly if copper prices are strong. The shell itself has no scrap value and is a disposal cost, not a credit.
Disposing of the Shell, Foam, and Fiberglass
The fiberglass shell and polyurethane foam are the bulk of what you’re disposing of. Neither is regulated hazardous waste under EPA guidelines, but disposal options vary by municipality.
Disposal options:
- Municipal landfill: Most accept fiberglass and polyurethane foam as construction/demolition debris — call ahead to confirm and ask about tipping fees (typically $50–$150 per load for a truck bed of material)
- Dumpster rental: A 10-yard dumpster ($250–$450 in most markets) handles a full hot tub demolition comfortably — book it before demo day
- Junk removal service: Companies like College Hunks or 1-800-GOT-JUNK will take pre-cut sections — some charge less for pre-cut material since it’s easier to load
- Donation/resale (whole tub only): If the tub is functional, Facebook Marketplace and Craigslist listings for free hot tubs typically generate responses within hours — someone will come get it if you’re willing to help load
Fiberglass note: Fiberglass is inert and does not leach chemicals into groundwater, which is why most landfills accept it. The concern is physical — loose fiberglass particles in a dumpster or truck bed can spread. Double-bag cut sections in contractor bags before loading.
Common Mistakes and How to Avoid Them
Even experienced DIYers make predictable errors on this job. Across DIY forums and contractor community discussions, these six mistakes come up repeatedly — and each one is avoidable.
1. Skipping the electrician to save $150. The electrician costs less than an emergency room co-pay. NEC Article 680 exists because hot tub electrical systems have specific hazards that standard household wiring doesn’t. Pay for the disconnection.
2. Starting demo without draining completely. Residual water in the plumbing lines and footwell adds 50–100 lbs of dead weight to sections you’re trying to carry. Use a shop vac after the drain cycle.
3. Cutting through deck joists. When the Sawzall is running and foam is flying, it’s easy to lose track of what’s below the shell. Mark joist locations on the deck boards with chalk before you start cutting, and keep cuts at least 2 inches above the framing.
4. Underestimating foam volume. One hot tub generates more foam debris than most people expect — 10–15 large contractor bags is typical. Order bags before demo day, not during.
5. Skipping the deck structural assessment. The most expensive mistake in this entire project is closing up the deck opening without checking the joists. A single compromised joist that’s missed during restoration becomes a structural failure two winters later.
6. Buying mismatched decking boards. New pressure-treated lumber is noticeably lighter in color than weathered boards. Either match the species and plan to refinish the whole deck, or use composite decking that can be color-matched more accurately.
Frequently Asked Questions
How do you move a hot tub off a deck without a crane?
The most practical method for moving a hot tub off a deck without a crane is the demolition approach — cutting the shell into 50–100 lb sections with a reciprocating saw. For surface-mounted tubs, furniture dollies and appliance dollies can slide the shell across the deck to a point where it can be tipped onto a truck bed with four or more helpers. Pipe rollers (2-inch PVC) placed under the base are a low-cost rigging technique that reduces friction significantly. Crane rental is recommended for whole-tub extraction over obstacles or elevation changes.
How much does it cost to remove a hot tub from a deck?
Professional hot tub removal from a deck typically costs $150–$600+, depending on deck integration and access difficulty, according to College Hunks Hauling Junk (2026). Sunken in-deck installations push toward the higher end because cutting is required. DIY removal costs $100–$350 when factoring in dumpster rental, disposal fees, and tool rental — plus the mandatory $75–$200 electrician fee for disconnection. The DIY route saves $200–$400 on average for homeowners who already own the core tools.
Can I remove a hot tub from a deck by myself?
Removing a hot tub from a deck solo is not recommended and is unsafe for most of the physical steps. The demolition method reduces individual piece weights to 50–100 lbs, but even that requires a second person for safe carrying over deck surfaces. Electrical disconnection requires a licensed electrician regardless. Most experienced DIYers recommend a minimum crew of three: one person cutting, one person removing sections, and one person managing debris. For the whole-lift method, four helpers plus equipment are the minimum safe configuration.
What do I do with the hole left in my deck after removing a hot tub?
The opening left by a sunken hot tub requires both structural assessment and surface restoration. Start by inspecting every joist in the bay for rot, deflection, and fastener corrosion — probe with a screwdriver to find soft spots. Sister any compromised joists before closing the surface. Replace decking boards to match the existing profile and species, leaving standard 1/8-inch drainage gaps. If the existing deck surface is significantly weathered, sand and refinish the entire deck after patching to avoid a visible color mismatch.
Are hot tubs worth scrapping?
Hot tub metal components have genuine scrap value — primarily the pump motors, heater elements, and copper wiring. A full set of hot tub equipment can yield $50–$100 at a scrap yard depending on current copper and steel prices. The fiberglass shell, foam insulation, and PVC plumbing have no meaningful scrap value and require standard landfill disposal. Before scrapping, check commodity prices at your local yard or via the iScrap App — copper prices in particular fluctuate enough to meaningfully affect the total return. Functional hot tubs in working condition are often worth more as free giveaways on Craigslist than as scrap.
Wrapping Up: Your Three-Trade Removal Plan
Removing an in-deck hot tub is genuinely manageable when you apply The Three-Trade Rule: hand off the electrical disconnection to a licensed electrician (non-negotiable), own the demolition with a Sawzall and proper PPE, and commit to the deck restoration that the project demands. Most empty hot tubs weigh 500–1,000 lbs — but cut into 50–100 lb sections, that weight becomes a logistics problem, not an obstacle.
The Three-Trade Rule works because it matches the right expertise to each phase. Electrical work carries fatal risk and legal liability — that’s a licensed professional’s domain. Demolition and deck carpentry reward preparation, patience, and the right tools, not specialized credentials.
Your next step is the one that unlocks everything else: call a licensed electrician and schedule the disconnection. Once that circuit is dead and confirmed, you control the rest of the timeline. Stage your tools, line up your helpers, order the dumpster, and give yourself a full weekend. The deck on the other side of this project is worth it.